A North Carolina lifeguard told me, “A drowning happens fast. A struggling, inexperienced swimmer has only a minute or two before it’s too late.”

Lifeguards can beat that fast-ticking clock, and they routinely do every season hundreds of times across the country. But in swimming areas without lifeguards there is often no realistic chance of rescue. According to the CDC, there are 3,500 non-boating-related drowning deaths in America every year, or about 10 per day — the fifth leading cause of unintended injury death.

Bystanders should always call 911, of course, but many times rescue personnel, hard as they try, cannot get to the scene fast enough. And it’s never a good idea for an untrained bystander to attempt a swimming rescue because statistics show that can easily turn into a double drowning.

Last summer at an ocean beach near where I live, a woman in her forties was suddenly caught in a rip current. All bystanders could do was watch her die. The recorded 911 call was hard to listen to, and right then I vowed to devise a rescue system that could be constantly available at any swimming area and could rival the fast response time of a lifeguard.

Figure A
Figure B

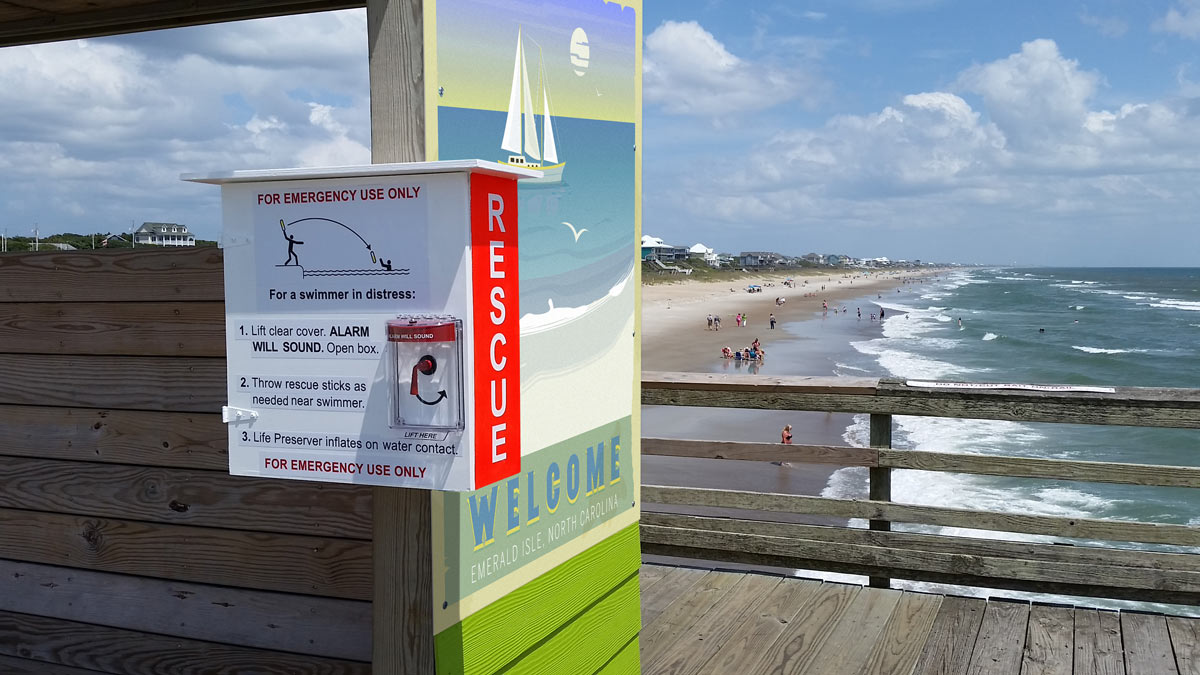
The result is the Rescue Box. It’s alarmed against tampering, like a fire alarm, but is quickly and easily accessible by anyone in a potential drowning emergency. It houses three Mustang Rescue Sticks (Figures A and B) which can be thrown — even into a wind — 100 feet or more to reach a distressed swimmer. The foam-padded 15.5oz Stick inflates immediately on water contact, creating a large, bright-yellow, horseshoe-shaped preserver with twice the flotation of a traditional life jacket, which cannot be thrown very far at all.

Mustang Sticks are proven lifesavers for boaters and first responders, but the Rescue Box is a new idea, making the Sticks available to the public wherever and whenever needed. Anyone who has ever thrown a softball, football, or even snowballs, can throw a Stick accurately enough to save a life. Just to be sure, the box holds three Sticks, providing multiple chances to reach a swimmer in trouble.

The Rescue Box is a good public service project for any maker with an unguarded beach or swimming hole nearby. A group like the Explorer Scouts or a community college woodworking class might consider taking on the job with funding from a local civic organization. A brief news item in a local newspaper or on TV will let area swimmers and their friends and families know the box is there and how to use it.

Let’s Save Some Lives

Your Rescue Box can be mounted, centered about head height, on a pier piling or on a 10′ 4×4 treated post dug into the ground. Use two 2½” hanger bolts, with wood-screw thread on one end and ¼-20 machine thread on the other. An easy non-measuring way to mount the box is to drive two nails partway into the post 3″ apart and level. Rest the box temporarily on the nails while you center it on the post and drill two pilot holes for the hanger bolts through the back of the box into the post. Take down the box and remove the nails. Enlarge the holes in the box just enough to clear the hanger bolts. Use two nuts jammed together on the end of the bolts to turn the bolts with a wrench and screw them into the pole. Remove the jam nuts, hang the box on the bolts, and secure it with 1½” washers, lock washers, and nuts.

Remove the Mustang Rescue Sticks from their clear protective plastic bags before placing them in the box. Close the box door, remove the stopper alarm pin to arm it, close the clear stopper cover, and the box will stand ready for fast access to save a life.

Figure J

The First Test Boxes

I installed two Rescue Boxes (the first of their kind in the world) on the Bogue Inlet Pier at Emerald Isle, North Carolina, last season for testing. The pier owners, local swimmers, and fire and rescue people welcomed the idea, and the pier will continue to use the boxes, one mounted above on the pier boardwalk (Figure J), and one below on a pier piling adjacent to the popular swimming area (Figure K).

Figure K
Figure L

For increased visibility I added a triangular day-glow orange bicycle flag on a fiberglass wand, cut down and mounted to the box back (Figures K and L).

Box Maintenance

The box can be taken down for storage during the winter months in the colder latitudes. The 9V alarm battery should be replaced each swimming season, or a 5-year battery could be used.

Directions for Stick maintenance are included with purchase; they are reusable after inflation with a Re-arm Kit (#MA7206) available online. Using a permanent felt-tipped marker, you might print “Property of [you or your group]” and a phone number on the preserver fabric for return after use. You can also build dummy rescue sticks in order to practice your throwing aim.

Author’s note: Thanks to longtime buddy and frequent Make: contributor Larry Cotton for his help and the generous use of his garage workshop.

Project Steps

1. Make the Plywood Box

The box is made of ½” high-grade plywood, and all hardware is stainless steel, brass, or aluminum to prevent rusting.

Using a table saw to keep all cuts square and accurate, cut out the seven parts (see Materials list for dimensions) and sand all surfaces smooth. Apply waterproof wood glue on all joints. Fasten the back onto the two sides with three 1″ #6 flat-head wood screws for each joint. You can speed the work with an all-in-one bit that drills the pilot hole in the side panel edges and the clearance hole and countersink in the back panel at the same time. The bottom panel fits inside, with two screws in each side and three in the back. Install the top panel flush with the back, overhanging on the front and sides to protect the door from weather, with two screws into each side and three into the back. Add the top front filler strip with three screws down through the top panel.

2. Fill and Paint

Fill all screw head depressions and any voids in the plywood edges with wood filler or auto body putty and sand smooth. Knock off sharp edges with 120 grit sandpaper.

For maximum durability, paint the box and door inside and out with a coat of white primer followed by two coats of exterior semi-gloss acrylic latex, sanding lightly between coats if necessary to keep the finish smooth.

Figure C

3. Make the Stick Hangers

Make the Rescue Stick hangers from six ½”×⅛”×7¼” aluminum strips (Figure C). The bottom of the hanger is bent down 90°, 1½” from the end, and the top is bent up 60°, 1½” from that end. To create each bend, clamp the strip in a bench vise close to the bend point and tap with a hammer until the desired angle is achieved. Use your first hanger as a template for the other five. Drill two screw clearance holes in each lower end. Use a file and coarse sandpaper to round and smooth the cut ends so they will not injure the user or snag the Stick fabric.

Caption D


With ½” #6 round head wood screws and optional washers, mount the hangers to the inside box back, 9″ apart on center (OC), each pair centered sideways in the box (Figure D). The Stick-resting surfaces of the top pair should be 5¾” down from the top, with the other pairs of resting surfaces each 5½” down from the pair above. These dimensions aren’t critical; what’s important is that the Sticks are easy to grab.

4. Weatherproof the Box

Attach the rubber weatherstrip to the front box edges and the top filler strip. Reinforce the self-stick adhesive with a single dot of gel super glue every 2″­–3″ and at all four mitered corners. Fill any corner gaps with clear silicone for a good weather-tight door seal all around.

5. Mount the Door

Install the two brass or stainless strap hinges on the door, pin side out, using ¾” #8 machine screws, plain washers, and locknuts. Because a hole or two may be too close to the hinge pin, you may have to drill new holes so you have at least two screws in each hinge wing. Fill any unused holes with body putty and sand smooth. I painted the hinges for better appearance. The hinges should be about 4″ OC from the top and bottom of the door. Lay the box flat on its back. Rest the door on the weatherstripping, which will compress just the right amount from the door weight alone. Mark the hinge holes for drilling through the box side, and install the door with ¾” #8 machine screws, washers, and locknuts.

Make a vertical door stiffener from ¾”×¾”×⅛” aluminum angle, 17″ long. Install it 1¾” down from the door top and 4⅞” in from the door edge, using three ½” #8 round head wood screws. This will prevent warping and also serve as a door latch mechanism stop. To keep the bottom panel flat, you can optionally add an aluminum angle 18¾” long, mounted with three 1/2″ pan-head wood screws so it’s flush with the front edge or about 1″ back. You can see both stiffeners in Figure B.

Figure E


Install the chain door retainer (Figure E) with two ½” #8 round head wood screws.

Figure F

6. Install the “Stopper” Alarm

The gasketed clear alarmed door handle cover (Figure F) is called a stopper, meaning it’s intended to stop tampering, which it does very well. It comes with directions. You can have a custom message printed on it when ordering. The alarm is powered by a 9V battery; it sounds loudly when the cover is lifted and stops when the cover is closed. It comes with a pin and fob in place to keep it silent until installation is finished (Figure F shows the fob).

Install the stopper 4¼” up from the door bottom and ⅜” in from the right-hand edge, using four ½” #6 flat head wood screws.

Figure G

7. Mount the Door Latch

I used the L-handle — painted red to match the alarm box — and the threaded pin from a brass storm-door lock set to make the latch mechanism (Figure G). Drill a clearance hole through the door 8⅛” up from the bottom door edge and 3½” in from the right edge for the threaded knob-set pin, countersunk on the back of the door if necessary. The latch arm is ½”×⅛”×3″ aluminum. There’s a flat place on the middle of the knob-set pin, so I made an aluminum clamp ½”×⅛”×1¼” and secured it at the flat spot with two #8 machine screws and lock nuts. Cut off the excess pin length and file the cut end smooth. Between the two machine screws, I tapped the pin to receive a ¾”-long 6-32 machine screw through the latch arm and clamp, to keep the mechanism from ever loosening.

There’s a thick ¼” ID × 1″ OD washer under both the inside latch mechanism and the outside L-handle as bearing surfaces. If necessary, shim these with more washers of different thicknesses to get a nice snug fit.

Figure H


The latch catch (Figure H) is made from a 2″ length of ¾”×¾”×⅛” aluminum angle, and has a smooth filed chamfer on the underside top lip to allow easy gradual engagement of the latch arm. Attach the latch catch to the box side with two ½” #8 round-head wood screws so the door compresses the weatherstrip equally all around when closed. Don’t make the compression excessive; all that’s needed is full all-around door contact and slight compression for a good seal. Position the top round-head screw to also act as a latch lever stop. Adjust the L-handle position and fasten with the supplied setscrew.

8. Add Signage and Graphics

You can order vinyl lettering and graphics from any sign company, using the photos from this article as a guide. They can apply the graphics for you, or you can save money by applying them yourself; they’ll give you instructions. I masked and spray-painted both box sides with several coats of day-glow orange (you could also use the same red color as the alarm box) and applied the white vinyl “RESCUE” lettering myself.

The 4″×11″ graphic of a bystander throwing a Rescue Stick to a swimmer was enlarged by the sign company from an image in the Stick instruction manual. I added a “Sticks are ready to throw as is” message inside on the box back wall because in testing two people asked if the yellow thing on the stick should be unwrapped first.

Figure I

9. Tuck the T-handles

Each Stick has a small red T-handle for manual inflation, which we do not want used in this application. Tuck the T-handle into the folds of the fabric to hide it (Figure I).