Photo by DJ Harrigan
This article appeared in Make: Vol. 78. Subscribe today to get more great projects delivered to your mailbox.

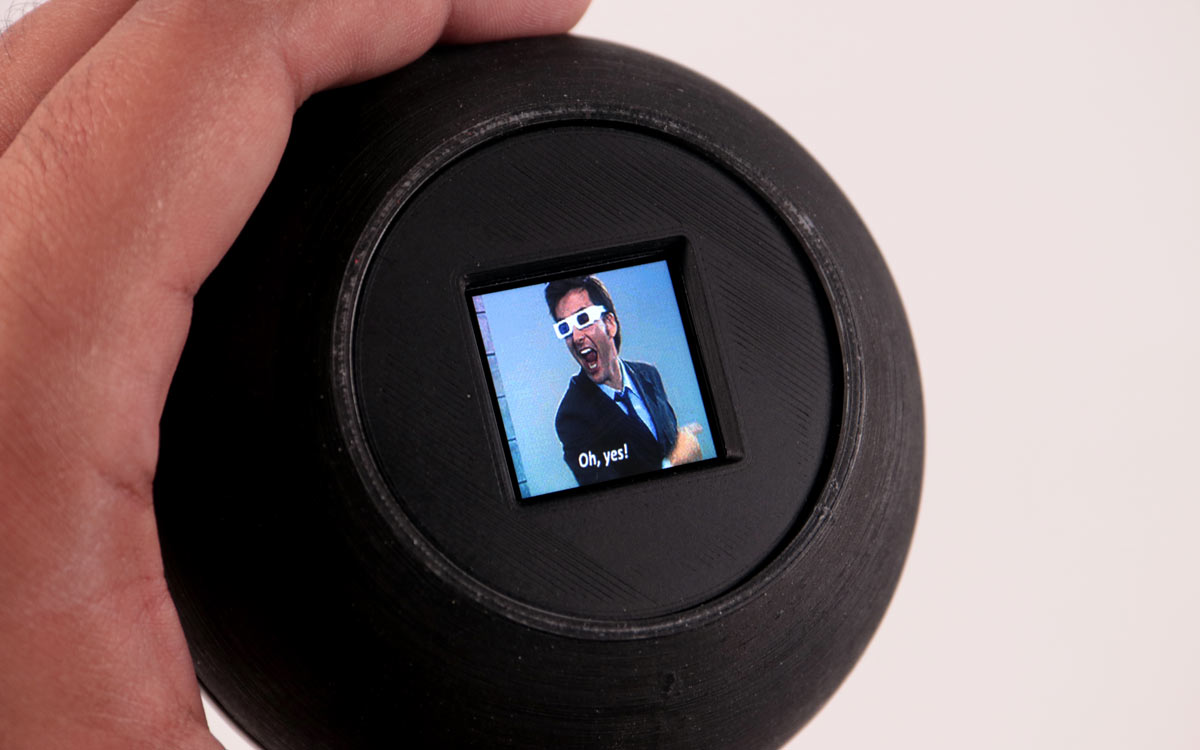
The classic Magic 8-Ball toy has been a mainstay of pop culture for decades: Ask a yes-or-no question about the future, then turn it over to see your answer “magically appear!” But it’s sorely limited by the 20 static replies imprinted on its floating icosahedron. We live in an age of endless stimulation, and equally limitless memes, so why not combine our modern entertainment sensibilities with the familiar form of that classic toy? Why not a Magic GIF-Ball?

I’m not the first person to decide that a fantastical fortune-telling sphere should answer with images instead of text, but I like to think I’ve made a tidier version that can easily be replicated by anyone with a basic knowledge of electronics and beginner’s grasp of the Linux command line. At its surface, this is still a toy, meant to surprise and delight your friends and loved ones as a spin on a familiar object. But it’s also an approachable project that tackles inputs, outputs, and programming (if you so choose) for the maker eager for more Raspberry Pi-related goodness.

Doctor Who Yes GIF - Find & Share on GIPHY

Materials

Tools

  • 3D printer
  • Soldering iron
  • Paintbrush, fine tip

Build Your Magic GIF-Ball

Let’s do it. Before you build, you might like to watch my overview video

Project Steps

1. PRINT THE PARTS

You can find the parts packed in a tidy .zip over at Element14. I’ve included the full assembly as a STEP file in addition to the individual STLs, so you can modify the design to your heart’s content.

There are seven parts to 3D print: the upper shell, lower shell, bezel, LCD retainer, mounting block, logo insert, and button retainer. I printed mine out of PLA at a 0.2mm layer height, but at higher resolutions your sphericity will of course be much better. For the shells, I recommend printing in dome vs. bowl orientation as this is less likely to warp.

Photo by DJ Harrigan

Print the logo vertically, as the X-Y axis is much higher resolution than the Z (the logo is a very shallow curved piece, which is a challenge for all FDM 3D printers).

2. PAINT

Photo by DJ Harrigan

Depending on what color filament you used, you’ll need to paint the shell and/or the logo pieces. If you print the logo in black, you can coat it a solid white and then scrape away (once dry) within the letters to reveal the black underneath, or as I did in the original version, use a fine tip brush to fill in the letters.

Photo by DJ Harrigan

I’m not a fan of hand painting, but perhaps you have steadier hands than I!

3. SET UP THE RASPBERRY PI

Photo by DJ Harrigan

There’s very little to do Linux-wise to prepare your Pi. First, flash the latest Pi OS onto your microSD card (Raspbian Lite is OK as the screen is run directly and doesn’t mirror the X framebuffer). Raspberry Pi’s new imager tool makes this all much more streamlined if you haven’t heard the word.

Get ready for basic headless setup by entering your Wi-Fi credentials. Once connected via SSH, you’ll need to install the ST7789 Python module from Pimoroni by entering the command:

sudo pip install st7789

They recommend installing some other common modules first, but I found that these were already up to date in the current OS. Also, be sure to run sudo raspi-config and enable I²C and SPI.

4. WIRE AND TEST THE DISPLAY

Before connecting any other components, let’s test our little TFT LCD display to make sure we’ve connected it properly and the software is good to go. With the Pi unpowered, use the female jumpers to make the following connections between the LCD and the Pi; they’ll communicate using the SPI serial protocol:

  • 3v3 to any 3V pin
  • TCS to Pi pin 7 — this is the SPI chip select pin for the TFT display
  • SCK to pin 11 — the SPI clock input pin
  • SI to pin 10 — the SPI MOSI pin (microcontroller out, serial in) to send data to the display
  • D/C to pin 9 — the SPI data or command selector pin
  • BL to pin 19
  • GND to any Pi ground pin
Photo by DJ Harrigan

Double-check your wiring, boot up the Pi, and cd into the folder st7789-python/examples. Then call:

python3 gif.py

And you should be greeted by Pimoroni’s colorful “Deploy Rainbows” GIF.

5. PREPARE YOUR GIF SELECTION

Chris Farley Idk GIF - Find & Share on GIPHY

The classic toy is restricted to a mere 20 answers, but we, dear reader, live in the future! Our GIF-Ball can for all intents and purposes house a virtually endless array of images, answers, and, most importantly, memes! So don’t hold back when it comes to selecting your reply set.

If you’re an 8-Ball purist, the original had 10 positive, 5 ambiguous, and 5 negative replies, so a mere 20 GIFs will be sufficient to capture that classic fortune-telling experience.

There are preselected GIFs in the download package in the Images folder, but if you’re selecting your own, try to find images with a more square aspect ratio. The code will accommodate different image sizes and naming schemes, but keep in mind that while the mini IPS display is crisp, it’s still only 240 pixels wide. Any image that ends in .gif will be randomly selected as a response.

6. SECURELY COPY YOUR FILES

Once you’ve curated your preferred selection of GIFs, it’s time to slap ’em inside the Pi. Navigate to the directory on your main computer where you’ve got all your images, as well as the main program (fortune.py), and transfer them to the Pi via SCP (Secure Copy). For example:

scp *.gif pi@raspberrypi.local:
scp fortune.py pi@raspberrypi.local:

Your GIFs and the program should now be in /home/pi so you can now test it with:

python3 fortune.py

Tip: Learn more about using Secure Copy at raspberrypi.org.

We haven’t connected the tilt sensor yet, but you can short BCM pin 2 to GND and the program will register that as a “shake.”

7. RUNNING THE PROGRAM AT BOOT

There are several options to have a program autorun, but we’ll keep it simple. Just call:

sudo nano /etc/rc.local

After the line exit 0, add:

sudo bash -c '/usr/bin/python3 /home/pi/fortune.py’ &

8. SOLDERING

Photo by DJ Harrigan

Cut a female jumper in half and solder the halves to the leads of the vibration sensor.

Photo by DJ Harrigan

Solder a strip of 8 right-angle male headers to the PowerBoost side connections, and a strip of 4 to the power pads.

Solder the JST socket to the pushbutton power switch (PPS) (red to IN, black to a GND connection). Add 3″ leads to the pushbutton and solder to PPS pads 1 and 3. Cut and solder a red jumper to the PPS OUT pin.

Photo by DJ Harrigan

Cut and solder a black jumper to the G pin of the PPS.

9. ELECTRICAL CONNECTIONS

You already connected the LCD in Step 4. Now, connect a jumper from the Pi’s 5V pin to the +5V pin of the PowerBoost, and another jumper from a Pi ground pin to a GND pin of the PowerBoost.

Connect the jumper from the PPS OUT pin to the Bat pin of the PowerBoost. Connect the PPS G pin to a GND pin on the PowerBoost.

Photo by DJ Harrigan

Lastly, attach one of the sensor pins to pin 2 on the Pi and the remaining pin to a GND pin on the Pi.

10. PHYSICAL ASSEMBLY

Photo by DJ Harrigan

Mount the switch in the square hole within the logo, using two M3 screws.

Photo by DJ Harrigan

Glue the logo insert into the lower shell.

Test-fit the clips in their matching holes, making sure they all seat at the same level when fully inserted.

Photo by DJ Harrigan

Put a couple drops of super glue on their tips and press them firmly down.

Photo by DJ Harrigan

Screw in the LCD retainer with two M3 screws, then the bezel with two more.

Photo by DJ Harrigan

Place the Raspberry Pi over the four mounting holes and align the mounting block above it, fastening it in place with four M2.5 screws.

Photo by DJ Harrigan

Insert the battery.

Photo by DJ Harrigan

Insert the vibration sensor into one of the holes on the side of the mounting block.

Photo by DJ Harrigan

Secure the PowerBoost to the mounting block with two M2.5 screws.

Photo by DJ Harrigan

Wait a few hours for the glue to fully cure, then connect the two halves together, making sure not to pinch any stray wires.

Conclusion

Now Ask the Real Questions

No No No GIF - Find & Share on GIPHY

Your Magic GIF-Ball is toggled on and off via the pushbutton period in the .gif logo, which by Pi standards is considered a hard shutdown, so you may want to set it to read-only mode if you’re worried about corruption.

Once the Pi boots up, using the Magic GIF-Ball is very similar to the original toy: Shake it up and receive the answers you so desperately seek! Should I buy Bitcoin? Should I eat fried chicken every day? Will I find true love next Monday?

The GIFs are set to loop twice, since most are so short that they usually finish by the time the user is done shaking. Shaking the ball during a currently playing reply won’t interrupt it, so if you want that mode of operation you’ll have to tweak the code to your liking.

You might also notice that the charging port is not externally accessible, which means it’ll have to be popped open to recharge. Is this silly? Yes. But I’ve shown the MGB to most of my friends and family, and there’s still plenty of charge left months later. It’s not exactly a daily use fortune-teller anyhow.

I’ve also pondered a few possible upgrades you may wish to explore:

  • Simplify it. I went with the Pi as it was the least hassle to prove this as a concept, but this could be adapted to run via an ESP32, Teensy 4.0, or the new Pi Pico!
  • Unlimited GIFs! It shouldn’t be unreasonable to pull GIFs down via Giphy or another meme-tastic API, but you’ll need to make sure your MGB has a constant internet connection.
  • Cleaner power. Break up the smooth, portless surface with a handy jack for charging, or add another switch to trigger a safe shutdown.
  • Cut corners. Did you know mini round LCDs are a thing now? Check out Pimoroni PIM570, for example. One of those would make an awesome display that matches the original aesthetic even better.
  • DIY the enclosure. This project could easily be stuffed into a DIY Christmas ornament, hamster ball, or original 8-Ball.
  • Amp it up. We’ve got all this processing power, why not have the MGB respond with full-fledged video clips? Perhaps for version 2…