Sunlight is essential for our survival, but too much of a good thing can sometimes be harmful. That certainly applies to the invisible ultraviolet (UV) wavelengths of sunlight, for too much exposure to UV can cause sunburn and even skin cancer. Yet, moderate exposure is important, for both mammals and reptiles depend on ultraviolet sunlight to manufacture the vitamin D that supports the growth of bones and fights some diseases.

ULTRAVIOLET AND HEALTH

Light is specified according to its wavelength. For example, green light near the peak response of human vision has a wavelength of 500 nanometers (nm) or half a micrometer. If UV wavelengths were visible, they would appear adjacent to the violet portion of a rainbow. The UV wavelengths are divided into three categories, each having distinctive effects on plants and animals:

» UVA: 320 to 400nm. UVA wavelengths penetrate deeper into skin than UVB and UVC. Excessive UVA exposure can lead to skin wrinkling. Recent research suggests that excessive UVA can also lead to skin cancer.

» UVB: 280 to 320nm. Most UVB is absorbed by the ozone layer, but some leaks through. UVB causes erythema, the reddening of the skin that precedes sunburn. Excessive UVB exposure can lead to skin cancer. UVB can also damage eyes.

» UVC: 100 to 280 nm. UVC rapidly kills viruses and bacteria. It is absorbed in the dead cells in the uppermost layer of human skin, where it does not lead to erythema. UVC exposure to living skin cells can cause erythema. UVC can also cause eye damage. Fortunately, UVC is totally blocked by the ozone layer.

It’s best to avoid more than several minutes of UVB exposure whenever your shadow is shorter than your height. You can minimize your exposure by applying sunscreen and wearing a brimmed hat and a long-sleeved shirt. You can learn more about UV hazards on the EPA’s website.

Total protection from UV isn’t necessary for most people, for UV stimulates the production of vitamin D in the skin. Vitamin D allows the body to metabolize calcium and provides protection from rickets in children and osteoporosis in the elderly. It may also protect against several kinds of internal cancer. Learn more here.

THE UV INDEX
The erythemal wavelengths are mainly between 295 to 320nm in the UVB but also include some UVA out to 370nm. This range of wavelengths is known as the erythema action spectrum, and its intensity is specified by the UV Index (UVI):

  •  Low: 0–2
  •  Moderate: 3–5
  •  High: 6–7
  •  Very High: 8–10
  •  Extreme: 11+

The peak UVI occurs during the summer months. It can exceed 12 where I live in Texas and 20 at Hawaii’s Mauna Loa Observatory. NOAA and the EPA provide forecasts of the UVI online here.

What will the next generation of Make: look like? We’re inviting you to shape the future by investing in Make:. By becoming an investor, you help decide what’s next. The future of Make: is in your hands. Learn More.

Project Steps

BUILD A SIMPLE UVA-UVB METER

Aluminum gallium nitride (AlGaN) photodiodes greatly simplify UV measurements, since expensive filters are not required. Several UV sensors that use AlGaN photodiodes are available. One is Adafruit’s GUVA-S12SD Analog UV Light Sensor, which uses a GenUV GUVA-S12SD GaN photodiode from Roithner LaserTechnik that responds from 240 to 370nm. While this diode is widely used to measure the UV Index, it’s not ideal since it’s more sensitive to UVA than UVB.

The image below shows the wiring diagram for a simple UV meter that uses the Adafruit sensor. The readout is a miniature 3½ -digit LCD voltmeter, the Lascar EMV 1025S-01. Its connection wires emerge from a hollow, threaded stud that allows the meter to be attached to a flat surface.

The readout is powered by 6 volts from a pair of 3V lithium coin cells installed in a Mini Skater dual CR2032 coin cell holder. The holder is modified to also provide +3V for the sensor by twisting ¾” of exposed wrapping wire around one end of the common contact that links both cells inside the holder. Inserting the cells and closing the holder will lock this 3-volt wire in place.

The components can be installed neatly in a 3″×1½”×¾” Altoids Arctic mint tin.

The UV sensor fits inside the recessed lid of the Altoids tin, where it can be secured with a single ¼” or ½” 6-32 screw and nut. Or it can be protected by being mounted inside the tin, as I did. This requires boring two holes in the upper side of the tin: a 1/8″ hole 9/16″ from the opening for the UV photodiode, and an adjacent 3/32″ hole 7/16″ from the opening for a 2-56 screw and nut to hold the sensor board in place.

To provide a better full-sky response, insert two layers of Teflon film between the photodiode and its hole in the box. Teflon must be used, since most other diffusing materials will not transmit UV.

A UVB METER HACK

You can greatly improve the Adafruit UV sensor’s response to the erythemal action spectrum for a UVI of 3 and above by swapping in a GUVB-S11SD UVB photodiode and increasing the feedback resistor to 10 megohms. While this hack works well for a UVI of 3 and above, low values of UV will give a false reading.

Begin by placing a white washcloth on your workbench to trap the tiny chips should you drop them. Then use a soldering iron with a very small tip, such as a Mega Power USB-powered iron, to carefully remove the original photodiode and feedback resistor just above it. My technique is to melt the solder on one side of the photodiode and gently tilt it upward. I then melt the solder on the second side. This leaves space to use solder wick to capture the solder holding the resistor in place.

Next, use masking tape to secure one side of the new photodiode in place. The notch in the chip’s corner must face toward the S in the word Sensor. Carefully heat the exposed junction of the chip and the board to melt solder between the two. If necessary, apply a bit of very thin (0.02″) solder. Remove the tape and solder the second side of the chip. Repeat this procedure to replace the original feedback resistor with a 10-megohm substitute.

I’ve done this with three Adafruit UV sensors. One failed and two worked well for a UV Index of 3 and above. But I don’t recommend this hack unless you have prior experience removing and installing tiny surface-mount chips.

A HIGH-QUALITY UVB SENSOR

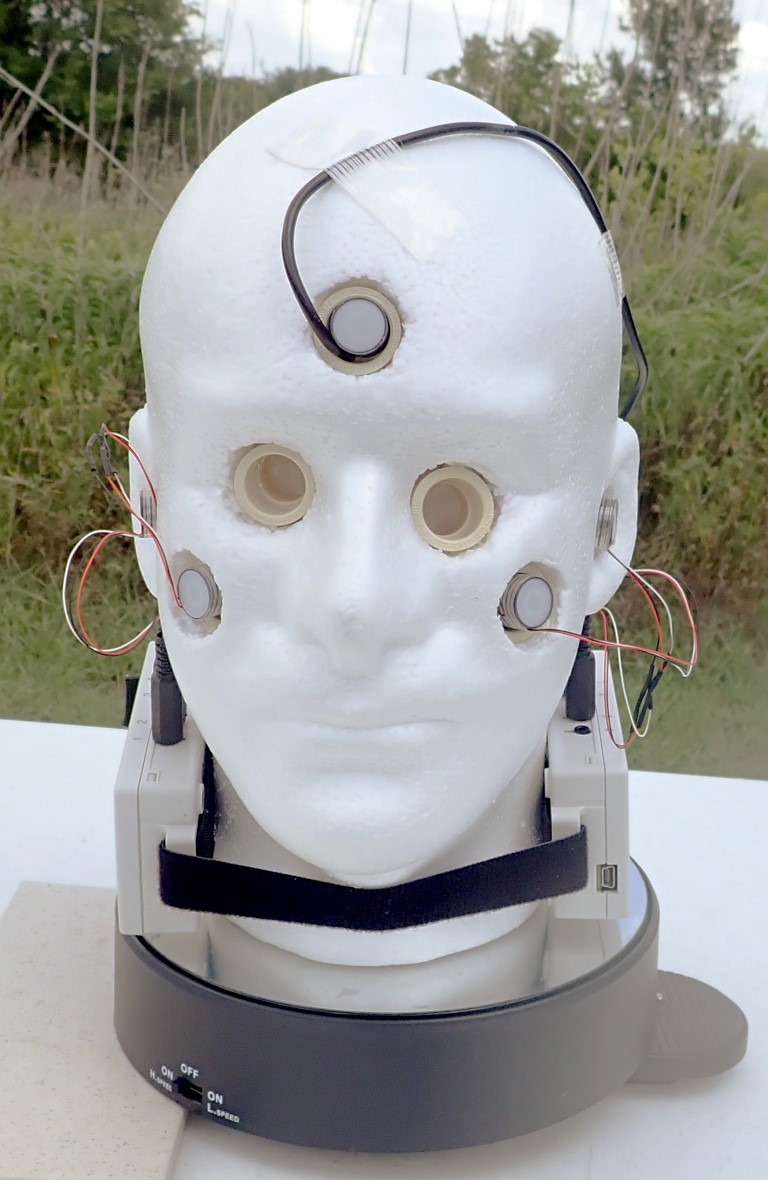
My best results with DIY UV Index meters have been with the GenUV GUVB-T21GH sensor module from Roithner. This module includes an AlGaN UVB photodiode and amplifier in a TO-5 case with a quartz window. It works so well that I’m using seven of them to measure UVB on a rotating mannequin head, in a Rolex-sponsored UV survey of the island of Hawaii. The head rotates 1,000 times a day while equipped with various hats and sunglasses.

David Brooks of the Institute for Earth Science Research and Education, an advisor for this project, made holders for the sensor modules that give them an optical response similar to professional-quality UV sensors that cost hundreds of dollars. The DIY holders are machined from ¼” ID PVC and fitted with a ½” disk of 0.4mm-thick Teflon. The result certainly justifies the $38 (plus shipping) cost of these modules.

The GUVB-T21GH can be connected to the Lascar readout described before and the two can be powered by the same modified 6V coin cell holder. For my research, the GUVB-T21GH is directly connected to an Onset 12-bit or 16-bit analog data logger using wrapping wire soldered to a miniature stereo phone plug that’s inserted into the logger, which provides 2.5 volts for the sensor. The image below shows connection details for both methods.

The image Below shows a GUVB-T21GH module installed in an Altoids tin.

You can use the NOAA/EPA hourly UV Index forecast for your zip code to convert the voltage from the module to the approximate UV Index, as shown here.

Use a spreadsheet to make a graph of the data that you can tape to the instrument or keep in a pocket. The high quality of the GUVB-T21GH fitted with a Teflon diffuser is shown below , which compares our DIY sensor with a much more expensive PMA1102 UV detector from Solar Light.