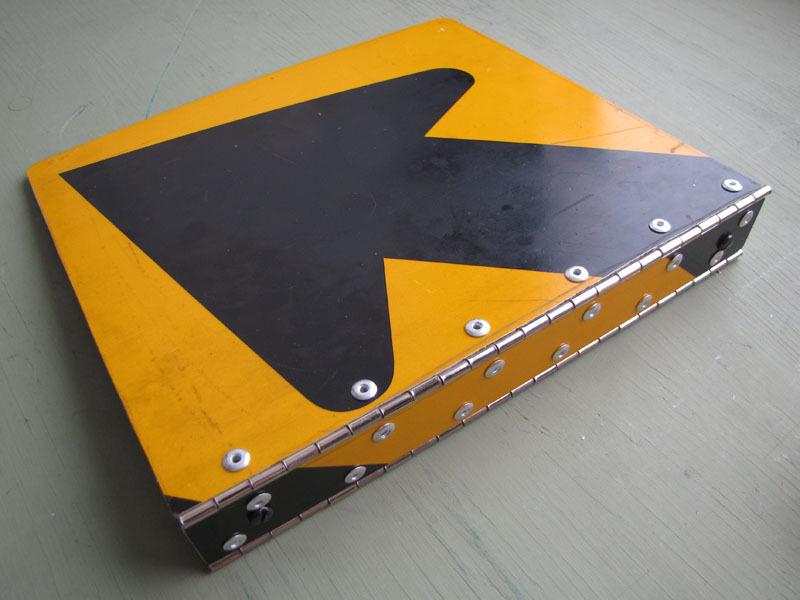
OK, so it’s not, actually. Bulletproof, that is. But with 3/32″ aluminum sheet covers, nickel-plated steel piano hinges, and all-riveted construction, it’s a damn sight tougher than just about any other 3-ring binder you’re likely to encounter in the wild. Especially those crappy cardboard-shrinkwrapped-in-vinyl models most of us had to make do with as schoolkids.
And no, you don’t have to use an old road sign to make yours, but it does confer serious style points. Just make sure it’s not stolen, please.
Project Steps
Remove old binder rings
You’ll need an old vinyl binder with working rings, to start.
Open the binder and drill out the rivets securing the rings to the cover. Use a 1/4″ twist drill. You shouldn’t have to drill very deep to remove the rivet lip that retains the ring assembly.
Cut away vinyl covering
Cut along the seams between the covers and the spine with a sharp hobby knife.
Once the covers and spine are separated, run the hobby knife around the edge of each and peel away the vinyl covering.
Save the three cardboard inserts and the metal ring assembly. Discard the vinyl scraps and the remaining bits of drilled-out rivets.
Trace cover sections
Position the three cardboard pieces on your sheet metal stock.
Once you have them arranged as you like, trace around each piece of cardboard with a permanent marker.
If you change your mind about the layout, the traced outlines can be wiped away with rubbing alchol.
Cut out traced patterns
Wear gloves, goggles, and ear protection when using an electric jigsaw or any power tool.
Use a 36 TPI metal-cutting blade in an electric jigsaw to cut along the traced lines.
Clamping the sheet metal to a piece of scrap plywood may be helpful. Spring clamps can be used at the outer edges; small wood screws turned into the plywood are handy for securing inner edges.
Round off the outer corners of the cover-pieces, if necessary, with a file.
Clean up cutouts
Use a file to clean up any sharp or rough edges or corners remaining along the saw cuts.
Wipe off any remaining traces of marker using a paper towel moistened with rubbing alcohol.
Prepare hinge for cutting
Temporarily mount the continuous hinge, using the screws that came with it, to a scrap wooden backer board.
Measure and mark the places to cut the hinge against the spine-side edge of the cover pieces.
Position your two cuts to leave the leftover scrap in the middle. This makes it easy to align the screw holes in the finished binder, and takes advantage of both “factory finished” ends of the uncut hinge.
Cut hinges
Use a 24 TPI hacksaw blade and cut the hinge, against the backer board, where marked.
Take long, slow strokes, cutting on the forward motion. Use a drop of oil on the blade and take your time.
Clean up cut hinges
Remove the screws and dismount the cut hinge sections from the backer board.
Lightly round off the corners and any sharp edges of the hinges with a file.
Align and drill first rivet hole
Line up all three pieces of the binder against a straight edge and position the hinges accurately.
Use a Sharpie to mark the position of one of the central hinge holes in one of the covers.
Drill out the single hole where marked using a slightly oversize drill, e.g. 7/32″.
Install one rivet
Pass a rivet through the drilled hole and through the corresponding hole in the hinge, with the head to the outside of the cover.
Position the assembly, rivet head down, on an anvil or other hard surface. A piece of scrap aluminum between the rivet head and the anvil will help keep it from getting marred.
Set the rivet. I’m sure there’s a proper tool for doing this, but the head of an old carriage bolt worked just fine for me.
Complete attachment
Rotate the hinge around the single rivet, if necessary, to re-align it.
Drill out the remaining holes in the cover using the holes in the hinge as a guide.
Install the remaining rivets.
Repeat steps 9-11 with the other cover.
Repeat steps 9-11, twice more, to join the hinged cover pieces to the spine.
Install snap ring assembly
Line up the ring mechanism on the spine, as shown.
Use the mechanism as a template to drill small pilot holes, in the spine, where the mounting screws will be installed.
Drill out the pilot holes to finish diameter.
Install screws from the outside in, and secure each with a lock washer and an acorn nut, as shown.
Use it!
Punch holes in your documents, load ’em up, and show off your new binder.