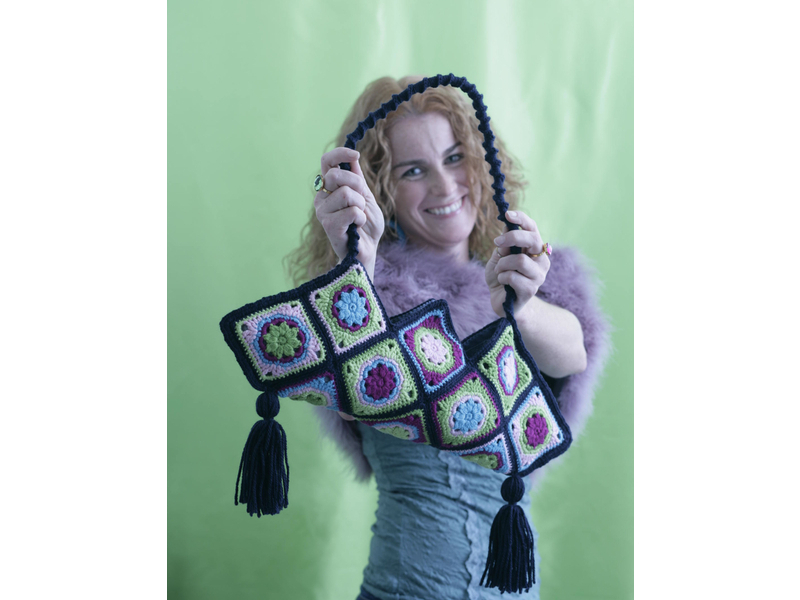
“Reduce, reuse, and recycle” have replaced “reading, ’riting, and ’rithmetic” as the three Rs foremost in people’s minds. It was in this spirit that I created the following pattern for a handsome shoulder bag composed of repeated motifs in randomly changing colors.

The lining is made from old jeans, and you can sew the change pocket in for a cellphone or ID pouch. The handle is a clothesline that’s been densely crocheted around, an environmentally friendly and economical choice, not to mention that it matches the bag perfectly. But more exciting than its use of recycled materials is the bag’s combination of recycled design from the 1940s and 1970s.

What will the next generation of Make: look like? We’re inviting you to shape the future by investing in Make:. By becoming an investor, you help decide what’s next. The future of Make: is in your hands. Learn More.

Project Steps

Gauge it.

The finished motif measures 3.5″ when steam blocked lightly (see how to block at the end of motif instructions). Note that this is a firm gauge — you don’t want your bag to sag. If you want to use this motif for a scarf or something else where softness is important, try a hook that is a few sizes larger than the one you used to get the gauge on the bag.

Stitch abbreviations, repeat instructions between asterisks as many times as directed.

Stitch (st)

Slit stitch (slst)

Single crochet (sc)

Decrease (sc2tog)

Cluster (dc3tog or dc4tog)

Treble crochet (tr)

Half double crochet (hdc)

Chain (ch)

Skip (sk)

Times (x)

Make ring (mr)

Round (rnd)

Right side (RS)

Wrong side (WS)

Crochet the motif.

Change colors randomly for each motif, but always use Navy for the last round. Instructions are given for one way of using colors as an example of which rounds the colors are changed after.

Starting in the center with Leaf Green, make a ring.

Rnd 1: ch 1, 7 sc in ring, slst to top of first sc to join (8 st, ch at beginning of rnd always counts as a st).

Draw the working yarn through the ring and put this loop on your hook. Make a ring by crossing the working end (the ball end) over the tail end, leaving about 6″. Single crochet into the ring and over the tail. When you are finished with Rnd 1, pull on the tail to close the ring.

Crochet the motif, continued.

Rnd 2: ch 3, dc3tog in same space as slst, ch 3, (dc4tog in next sc, ch 3) 7x, slst to top of dc3tog to join (8 clusters and 8 ch 3 spaces). Fasten off Leaf Green.

Switch to Fuchsia.

Rnd 3: Pull up a loop in any ch 3 space, ch 1, 4 sc in the same ch 3 space, sk next cluster, (5 sc in next ch 3 space, sk next cluster) 7x (40 sc).

Fasten off Fuchsia. Join to first st of rnd as shown.

Crochet the motif, continued.

Switch to Light Blue.

Rnd 4: Pull up a loop in the center sc of any 5 sc group, ch 1, 2 sc in same sc, (sc in next sc, sc2tog, sc in next sc, 3 sc in next sc) 7x, sc in next sc, sc2tog, sc in next sc (48 sc).

First, fasten off your yarn leaving about an 8″ tail, and thread it onto a tapestry needle. With the RS facing, go under both loops of the first stitch of the rnd.

Pull the needle through to the WS and then insert it into the middle of the last stitch of the rnd. Weave in the end on the WS. Fasten off Light Blue. Join to first st of rnd as shown.

Switch to Light Pink.

Rnd 5: Pull up a loop in any sc2tog, ch 1, sc in next st, * sc2tog, hdc in next st, dc in next st (tr, ch 3, tr) in next st, dc in next st, hdc in next st, sc2tog, sc in next 3 st, rep from * 3 x, sc2tog, hdc in next st, dc in next st, (tr, ch 3, tr) in next st, dc in next st, hdc in next st, sc2tog, sc in next st, (44 st and four, ch 3 corners). Fasten off Light Pink. Join to first st of rnd.

Switch to Light Green.

Rnd 6: Pull up a loop in any center sc in which there are 3 sc in a row, ch 1, sc in next 5 st, * (2 sc, hdc, 2 sc) in corner ch 3 space, sc in next 11 st, rep from * 3 x, (2 sc, hdc, 2 sc) in corner ch 3 space, sc in next 5 st (64 st). Fasten off Light Green. Join to first st of rnd.

Switch to Navy.

Rnd 7: Pull up a loop in any center sc in which there are 5 sc in a row, ch 1, sc in next 7 st, * (2 sc, hdc, 2 sc) in next st, sc in next 15 st, rep from * 3 x, (2 sc, hdc, 2 sc) in next st, sc in next 7 st (72 st).

Make 16 more motifs, for a total of 17, changing the colors randomly as desired.

Block and join your motifs.

After your motifs are made, you will want to block them, or rather, you will wish that you did not have to block them, but blocking makes joining the motifs much easier, and because you used 100% wool yarn, the process is fairly quick and painless.

At right (above) is an unblocked motif. It looks kind of ill tempered, which you will be if you try to join the motifs without blocking them first.

To block a motif, simply pin it to size (you really only need to pin the corners), in this case 3.5″, spritz it with a bit of water, or set your iron on steam, and iron it on the “wool” setting.

After all of the motifs are blocked, lay them out and join them together into a single piece that is folded in half to form the front and back of the bag. In other words, you will be joining all of the motifs together at this time — none are being saved for the front or the back.

Block and join your motifs, continued.

There are many methods of joining motifs together. Some people like to sew them, some people like to sc them. My preferred method is to slst them together on the WS.

At right (bottom), 2 motifs are being joined. The right sides are together and the wrong sides are facing out. I like to slst through just the 2 outside loops. This gives me a nice edge on the front of the motifs. Again, there are many methods of joining motifs. This is my favorite because it does not show from the front and I do not have to cut lengths of yarn for sewing them together.

When 2 motifs have been slst together, do not break your yarn, and keep going to the next 2 motifs.

Line the bag.

Since this bag is made out of motifs that have holes in them, it’s nice to give it a lining. Even nicer is a stiff denim lining from recycled blue jeans.

Note: If you want, you can also cut the change pocket out of the jeans and sew it into the lining. It would be the perfect size for an id or small cellphone.

You’ll need a big piece of material to line this bag. The easiest way to get a this is to use the leg of a pair of jeans. Cut the leg and open it at the top stitched seam. Then lay the center of your crocheted piece across the remaining seam of the jeans leg as shown.

Place the bag on top of the cut jean material and, using a pencil, trace around the outside of the bag. Cut out around this line. There is no need to leave an additional seam allowance.

Fold the cut piece in half at the factory seam with the RS together. Sew the 2 shorter edges with a 1⁄4″ seam allowance. Pin the seam binding around the top of edge and sew it in place.

Assemble the bag.

Sew the 2 ends of your 60″ length of rope together. I used the zigzag stitch on my sewing machine. Lay the loop of rope inside your bag. Fold the bag in half with the rope inside the bag, as shown.

Note: The WS is up.

Assemble the bag, continued.

With RS facing and Navy yarn, pull up a loop at the fold and sc through both thicknesses of the bag and around the rope. You are at once attaching the handle and crocheting the sides closed. I found it necessary to put at least 2 sc in each st. To do this, set the rope on top of the motifs, sc into the motifs and over the rope. When one side of the bag is closed, sc around the clothesline alone.

I found that the clothesline was making the sc want to twist. I went with this instead if fighting it. I gave the crochet some extra twists as well as scrunching up the crochet very tightly. This gave the handle a nice body. I also found clothespins useful for keeping the rope in place and keeping track of when I was done with the handle and when I had to start crocheting the other side closed.

Assemble the bag, continued.

When the handle is completely and tightly covered, sc through both thicknesses of the bag and around the rope like you did on the first side. You may also want to sc around the top of the bag.

Insert the lining into the assembled bag and whipstitch it into place.

Sew the snap onto center points.

Make tassels (optional).

Cut a 5″ tall piece of cardboard. Place a 12″ length of yarn across the top of the cardboard, then wind the Navy yarn 30x lengthwise around the cardboard and yarn. Tie the 12″ strands tightly together around the top. This is what you’ll use later to attach the tassel to the bag. Cut the yarn at the bottom.

Wrap an additional piece of yarn a few times tightly around the tassel about 1″ below the top, securing the ends with a knot. Trim the ends of the tassel. Repeat to make the second tassel.

Sew one tassel on either side of the bag where the rope comes out of the fold.

And we’re done! Now go and wear your retro-remix bag proudly.

Conclusion

This project first appeared in CRAFT Volume 02, pages 62-69.