Randomness has always fascinated me.
Pretty sure it fascinates a bunch of other people too, especially those who try to keep our personal information secure.
And oh yeah, Las Vegas.
So I was very interested in an article on an electronic random number generator (RNG) in Make: Volume 45 entitled “Really, Really Random Number Generator” by Charles Platt and Aaron Logue.
This RNG was based on a simple circuit by Aaron, and here’s what they said about it: “The PN junction of [a transistor] is reverse biased to produce avalanche noise. The resultant signal is amplified for the purpose of driving a TTL-level Schmitt trigger to produce … totally unpredictable signal noise [which] can then be converted into an unlimited stream of random high and low digital states.”
I translated this to: If you correctly connect nine cheap electronic parts, feed them 18 VDC and send their output signals to an input pin of a microcontroller, you’ve got yourself a very fast stream of zeroes and ones in no predictable order, to do with as you wish.
Since I was also exploring DC motor control at the time, it seemed like a good idea to put the two ideas together as a drawing machine (Figure A). Why not let a couple of motors randomly control a pen?

So I ordered a cheap dual motor-control circuit board, featuring the L298N wonder-chip, used primarily to move small robotic vehicles. (The board can also control a single stepper motor.) The less common parts for the RNG circuit are available at Amazon or eBay, though some may be on a slow boat from China for awhile. While you’re waiting, you can read up on how to use the L298N board, including a couple of Arduino sketches.

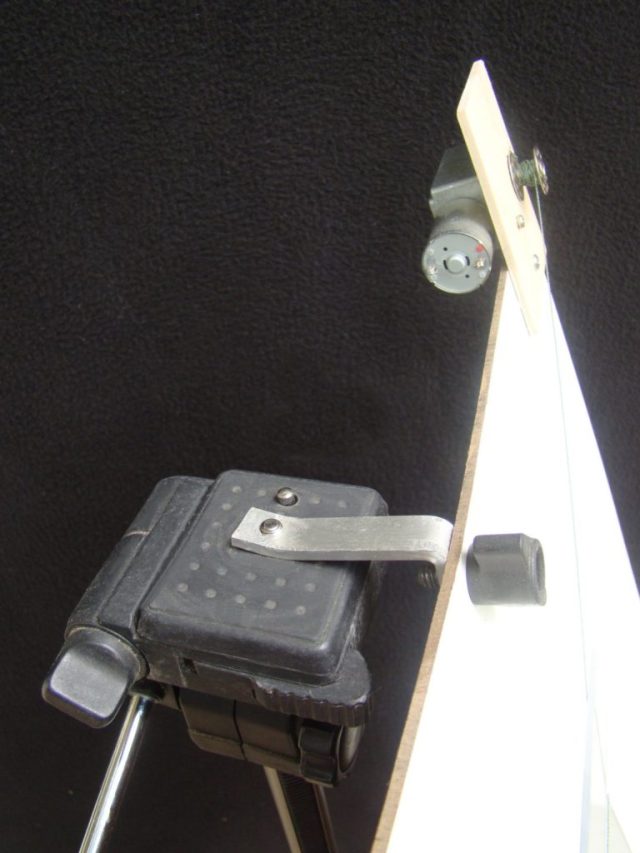
Any inexpensive easel will do, but I like to build things. Mine consists of a camera tripod, a piece of dry-erase board (project plywood is also suitable), and a few things that should be lying around any respectable shop (Figures B and C). Use a vise and hammer to bend a piece of aluminum to fit between the tripod’s camera-mounting screw and your screw or knob at the top of the dry-erase board. Drill and tap the holes to match those threads. Be sure to lean the board back so the pen can draw properly; more on that later. There’s a simpler tripod easel on Instructables that’s not as big or sturdy.

Platt and Logue used two 9V batteries to power their RNG. With no 9V batteries on hand, I found a 115VAC supply that provides a steady 12VDC at 1A, which is enough for this project. The motors draw about half an amp total when both are pulling the pen over the drawing surface. The L298N also runs on 12VDC.

Once your parts arrive, build the circuits (Figures D, E, and F). I built mine on top of a BASIC Stamp Homework Board, but you can use any breadboard or proto board. Note that the first transistor (it generates the random noise) has only two leads connected; clip off the third lead. You should read Platt and Logue’s detailed build description, but here’s an important tip: “When installing the Zener diode, remember that its cathode stripe should point away from the negative bus, unlike a regular diode. The Zener shunts voltages above 4.7VDC to ground.”

NOTE: You can safely ignore the right-hand breadboard in Figure D; it comes standard with the HomeWork board, but I played it safe and put my RNG components on the separate breadboard at left, so I didn’t accidentally blow my HW board. The (unconnected) pull-down resistors are for insurance; sometimes you gotta guarantee a 0 when you want a 0. The LED is just for testing.

Mount the motors to the left and right top edges of your drawing board with two 3mm machine screws each, either directly to the dry-erase board or through small pieces of project plywood. Mount the string pulleys to the motor shafts. I used thread bobbins from an old sewing machine; Amazon carries these as well. They’re a slip fit on the 6mm motor shafts, so add a disc of masking tape first (Figure G). Wind about 4′ of flexible braided fishing line from one bobbin to another. Try to keep roughly the same amount of line on each bobbin, and leave some slack between them. It doesn’t matter which side of the bobbins the line exits.

Make the pen holder from ⅛” clear acrylic — scraps are often available at glass shops — following Figure H, and hang it temporarily (upside down) on the slack “V” in your fishing line, for testing.

Connect the output of the RNG’s Zener diode to any input pin of a microcontroller (Arduino, Basic Stamp, etc.). The L298N board has 4 inputs to control 2 motors, so I decided to grab groups of four consecutive signals from the RNG, such as 0010, 1010, etc., all using a single input pin of the microcontroller.
Programming Your Random Drawbot
Download my code for the BASIC Stamp microcontroller. But it’s pretty simple to make your own version for your favorite microcontroller.


