Light prefers to take the shortest path, but under the right conditions you can make it bend and bounce, generating lovely effects in the process. This project takes advantage of some special properties of acrylic. Inside polished acrylic, light rays reflect off the smooth inner surfaces, preferring to escape at the rougher edges or scatter at imperfections in the surface. This internal reflection causes the light to suffuse the entire acrylic shape with a subtle uniform glow, even where it bends and curves.

We can take advantage of light scattering by engraving patterns into the smooth surface of acrylic sheet then illuminating the sheet to generate a brighter glow at the etched spots. These edge-lighting effects are often seen in signage or décor used in dark venues (see “LED Nixie,” Make: Volume 66).

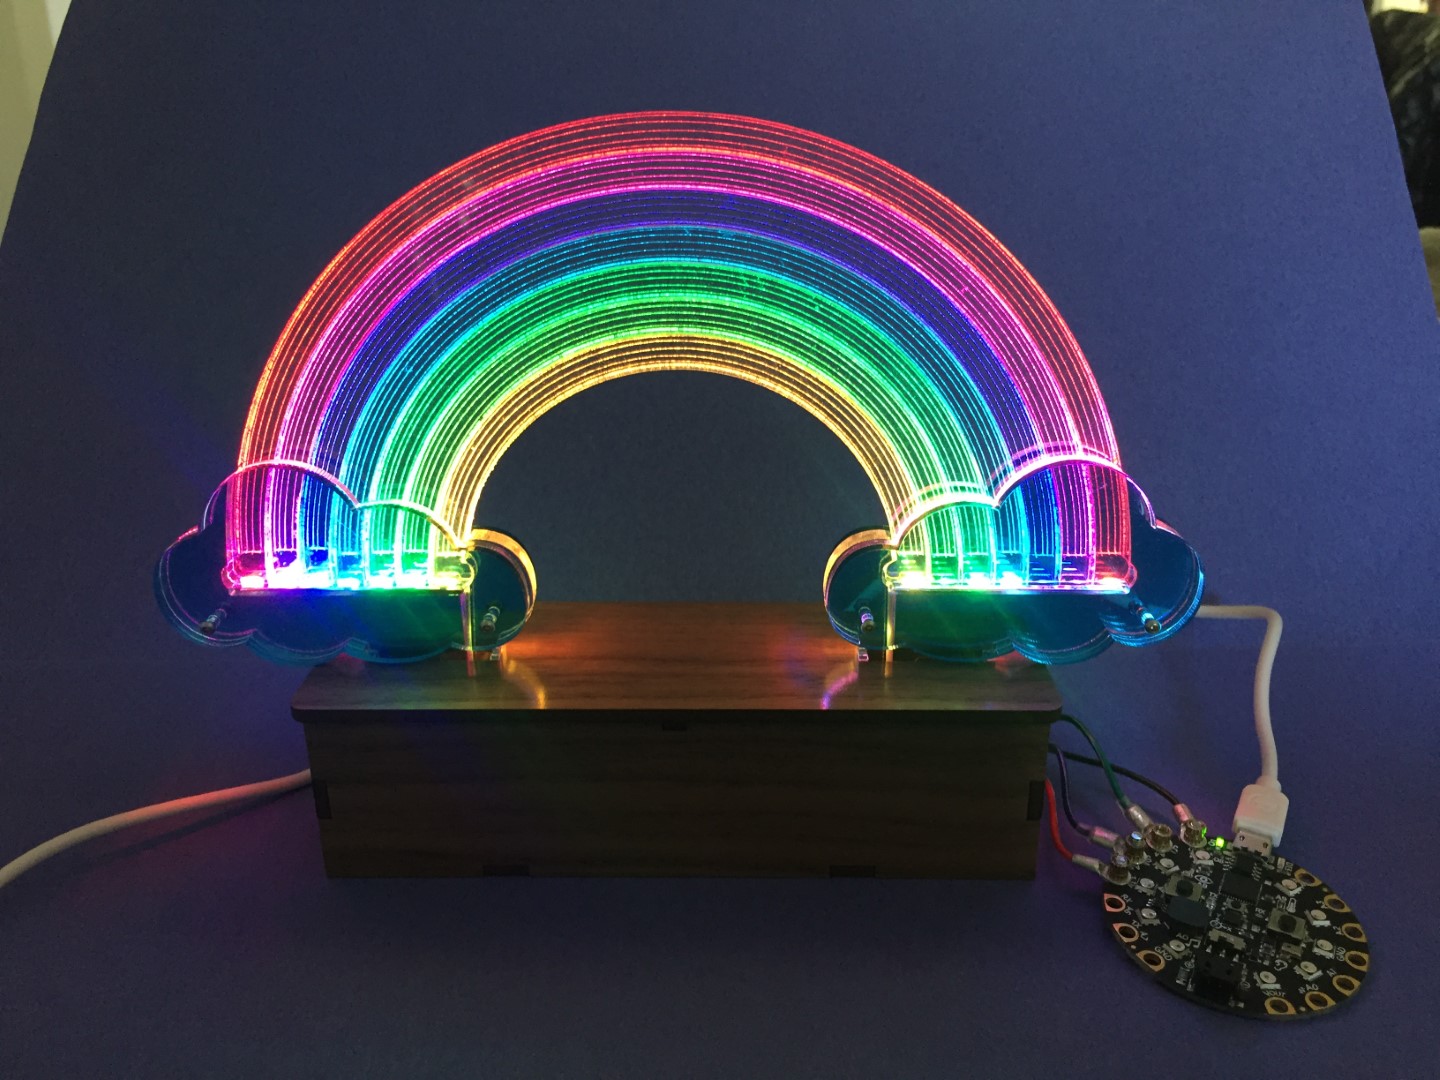
The edge-lit rainbow juxtaposes seven separate acrylic “arcs” and illuminates each one individually with RGB LEDs so that each arc glows with its own colors, independent of its neighbors. This project takes the effect one step further, giving both ends of each arc separate RGB LEDs to generate a color mixing effect.

There are many possible ways to control RGB LEDs, so I made this project versatile by attaching the LED strips to a JST connector, allowing it to be easily powered by interchangeable microcontrollers. This build explores ways to illuminate the rainbow using CircuitPython code on a Circuit Playground Express for quick programming and interactive color-mixing, as well as an ESP8266 board for IoT connectivity and a colorful report on real-time weather conditions.

MATERIALS

  • Circuit Playground Express or Adafruit Feather Huzzah ESP8266 or other microcontroller capable of controlling RGB LED strips. For the full weather display functionality, you’ll want the Huzzah or another microcontroller with Wi-Fi.
  • RGB LED strip, SK6812 type, 3535 size, white with a pixel density of 144 LEDs/meter, such as Adafruit #2969 (adafruit.com) or SparkFun #14732 (sparkfun.com)
  • Clear acrylic sheet, ¼” thick, 6″×10″ or larger
  • Clear acrylic sheet, 1/8″ thick, 5″×5″ or larger
  • Translucent blue acrylic sheet, 1/8″ thick, 8″×5″ or larger
  • Wood sheet, 1/8″ thick, 8″×12″ or larger for the laser-cut enclosure. I found a nice selection of laserable wood sheets at Johnson Plastics johnsonplastics.com/engraving/sheet/laser/wood and used a lovely walnut veneer for this project.
  • Copper tape, 3/16″
  • Wood glue
  • Machine screws, M2×16mm (4) with nuts
  • Hookup wire, 26 AWG solid insulated, white
  • Heat-shrink tubing

OPTIONAL:

  • JST connectors, 4-pin: male (1) and female (1)
  • Painter’s tape very helpful
  • Crimp ring terminals, M3 uninsulated (4)
  • JB Weld epoxy or similar glue that can adhere to plastic and wood
  • Sharpie markers: red, black, and blue

Project Steps

1. DOWNLOAD THE VECTOR FILES

Download the free vector files for this project. If you have access to a laser cutter, you can cut them yourself; otherwise an online service like Ponoko can cut them for you. The outlines are sized precisely to fit the LED strips, so it’s important not to change the scale of the vector files before cutting the materials.

2. LASER-CUT AND ASSEMBLE THE ENCLOSURE

Use the design in WoodBox.svg to cut the pieces of the box enclosure from 1/8″ wood. Delete the red text labels from the file before cutting.

Use wood glue to attach the inner and outer lid pieces together so that the small rectangular holes in both pieces align as closely as possible. While the glue is drying, clamp or tape the pieces together with painter’s tape to maintain their alignment.

Lightly glue the interior edges of the enclosure body, and assemble the pieces using the slots and tabs for alignment and stability. While the glue dries, clamp or tape the pieces of the enclosure body in place.

3. LASER-CUT THE ACRYLIC

There are three different vector files for the acrylic pieces. Cut the file Rainbow.svg from ¼” clear acrylic. The red lines in the file are for etching, and black are for cutting. Some of the acrylic pieces have narrow parts that can be brittle if stressed, so be sure your laser power settings make a clean cut all the way through. The small notches in the ends of each arc may stick a little, but can be easily dislodged with just a tiny amount of pressure from a fingernail.

Cut the clouds from 1/8″ translucent blue acrylic using Clouds.svg

and the two support pieces in Support.svg from 1/8″ clear acrylic.

Peel off any protective masking paper, leaving just the bare acrylic.

4. APPLY COPPER TAPE

Placing strips of copper tape between the rainbow arcs will reflect any light that tries to escape from the interior acrylic edges. The tape also helps to separate the different LED colors in the acrylic arcs, minimizing color bleed and keeping the colors sharp and distinct.

Cover the top rounded edge of the smallest six arcs (but not the outermost arc) with a piece of 3/16″ copper tape. Don’t let the tape extend past the end of each arc, or you’ll risk a short-circuit if the copper tape comes in contact with the LED strips.

5. PREPARE THE LED STRIPS

Cut two segments containing 7 LEDs apiece from the SK6812 3535 RGB LED strip. Cut six 5″ lengths of white 26 AWG hookup wire and strip a bit of the insulation from the ends.

Using white insulation makes the wires less obvious through the transparent acrylic. It also makes it harder to distinguish between the leads for 5V, signal, and ground, so we’ll mark them once they’re connected.

Tin one end of each piece of wire, and solder connections to the three input pads of each cut LED strip. Mark the end of each wire with a colored Sharpie, denoting its purpose: 5V red, Signal blue, and GND black.

Using pliers, carefully bend the wires down from the LEDs just past the solder joints. The length of LED strip should fit, with a little extra space, along the long straight edge of the ¼” acrylic cloud piece, as shown in. The wires should bend just at the corner of the acrylic piece.

6. ATTACH THE LED STRIPS

Remove the adhesive backing from the LED strips, and stick them firmly to the long straight edge of the ¼”-thick clear cloud piece. The unsoldered edge of the LED strip should extend along the edge to just about the place where the curved notch starts. It’s likely that the LED strip is wider than ¼”, so align the back side of the strip (the side furthest from the viewer) to one side of the straight edge and allow the front edge of the LED strip to overhang the other side of the acrylic a bit.

7. STACK THE CLOUD PIECES

On each side of the rainbow, set out the cloud pieces.


Each cloud consists of four layers. The bottommost layer is the blue cloud shown nearest the rainbow, and each acrylic piece will stack over the one shown just above it in the picture.

Take the 16mm M2 screws and insert them through the holes in the first blue cloud as shown. Place the cloud on a level surface so that the screws point upward.

Next, stack the two ¼” acrylic cloud pieces over the blue cloud so that the M2 screws pass through the hole in each piece, and thread the hookup wires down through the narrow slot between the two ¼” pieces.

The rainbow also sits in this layer. Place the seven rainbow arc pieces together on a flat surface with the notched edges forming a line. Be sure each arc is resting with its etched face oriented downward. Apply a few small strips of painter’s or masking tape to help hold all seven arcs in alignment.

Lower the ends of the rainbow into the wide gaps between the two ¼” pieces of acrylic cloud.

The small bumps on the innermost and outermost arcs should just fit into the corresponding curved notches in the ¼” cloud pieces. If the pieces don’t fit easily, don’t force them. Instead, try very slightly rotating the ¼” acrylic cloud pieces until the fit is good.

Once in place, support the center of the rainbow from underneath so the ends won’t dislodge. (The 3/16″ roll of copper tape works nicely for the task, if you place it under the tops of the arcs.) The rainbow arcs should be seated inside the clouds so that each LED is nestled in the gap at the bottom of an acrylic arc. If the LEDs and arcs don’t align, you may have to remove the rainbow arcs and re-seat the LED strip.

Once the rainbow arcs are in place, cover the bottom edges with the 1/8″ clear support pieces by sliding them over the M2 screws. These should sit so that the horizontal slot just encompasses the overhanging edge of the LED strip from Step 6. This allows the acrylic cloud to be sandwiched snugly together without squishing the LED strip.

Finally, add the last blue acrylic cloud to the top of the stack, and screw down the M2 nuts to hold the pieces together.

The nuts currently sit on the front side of the clouds. Later, we can reverse the screws, but for now, they’ll hold the acrylic pieces nicely in place.

8. ATTACH RAINBOW TO ENCLOSURE

Take the top of the wooden enclosure and run the white hookup wires through the corresponding rectangular holes.

Slot the rectangular bottom portions of the clouds through the same holes. They will fit loosely. Once the electronics are successfully tested, you can glue the rectangular acrylic tabs into the slots for greater stability using JB Weld or similar adhesive.

9. SOLDER THE CONNECTOR

I like to solder a detachable JST connector to the ends of my LED strips, so that I have the flexibility to swap microcontrollers without resoldering the connections. If you do choose to solder the leads directly to a controller, make the connections.

The instructions below describe how to attach a 4-pin JST cable connector to your wires.

Take the color-marked hookup wires and bend them so they meet near the middle of the enclosure lid. Trim the wires from the male JST connector to a few inches in length and strip the ends. Slide heat-shrink tubing over each wire.

Each LED strip signal wire has its own wire in the JST connector. The 5V wires both connect to the red JST connector wire, and the two ground wires both connect to the black JST connector wire. Trim the white hookup wires so they meet in the middle and extend an inch or so away from the lid, then strip the ends. Be careful not to lose track of which wire is which — you may want to mark the color of each wire again with a Sharpie.

Twist the ends of the hookup wires together with their corresponding connector wire. Solder the connections, then slide the shrink tube over each junction. Heat the shrink tubing so that it shrinks to reinforce and insulate each join.

Now place the lid on top of the enclosure base, with the JST connector extending out the slot in the back of the enclosure. The tabs in the underside of the lid fit in the slots at the top edges of the enclosure.

10. CONNECT THE CIRCUIT PLAYGROUND EXPRESS

An Adafruit Circuit Playground Express (CPX) running CircuitPython will get your LED rainbow up and running quickly. Its built-in buttons and sensors make it easy to add interactive features to the program.

Connect a female 4-pin JST connector to the CPX. You can solder the connections shown in Figure T directly, or, if you have some M3 crimp ring terminals, you can strip the ends of the JST connector wires, crimp the ring terminals over the ends, then use M3 screws and nuts to secure the connector to the circular pins on the CPX.

11. MAKE IT GLOW WITH CIRCUITPYTHON

The CircuitPython code (file main.py) uses the CPX’s built-in switch, buttons, and accelerometer to change color effects in response to user interactions. The code uses the FancyLED libraries by Phillip Burgess which accept HSV (Hue, Saturation, Value) colors and make cycling through different hues as simple as counting.

The program runs in two modes, Spectrum and Color Mixing, which are determined by the switch position. In both modes, the colors of each rainbow arc change gradually with time, following a base hue that cycles through the color spectrum.

Pressing CPX button A changes the rate at which the base hue evolves. The rate cycles through four different values — ranging from barely perceptible change to zippy color rotation. Pressing CPX button B toggles the colors displayed at either end of each arc. In Spectrum mode, the hues at either end of each arc are either the same, lighting the arc with a single, distinct color

or they are opposites on the color wheel, generating a color gradient along each arc.

In Color Mixing mode, the rainbow displays two opposite hues in each arc. These hues evolve with time, and the rate at which they cycle is set by pressing CPX button A. The relative intensity of these two colors responds to the x-axis orientation of the CPX. Tilting the CPX to the left or right makes each color brighter or dimmer.

Pressing button B in Color Mixing mode toggles the colors on each side from uniform, to interlaced.

12. MAKE IT A WEATHER DISPLAY WITH AN ESP8266

A Wi-Fi-enabled board, like the Adafruit Feather Huzzah ESP8266, can turn your edge-lit rainbow into an IoT weather display. Different colors in the rainbow arcs represent the temperature, and lively animations indicate weather conditions like rain, snow, or strong winds.

If you terminated your rainbow LED wires with a male 4-pin JST connector, then connect the Feather to the corresponding female JST connector. Make the connections.

I soldered female jumper wires to the four female JST connector wires, and attached them to header pins on the Feather ESP8266.

Download the Arduino code. It’s based on Adafruit’s ESP8266 Wi-Fi Weather Station Learning Guide which uses OpenWeatherMap — a free online service with an API that allows you to check local weather conditions as often
as every 10 minutes.

You’ll need to create an account with OpenWeatherMap and get an API key. Once that’s done, find the numerical code for your location by going here, searching for your city and clicking the link to see its current weather. The numerical city code will be the last part of the URL.

Replace the placeholder values in the Arduino sketch with your API key and city code, along with your Wi-Fi SSID and password. Compile and upload the code. The LEDs will display an evolving rainbow spectrum, which, every 30 seconds, will glow uniformly in a solid color to represent the current temperature. Additional animations indicate weather conditions, like arc colors dripping downward for rain, sparkling for snow, and sliding side to side to indicate strong winds.

Place your rainbow somewhere you’ll be able to see it when you want to know the weather. Even ugly conditions will look attractive now!