Working directly with DNA isn’t only for the labs of CSI, agribusiness, and headline-grabbing research institutions. It’s basic chemistry, but it uses the molecules of life. You can even do it at home. This project explains how you can isolate and “fingerprint” some of your own DNA (which is a bit more difficult). You can view these experiments as an extension of high school education, a low-cost contribution to science infrastructure in developing countries, or perhaps even an exercise in bioethics.

Project Steps

Mix the 3 buffer solutions according to these recipes.

Rinsing buffer: 1.5g (approximately ¼ tsp) table salt, 5g (about 1 tsp) of baking soda, and ½ cup bottled water.

Running buffer: .05g (a pinch) of table salt, 2g (½ tsp) of baking soda, and up to 1L bottled water. Use a pet-store aquarium kit to make sure this buffer measures pH 7.5; add water to lower the pH, or add baking soda to raise it.

Loading buffer: 1.25ml (¼ tsp) glycerol/glycerine (available at most pharmacies) and several drops of red food coloring.

Extract the DNA.

Swirl 5ml (1 tsp) of rinsing buffer around in your mouth for about 30 seconds. Swirl gently to prevent the sample from becoming frothy. The more cells you can rinse out, the better — so don’t do this after brushing your teeth.

Spit the buffer into a paper cup and pour it into a test tube. Try not to spit out more (from added saliva) than the original volume of rinsing buffer. Squirt a bit of liquid soap (about ¼ tsp) into your sample and mix well, but gently, with a wooden toothpick. Slowly add 5ml (1 tsp) of cold rubbing alcohol to the sample, pouring it down the side of the test tube at an angle so you form 2 undisturbed layers of liquid.

After 10 minutes, the DNA should appear as a whitish, snot-like substance floating between the rinse solution layer and the alcohol. Results can depend on the soap you use and other factors, so you may have to experiment.

Make the gel box.

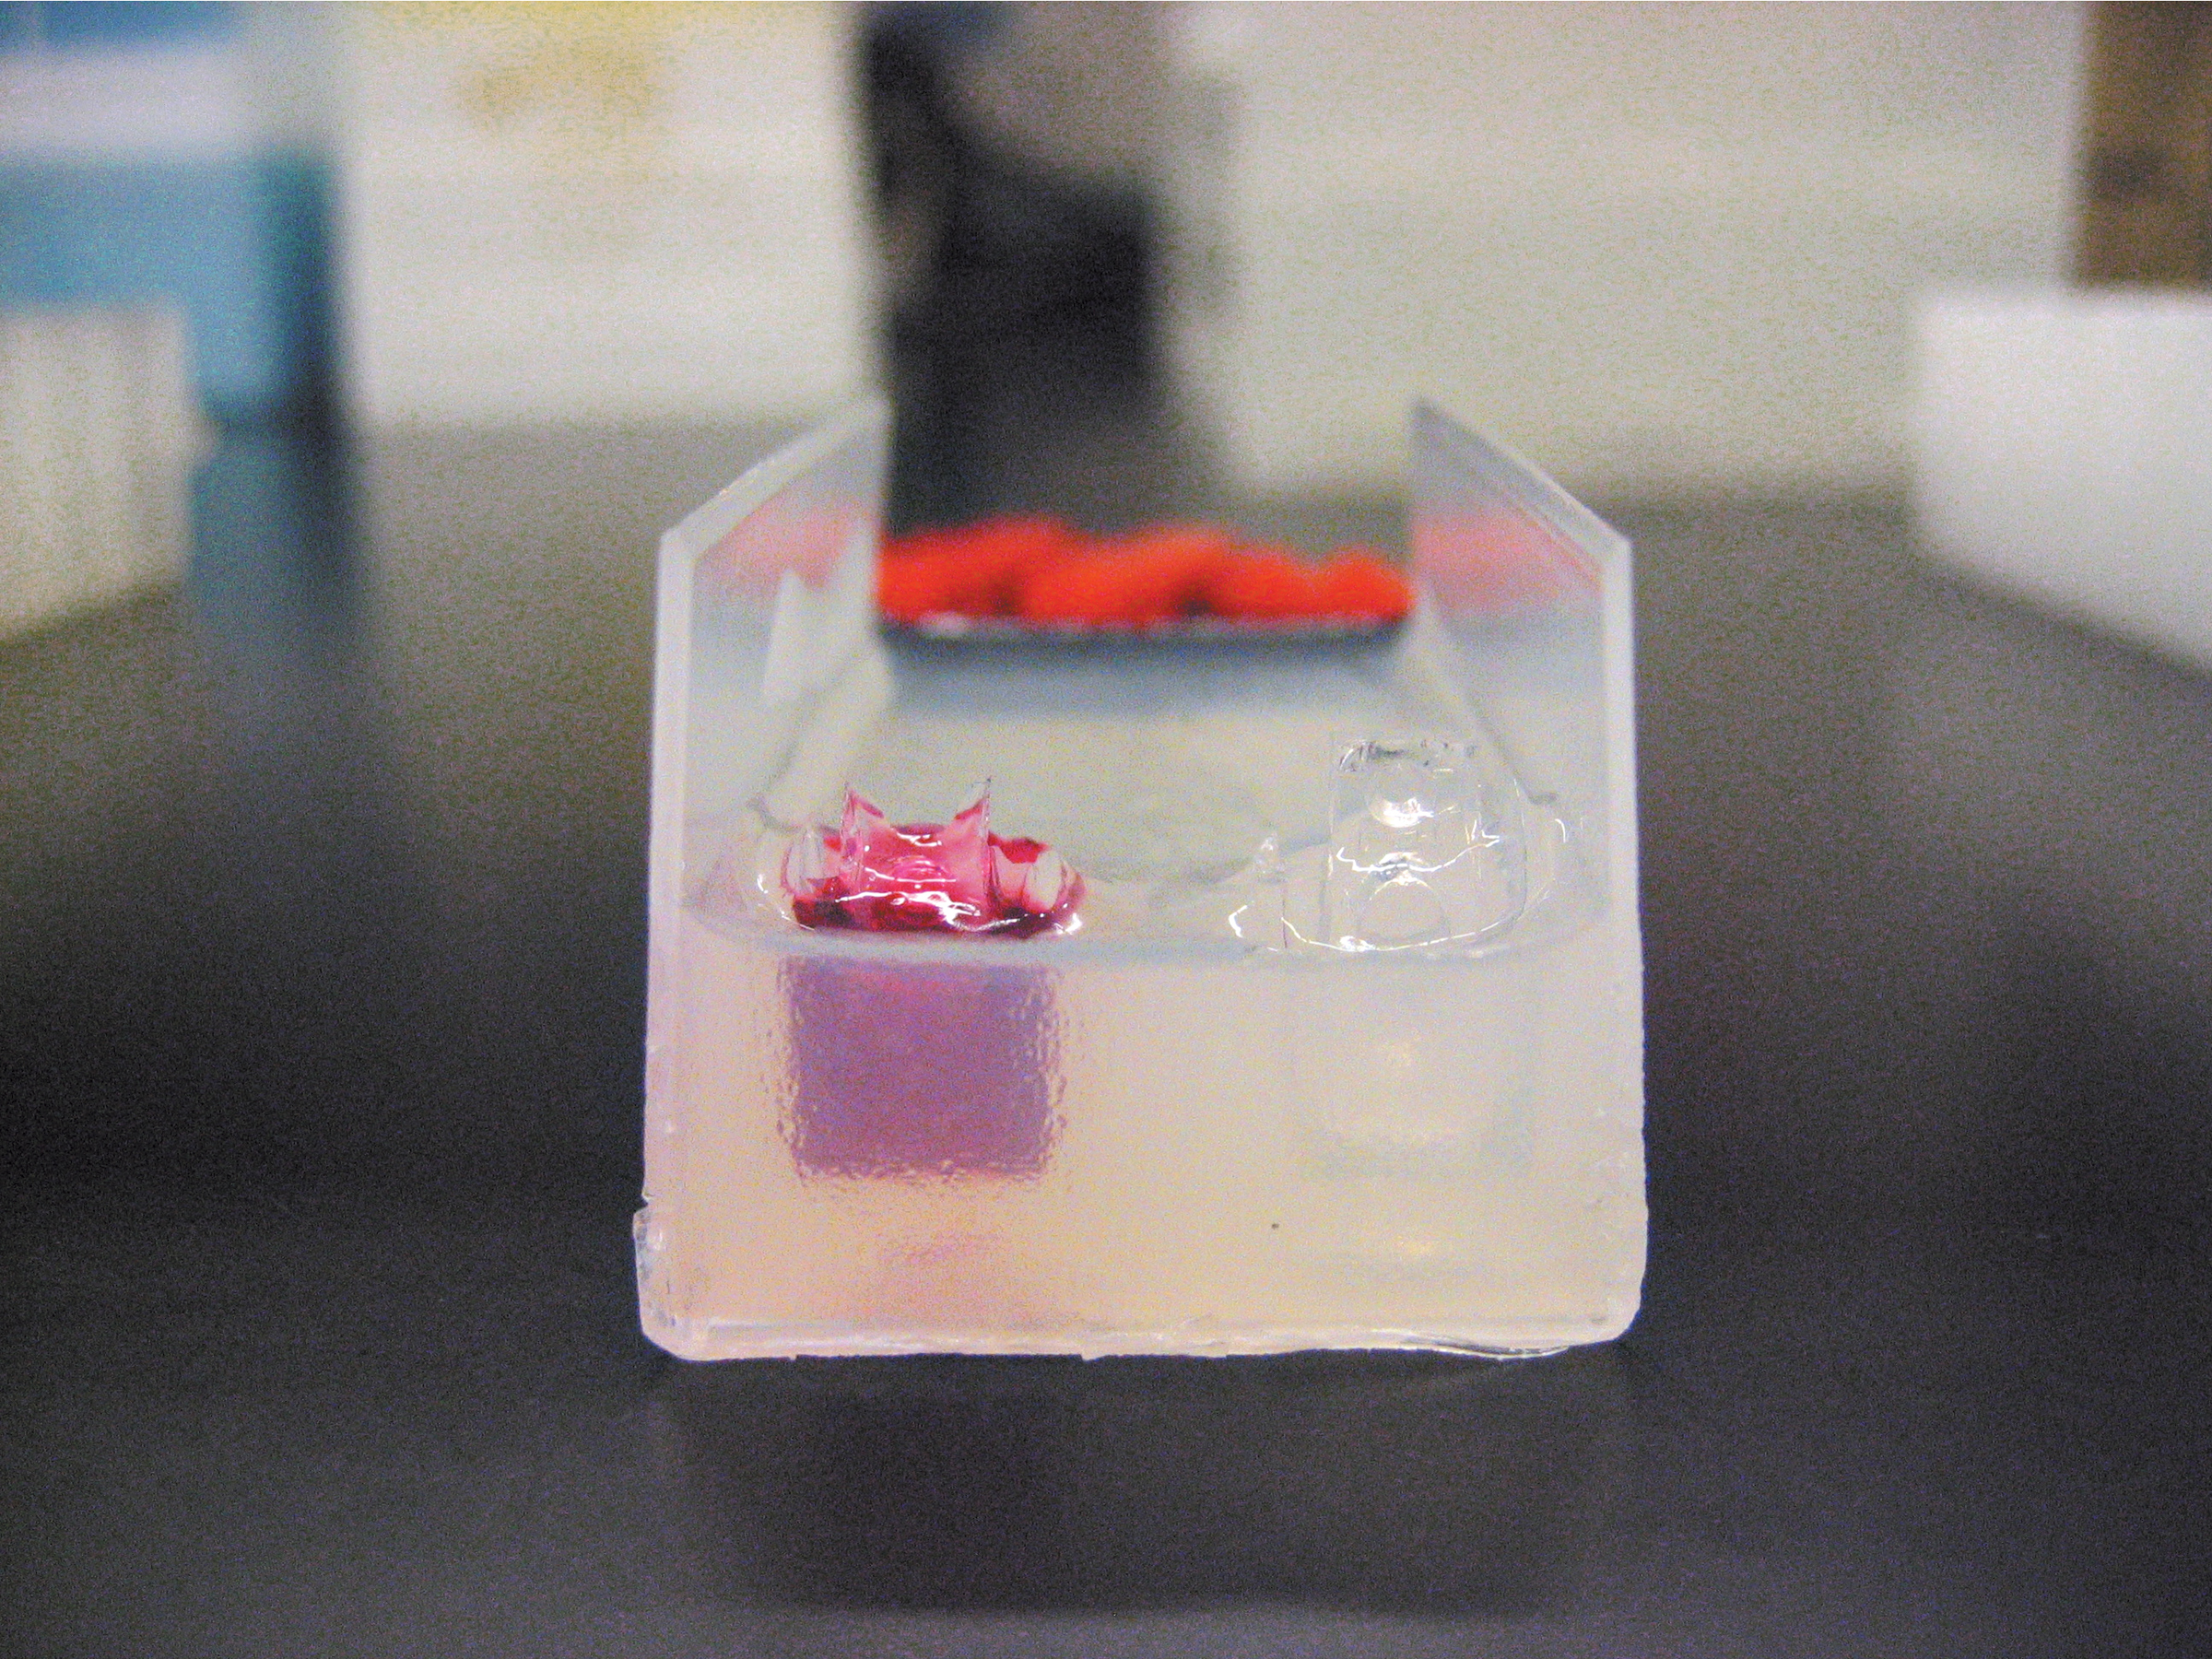
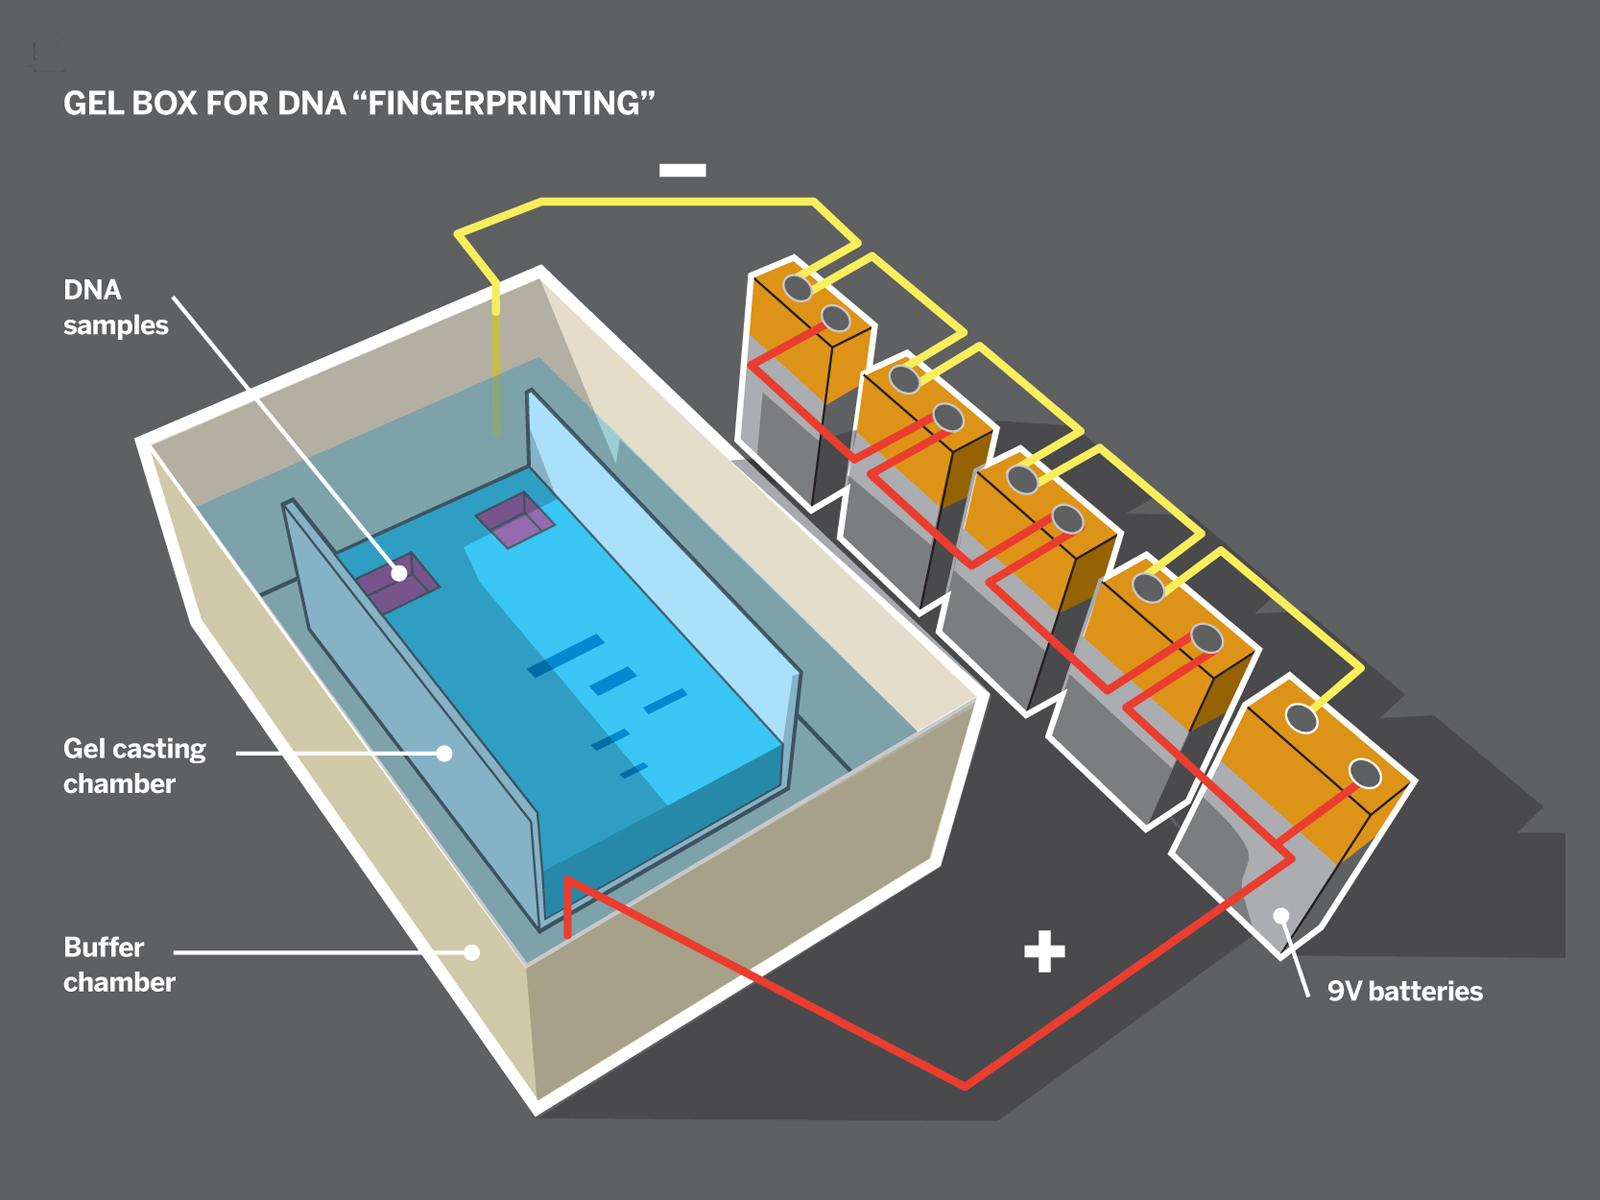
The gel electrophoresis process lets you separate and visualize different DNA molecules based on their sizes. Agar gel — a dense, microscopic network of sugar — is difficult for larger DNA molecules to travel through, but because DNA is negatively charged, you can draw it through the gel by applying an electric field. A gel box uses this principle to act as a DNA racetrack. The shorter the strand of DNA is, the faster it runs.

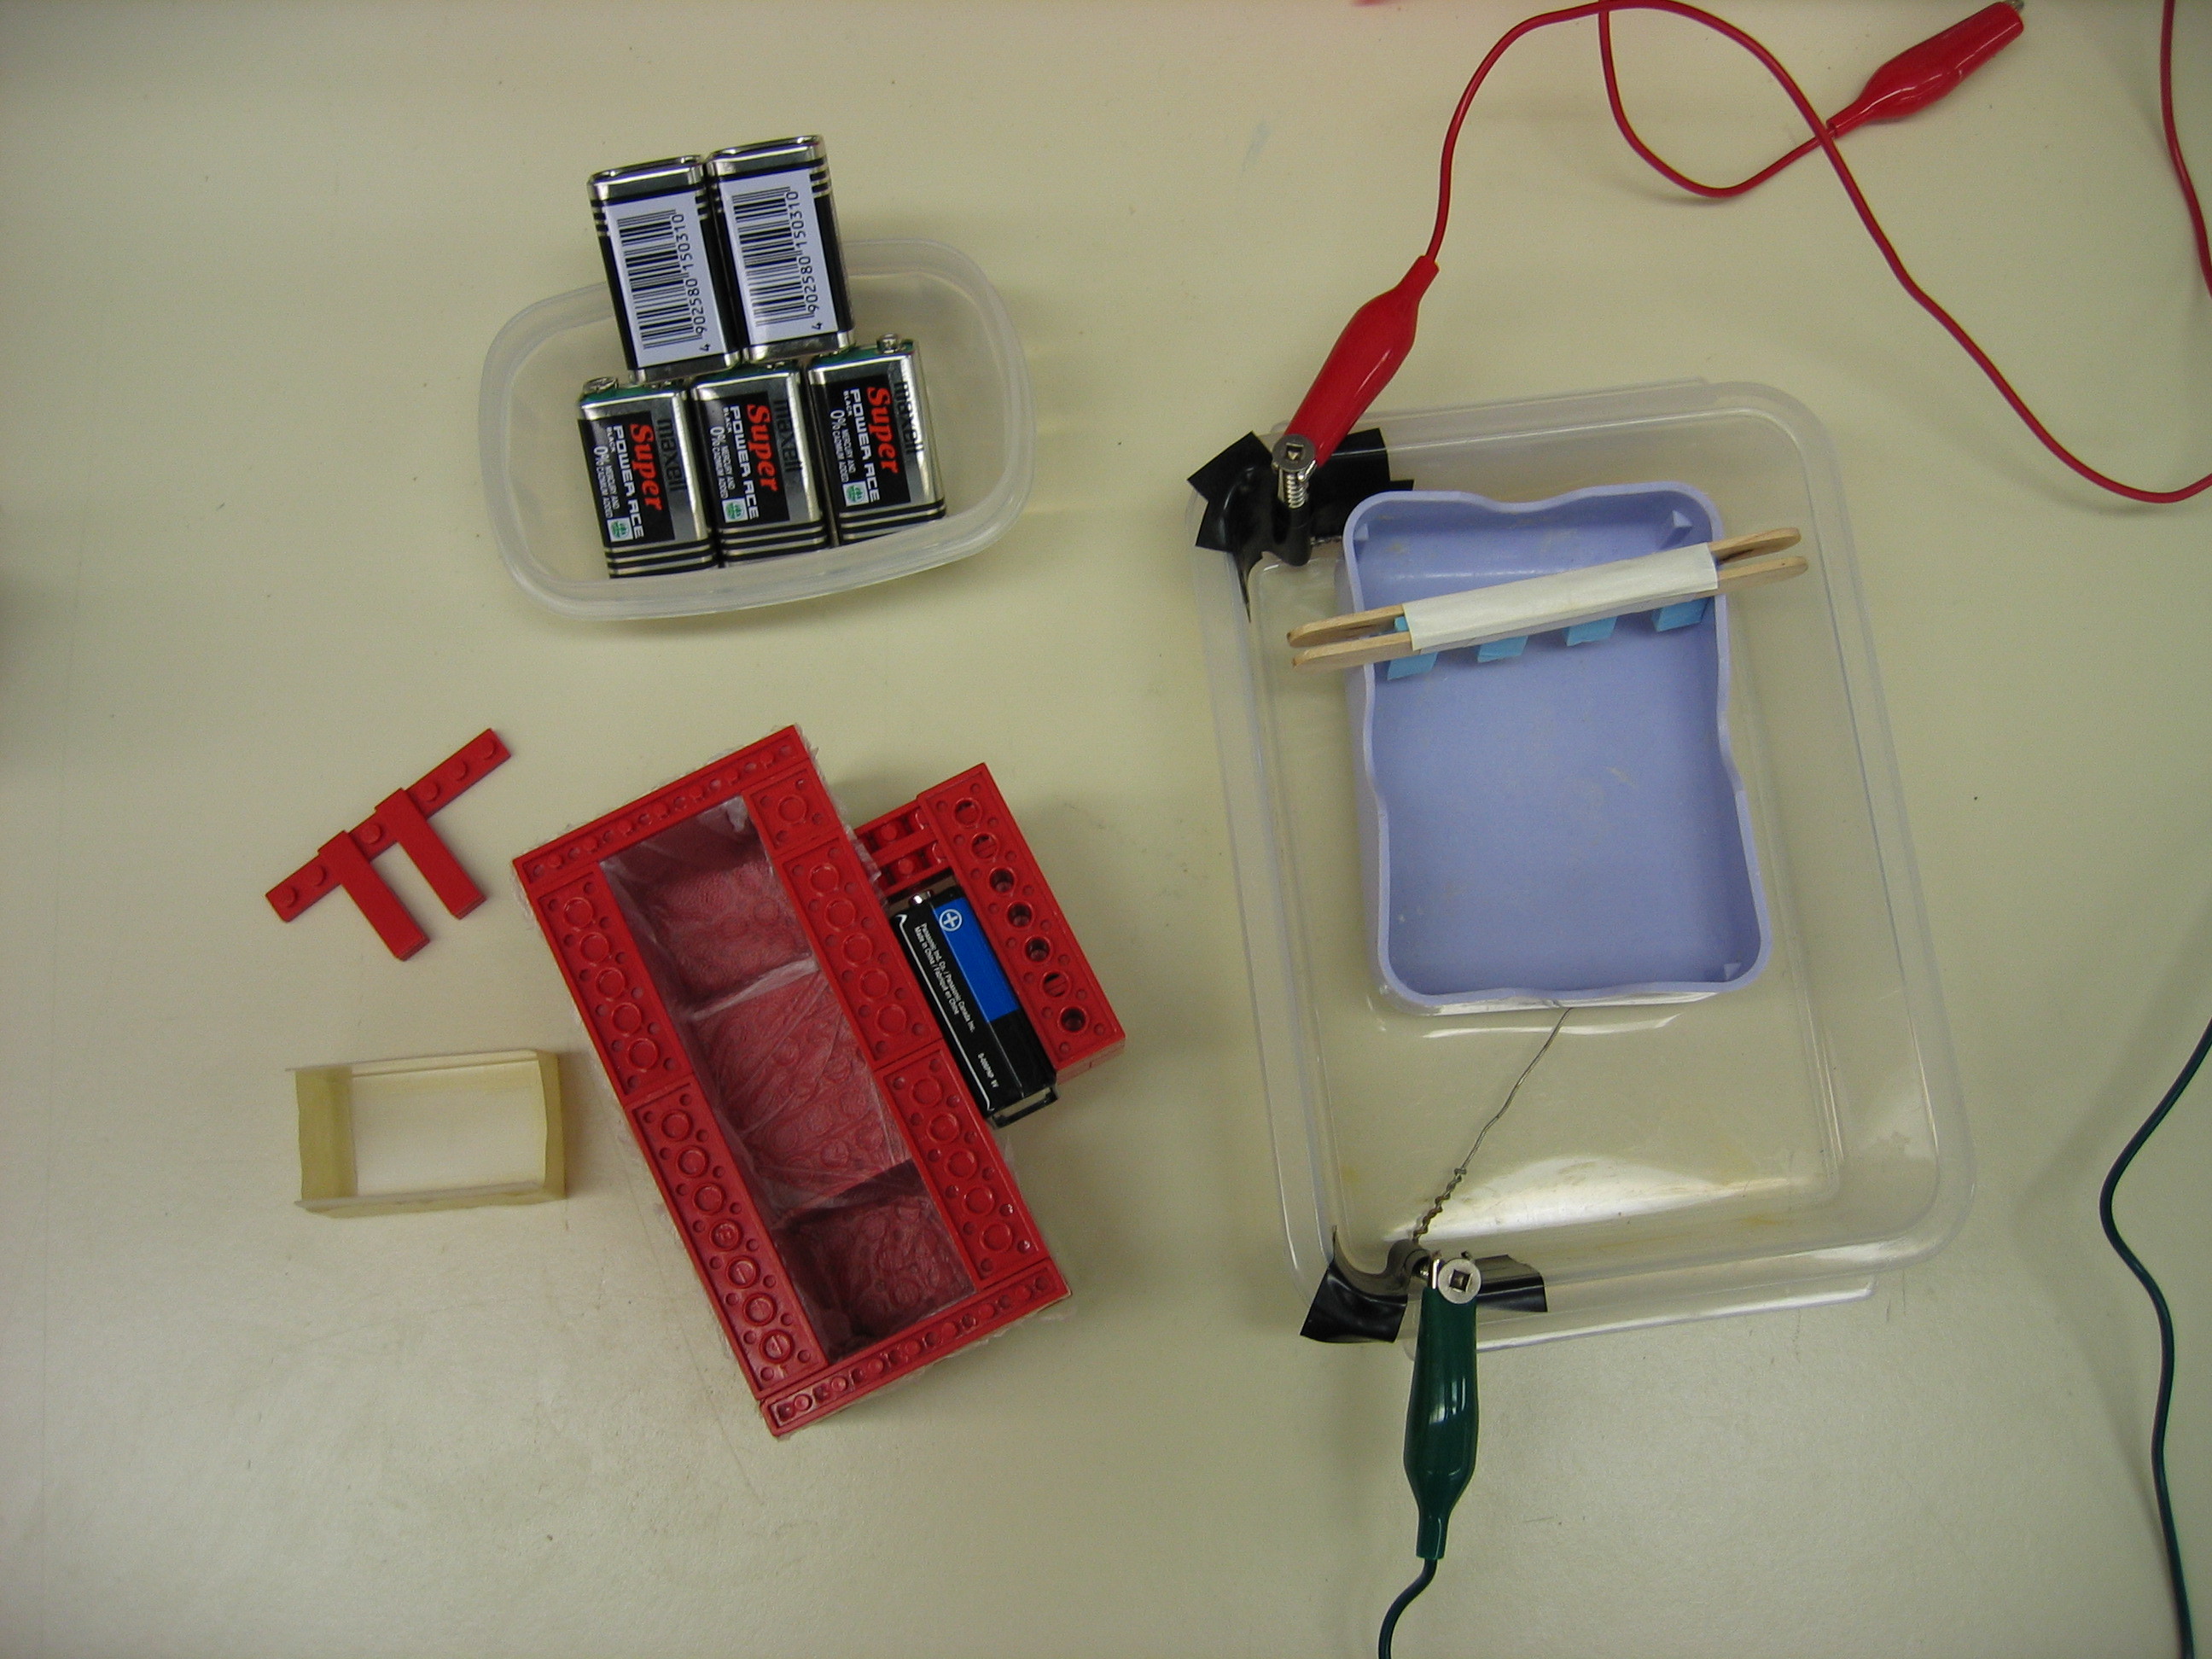
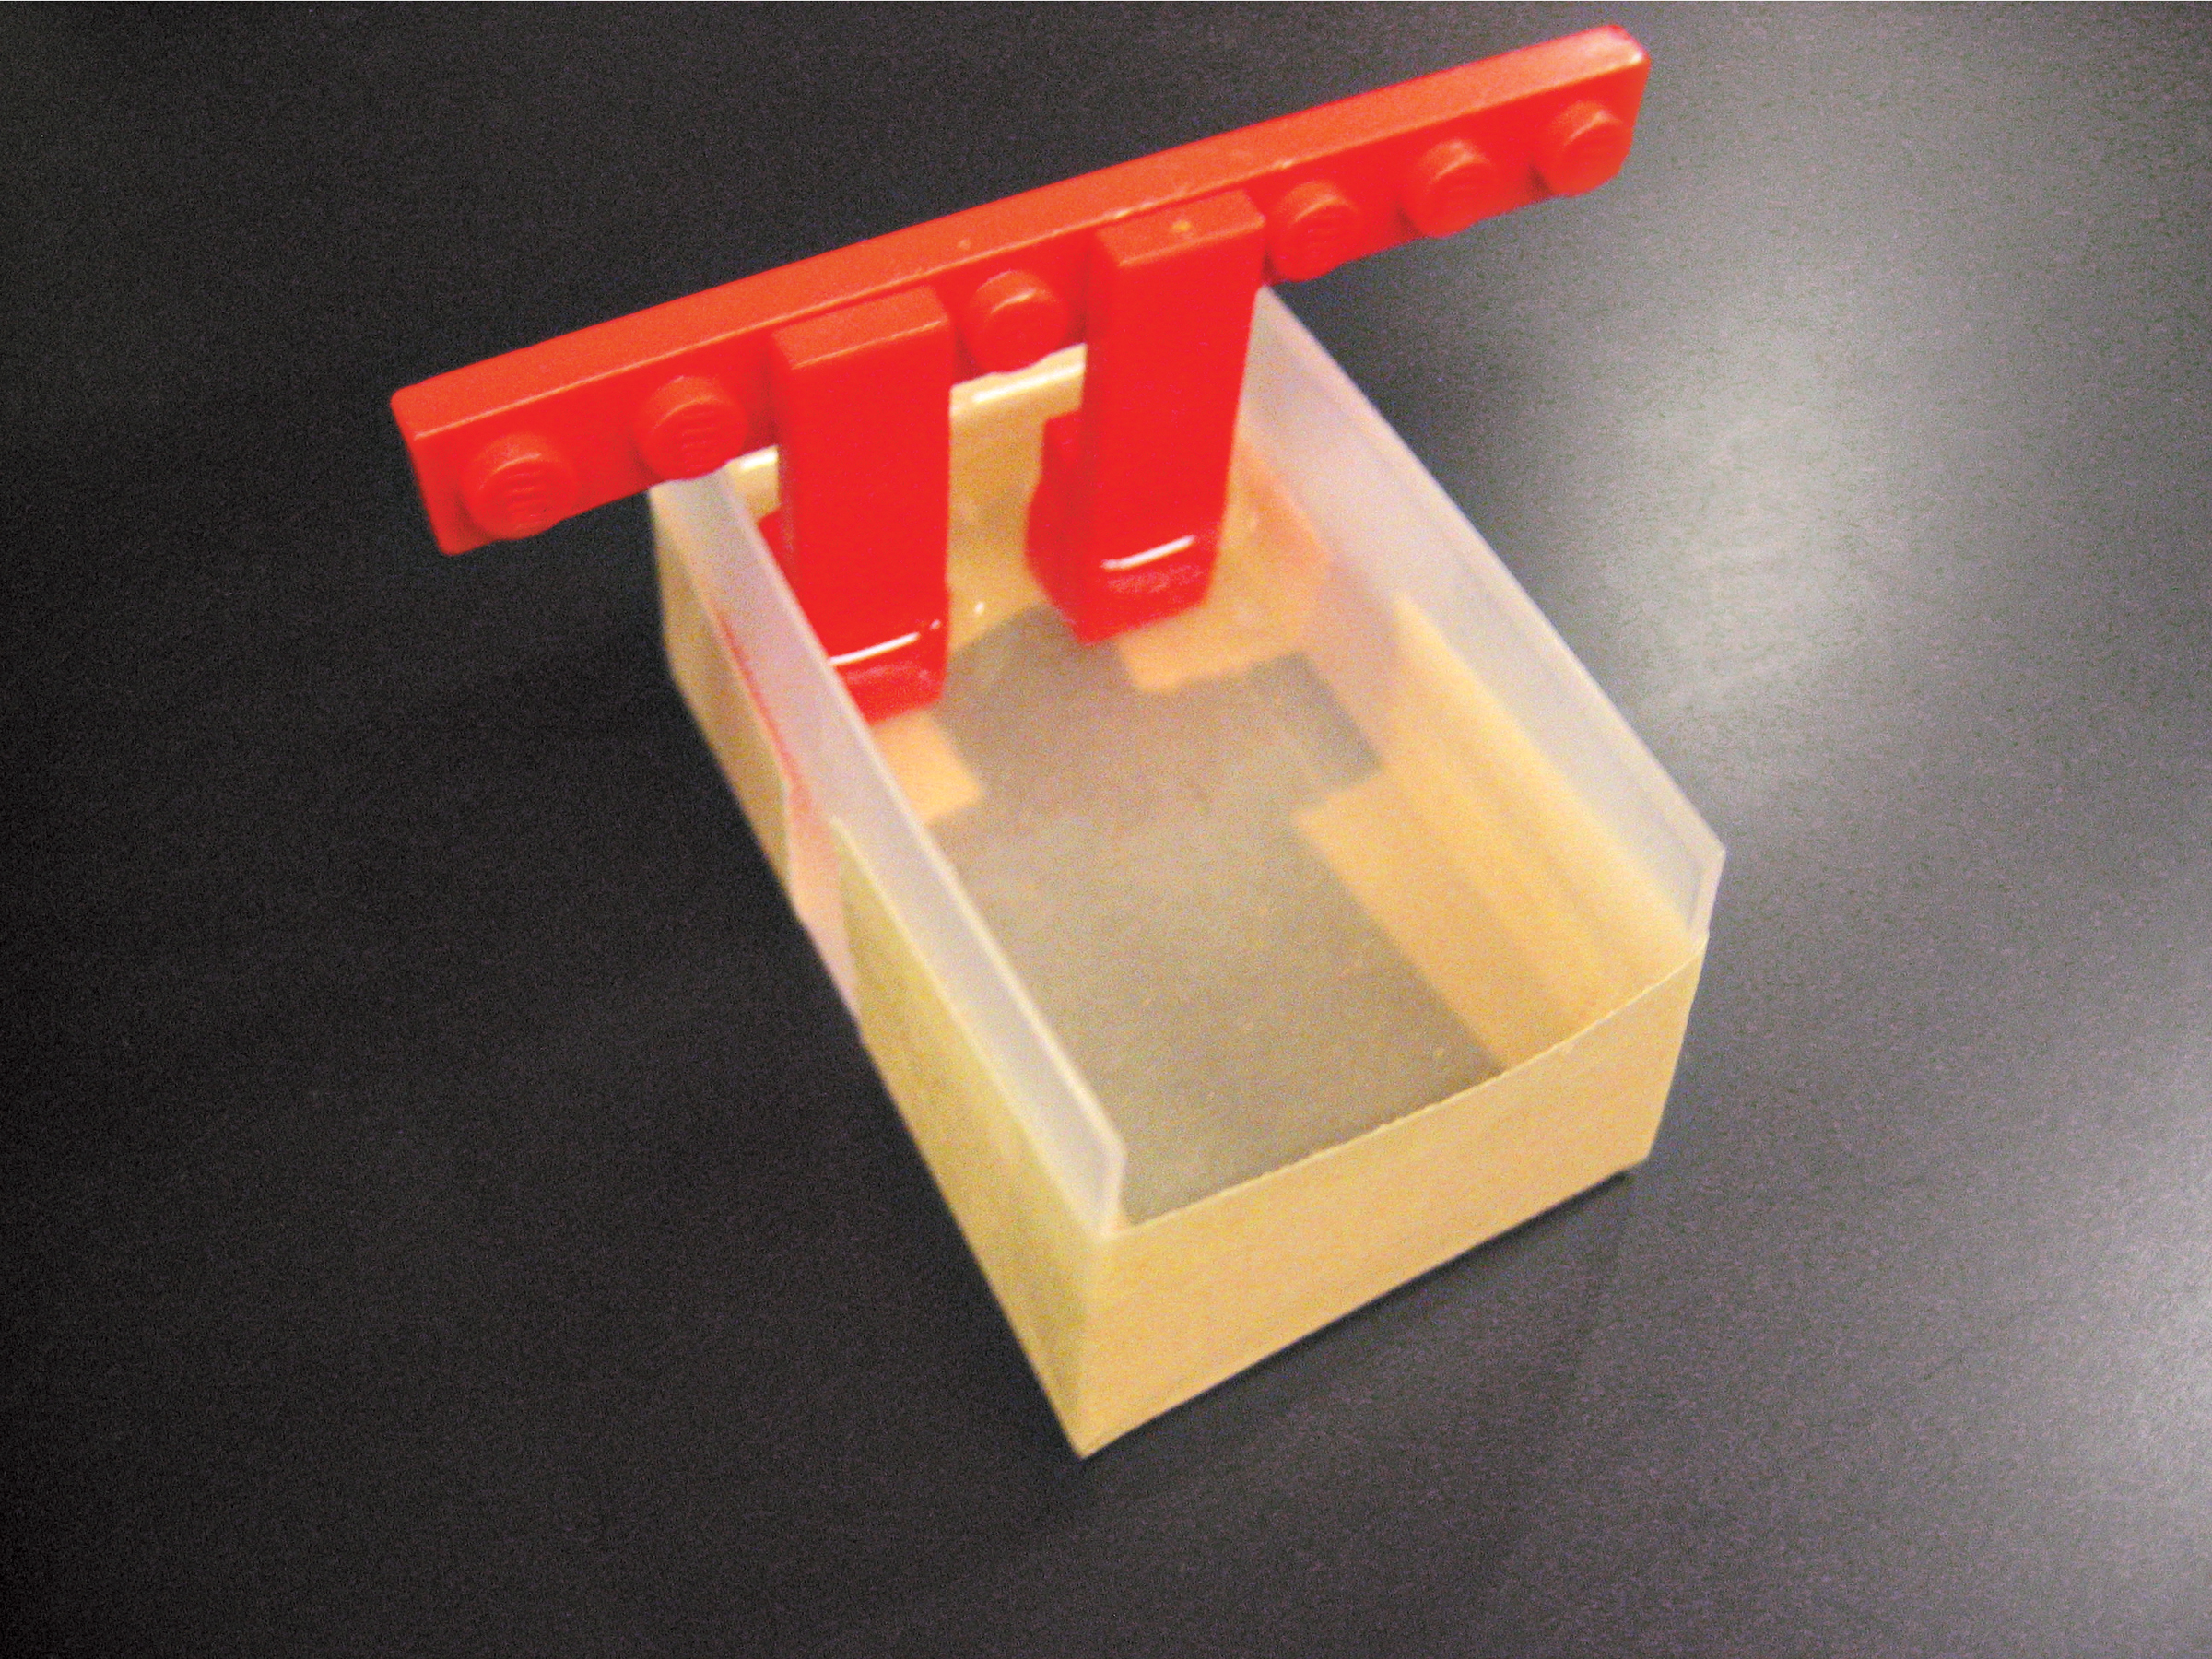
The box consists of 2 nested containers. An inner “casting chamber” contains the gel itself and sits in the running buffer inside the outer “buffer chamber.” Two opposite ends of the casting chamber are open to give the gel direct contact with the electrolytic buffer. Two corresponding electrodes in the buffer chamber electrify the liquid across the 2 ends.

We built our box in 2 ways: using half of a plastic travel soap dish inside of a larger rectangular Tupperware container, and using the lid of a plastic slide box inside a box made of Lego blocks and lined with Glad Press ’n Seal wrap to prevent leakage. In both cases, we cut away the narrow sides of the casting chamber, creating a U-shaped channel. For the electrodes, we ran wire along both ends of the buffer chamber and connected each to a screw as a contact.

Prepare the gel.

The gel needs 2 wells at one end, in which to insert the DNA; we’ll make these by casting the gel around a 2-pronged Lego “comb” sticking down into the casting chamber. Make the comb as shown, then seal the open ends of the chamber with masking tape.

On a hot plate, heat 8g (about 2 tsp) of agar and 125ml (½ cup) of running buffer in a small pot. Stir gently until the agar is fully dissolved and the solution is clear, which may take up to 30 minutes. Pour the liquid into your gel-casting chamber to a thickness between 0.5cm to 1cm. Hang the comb into the gel at one end and let the gel cool. After it sets, remove the comb and masking tape.

Prepare the DNA.

Use a wooden toothpick to spool up the DNA from the extraction step. Mix 7 parts rubbing alcohol to 3 parts water in a small container, and dip the DNA “snot” into this solution for a few seconds. Air-dry the glob on the toothpick for 10 minutes, then scrape it into 75ml (3 droplets) of running buffer and allow it to dissolve overnight at room temperature. Add 1 drop of loading buffer, and your sample is ready to run.

Run the gel.

Load as much of your DNA sample as possible into the wells of the gel. Put the gel-casting chamber into the buffer chamber and cover it with running buffer until it’s fully immersed, with 0.5cm of fluid above the gel. Connect the electrodes to 5-7 9V batteries, wired in series. Since DNA is negatively charged, be sure to position the positive electrode at the end opposite the wells.

Let the race begin! The batteries should supply enough power for a 3-hour run, but the exact timing depends on the dimensions of the gel, buffer chamber, etc. The smaller the chambers, the faster the run (due to less resistance). Do not stick your finger into the fluid during the run. You can check if the circuit is complete by looking for bubbles forming on the positive electrode.

Stain the gel.

Make a 0.02% solution of Methylene Blue in distilled water; some aquarium supply and pet stores carry Methylene Blue in 2.3% solution, so you’ll need to dilute this at about 12:1. Immerse your gel chamber in the solution overnight at room temperature. If all goes well, you should be able to see at least one faint band of DNA from your cheek cells.

This DNA “fingerprint” process is not good enough to match a sample with the person who submitted it, but it could probably be used to determine whether the DNA came from a human rather than, say, banana. In fact, you can make a fingerprint using banana or bean DNA and compare the differences with the cheek-cell sample.

Conclusion

This project first appeared in MAKE Volume 07, page 65.