H_webgun_fig-10_r

This article appeared in the Make: Halloween issue.

Halloween is a time to cast off the gleam of the new and put on the musty mantle of the old, the creepy, the decrepit. Nothing says “unused and uncared-for” like cobwebs, that dusty detritus of spiders gone by.

But how do you create cobwebs for your party, to turn your sparkling living room into a gloomy crypt? Short of training spiders to do your bidding, you must turn to artificial means. You can find clumps of polyester cobweb in bags around every corner when the Halloween season strikes, and if you spread it thin enough, you can create an acceptable effect. But we can do better.

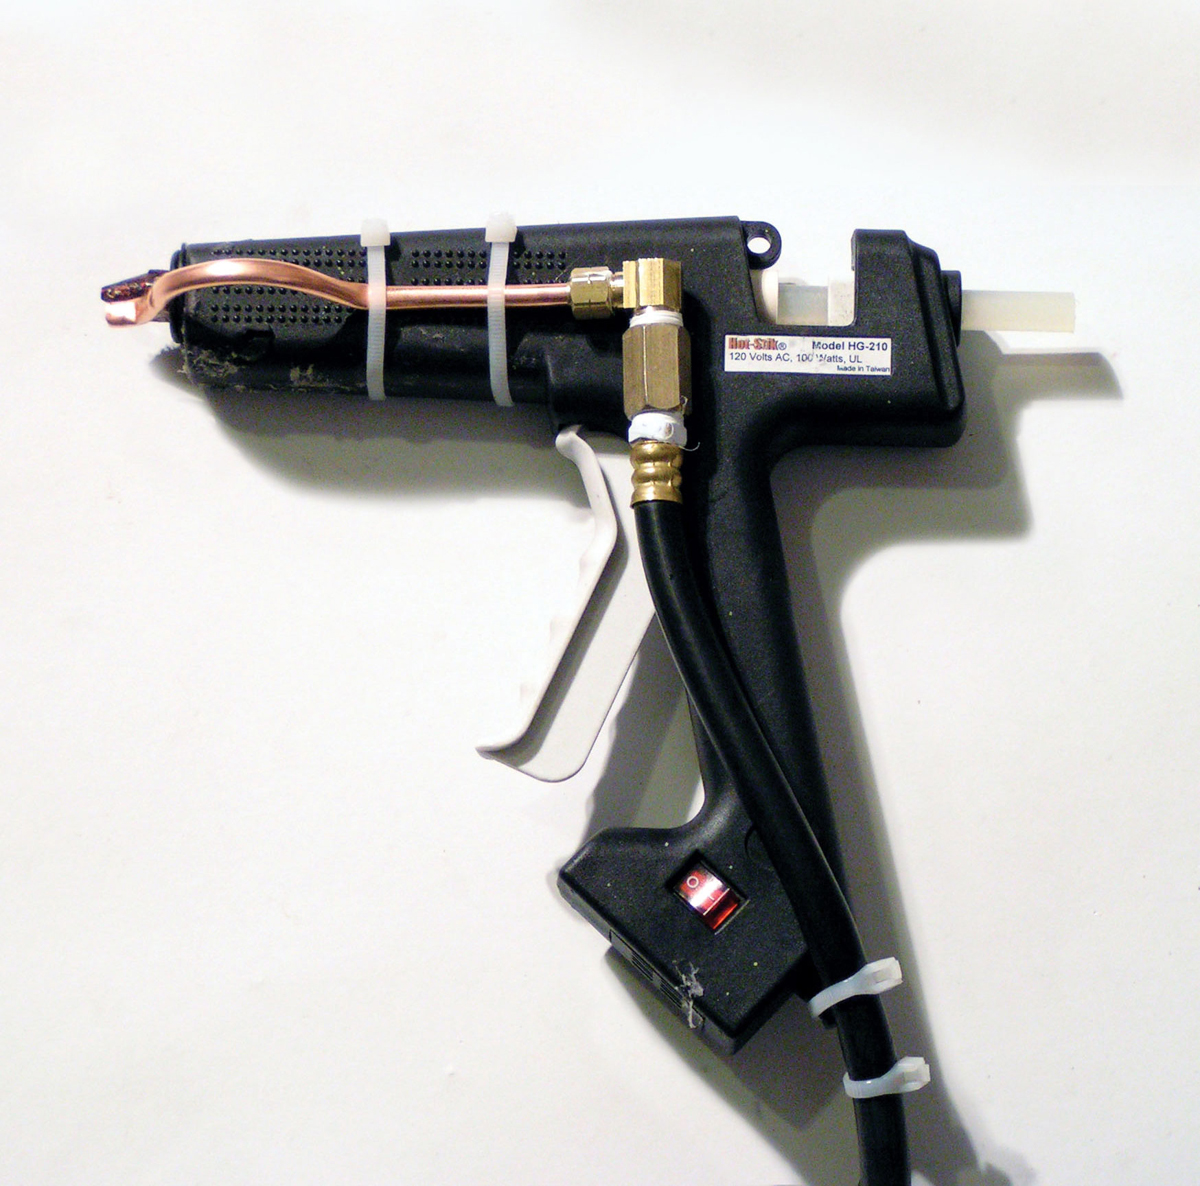
The traditional web spinner uses a small fan blade, a little tin of goop, and a powerful hand drill to blow filaments of glue onto your scenery. This creates a detailed web, but the device is prone to clogging, and the resulting web is delicate, unlikely to withstand the rigors of weather or the attention of your guests. For a bright, durable, and visible web, we turn instead to the venerable hot glue gun, a staple in every home craft drawer. Using compressed air, you can blow thin filaments of hot glue into delicate tapestries of webbing.

Project Steps

Shape and trim the air line.

The first step is to bend your copper air line into a convoluted shape. The output of the line must be next to the glue nozzle, and slightly (1″ or so) behind the nozzle tip, otherwise hot glue will clog it.

There are 3 ways to run the air line on the glue gun: 1) take apart the gun and run the copper line inside, from a hole in the bottom of the handle to a hole just under the nozzle; 2) run the line straight up to a 90º angle connector at the top of the handle, then straight forward to the nozzle, bending it so it comes out beside or below the nozzle; 3) run the line through a roller coaster of curves, up along the handle, across the body, then under the body of the gun (where it will be attached) and around to the nozzle. This is the approach shown here.

However you route the air, you will operate the web gun with the air coming out below the glue, not to the side or above it. The glue drips down into the airstream and is blasted into fine threads, cooling as it goes, until it strikes (and sticks to) your target.

Since the copper line does not bend very sharply, all of the corners end up being large, giving a retro look to the system. But some sharper bends can be created with the assistance of the hole in the handle of your crescent wrench.

Mark the air line where you’ll trim it — just beyond the bottom of the handle, and where it stops behind the glue nozzle. Then trim the air line.

NOTE: Removing the spring bending tool from a sharp corner in the tube is difficult. I ended up “unscrewing” the spring — twisting it to make it expand — and then inching it off the tight bends.

Route the air line.

For a permanent web gun, you can route the air inside the body of the gun, or attach it to the outside with hose clamps. I use the gun as a web shooter just briefly each year, so I attach the air tube with zip ties, which I can cut when I’m done.

Wrap Teflon tape around the (male) threads on both fittings and screw them into the valve. Tighten with crescent wrenches: snug, not stressed. Pull out the compression fitting insert and cap (top left).

Use the triangular deburring attachment on your pipe cutter, or a rasp or other smoothing tool, to clean up the receiving end of the copper air line. Slide the compression cap onto the copper line, and press the insert into the line. It’s shown partly inserted here (middle left); stuff it all the way in.

Now screw the compression cap onto the previous assembly, completing the air pathway. Make sure the valve is easy to control with your off hand while you’re holding the gun in your dominant hand. Tighten the compression fitting very well; this is a point of weakness in the assembly. A wimpily tightened fitting will slide right off the copper air line, which inhibits the correct operation of the web gun.

Assemble the web gun.

The positioning of the pieces is shown at middle right, with the air coming out below the glue nozzle and the air line running down the handle. There are no zip ties holding the copper line to the handle in this particular web gun, because the squeeze trigger cleverly slips into the handle during operation. Instead, the air line is stabilized by the hand holding the glue gun. My right hand holds the gun and squeezes the trigger, while my left controls the air flow with the valve.

Shoot webs!

First, let the glue gun heat up and turn on your compressor to let it charge its tank. Attach the compressor’s air line to the gun. Turn on the air to about 30psi. Load a glue stick and point it at your target, standing 10 feet or more away. With one hand, turn on the air at the web gun, and with the other, slowly squeeze a thin trickle of glue. Wave the gun around gently, wafting webs into complex tangles. If the web plasters itself flat against your target, stand farther away or use less air. If the web falls to the ground, reverse this correction.

CAUTION! Be aware that hot glue is hot enough to hurt you. Unless you don’t love the skin on your fingers, wear leather gloves while operating the web gun. Don’t fire this stuff toward anything alive or delicate. A well-placed web will come off most surfaces, but if you get careless and too close, the glue can damage plastic items, meld into cloth, and generally wreak havoc. Test in a discreet corner before going wild with it. Don’t web across open flames. If you use this webbing in a public haunt, research which hot glue stick is not flammable. Remember, safety first.