2018 is the 50th anniversary of the introduction of Hot Wheels, Mattel’s line of die-cast toy cars. You can celebrate in true maker style by creating your own customized Hot Wheels car.

Hot Mods Contest for Make: readers! Submit photos of your custom Hot Wheels by Nov. 30, 2018, and official Mattel Hot Wheels designers will judge the winners and award cool HW prizes. Go to the contest page to enter!

1968 was a huge year for the toy business, with many best-selling (and still well-known) toys like Easy-Bake Oven, G.I. Joe, and games like Operation and Twister. But no toy is bigger than Hot Wheels in total number sold — over 4 billion to date!

Back then the world of die-cast cars was pretty tame, with realistic scale models of sedate sedans, dumpy trucks, and a few race cars. British toy company Lesney sold their Matchbox 1/64 scale vehicles in a “matchbox” package; very cute, and focused on collecting. Mattel revved up the toy car business with their revolutionary new approach, stressing bold new designs and performance.

The original Hot Wheels cars had special low-friction Delrin bearings in mag styled wheels. Instead of straight pieces of stiff wire, Hot Wheels had flexible, thin wire axles formed to act as torsion bars, giving the tiny cars a functioning four-wheel, independent suspension. To really show off the speed and performance, Mattel engineers also created the iconic flexible orange track along with motorized boosters, high-speed banked turns, jumps, and loop-de-loops.

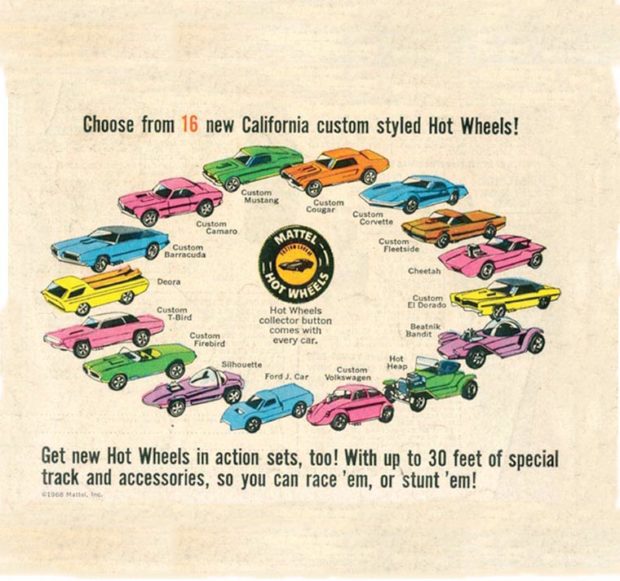
Just as revolutionary as the technical designs were the aesthetics. The cars were painted with wild “Spectraflame” paint, in transparent candy colors that let the die-cast metal gleam and sparkle. The original car designs included Camaros, Firebirds, Mustangs, and famous custom show cars like the Silhouette, Deora, and Ed “Big Daddy” Roth’s Beatnik Bandit. When the first prototype car was shown to Mattel founder Elliot Handler, he said: “That’s one set ofhot wheels you’ve got there!” The name stuck.

Mattel also revolutionized the marketing of die-cast cars with exciting promotions. Kids were thrilled to re-create the exciting drag strip battles between real-life rivals Don “The Snake” Prudhomme and Tom “The Mongoose” McEwen on their bedroom floor, complete with popping drag ’chutes!

Today, the original sixteen Hot Wheels cars (called “Redlines” for their red sidewall tires) are treasured by collectors. The holy grail of vintage Hot Wheels cars is the limited-run Beach Bomb VW surfer van prototype with rear-loading surfboards. One famously sold for over $100,000 and was featured on PBS’s Antiques Roadshow.

CUSTOMIZE YOUR HOT WHEELS CAR

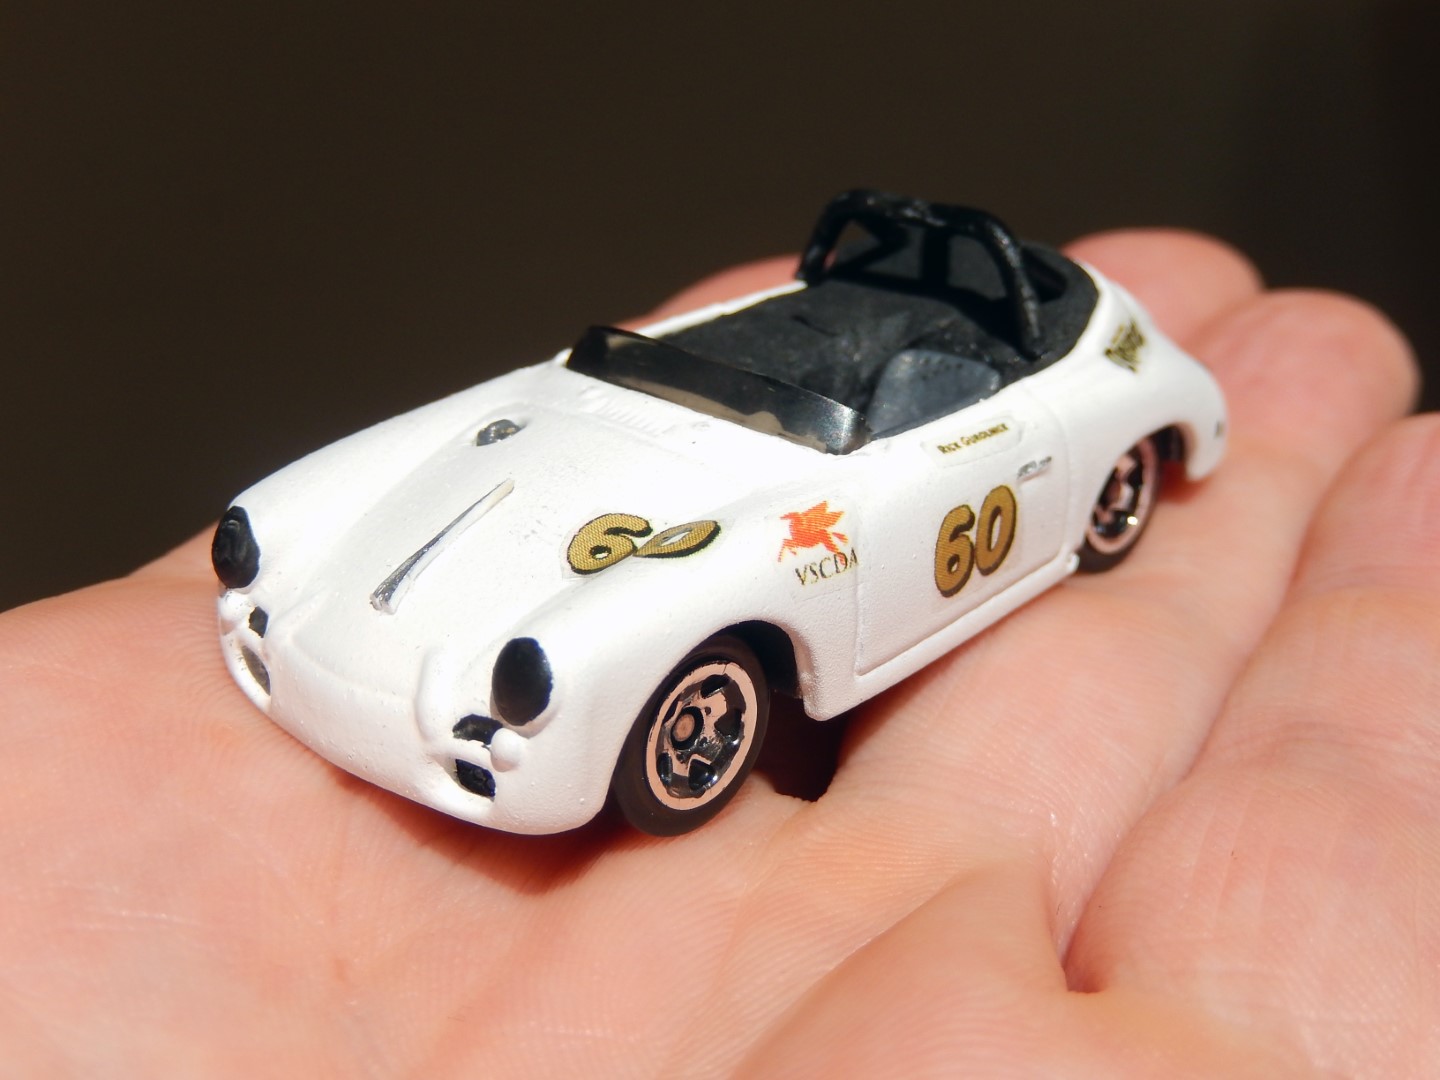
Ready to mod your ’rod? Here’s an example of an easy project to help get you started. My toy invention business partner, Rick Gurolnick, races in this 1960 Porsche 356 Speedster.

Its number 60 and “Doctor Dreadful” livery are well known on the vintage racing circuit. I wanted to make a tribute Hot Wheels version of his car, and fortunately Mattel produced a vintage Porsche that I could use as a starting point.

It was a coupe, so I needed to remove the roof, cut down the windshield, scratch-build the roll bar, as well as paint and create custom decals.

What will the next generation of Make: look like? We’re inviting you to shape the future by investing in Make:. By becoming an investor, you help decide what’s next. The future of Make: is in your hands. Learn More.

Project Steps

1. Remove the packaging

I wanted to be able to put the finished car back into the original blister card, so I needed to remove the car without damaging the packaging. How? Brush acetone (nail polish remover) on the backside of the card along the bottom and sides where the vacuum-formed blister is glued on.

Apply liberally and let it soak in, right through the card. The acetone will gently dissolve the glue without affecting the printing. I left the top edge glued on so I could replace the car later.

2. Drill out rivets

Hot Wheels cars are fastened together by “heading” the posts of the metal body, mushrooming them like a small rivet. To disassemble, place the car on a soft towel and carefully drill out the rivet heads.

Start by punching a divot with a center punch, then use a large drill with a shallow drill angle so that you remove just enough of the top of the post to release the car body.

That will preserve most of the post for reassembly. Use a center drill instead of a twist drill for more control and minimum material removal.

3. Disassemble

Once drilled out, disassemble the car parts. This car has a separate interior, body, chassis, and plastic windshield.

4. Cut and shape

o remove the car’s roof I used a jeweler’s saw.

Hot Wheels cars are made of zamac, an alloy of zinc, aluminum, magnesium, and copper. It’s soft enough that you can cut, grind, drill, and sand to make the modifications of the metal body.

I also cut the plastic windshield down as shown in the next step.

5. Create your own custom parts

The real race car has a tonneau cover, so I used some Sugru to fill in the passenger side of the interior and build up enough to make a cover.

The black Sugru has a nice matte finish that’s just right.

I hand-fabricated a roll bar from pieces of 1/16″ plastic rod. I used a candle flame to carefully heat and soften the rod just enough to bend, then held it at the needed angle until cooled and set. I used MEK to solvent-bond the rod pieces together to make the roll bar and supports, then painted it with flat black paint.

6. Paint

The real race car’s basic body color is white, so I sprayed some primer and solid white enamel paint on the body. I brushed on a few painted details with black, silver, and red enamel paint.

I also fabricated a tiny hood handle from bent styrene sheet, painted it silver, and super-glued it in place.

7. Reassemble

Press the body posts back into the chassis holes. Often there’s still enough friction and material in the posts to hold the car together gently for display. For a more rugged assembly, drill and tap holes in the post and reassemble with 2-56 screws.

8. Do decals

To make the decals, I found images online of the Mobil Pegasus and other logos, and created text images for the numbers and driver name in a matching font. You have to print these on a special laser printer decal sheet, because inkjet inks aren’t waterproof.

Trim the decals, loosen in water, and slide into place on the car — done. Looks just like the real car!

Here’s the final result, back in the original package and with a collector protective clamshell, ready to display. And you can still open up the package for play.

REV UP YOUR RIDE

Now it’s your turn! Which cool custom Hot Wheels car will you make? A gleaming metal flake show car? “Rat rod” street racer? Lowrider with custom spoke wheels? Post-apocalyptic monster truck? It’s up to you!

And Happy 50th Birthday, Hot Wheels!