SCplanet

I decided the best way to make a cost effective alien spacecraft would be to appropriate parts and shapes instead of sculpting or 3D printing them. I used recycled materials and some creativity.

First, determine the overall look of your spacecraft so you can envision the end product when searching for objects you can use in its construction.  The local thrift shops or dollar store are great places to start. I bought many types of toys and other plastic items I envisioned could be used in the construction of my spacecraft. It is amazing how many ways you can repurpose every day items for the construction. I used just sections of toys, PVC & ABS pipe, sprinkler parts, and hardware to give a completely new and original look for my spacecraft.

An intermediate to advanced degree of creative skill and craftsmanship is required to get the quality shown. Here are the basics to get you started, but the design and level of detail is up to you.

And to really get into spirit of this build, you might want to have my alien rifle nearby.

Project Steps

Decide who will fly your spacecraft

Conceptualize the life form that would fly the spacecraft and the planet from which it originated.

This will help you focus on the feeling and look of your spacecraft. To give it a cohesive look, I decided that my alien would be a cross between a human and amphibian in appearance.

Shown are two latex masks which I created to depict the alien creature that I envisioned would potentially fly my spacecraft. The one on the left is a warrior and the one on the right is the aristocrat.

Research material and concept design

Look at other spacecrafts that exist to give you ideas and see how others have interpreted flying machines. I chose to have my craft have organic influences in the design. So I looked at insects and aquatic life for inspiration.

Organic influences blended with the mechanical

Since I decided the alien would be a cross between a human and amphibian in nature, I wanted the spacecraft’s shape to be sleek and graceful like a manta ray or squid.

Sketch your idea

Sketch your spacecraft design so you have a clear vision of what you are going to make. This will help keep you focused while you are looking for recycled materials to build your craft. Keep an open mind when fabricating your craft. You may discover materials and objects that work well for the construction and give you other ideas that may change your initial concept. Be flexible.

Build the basic structure

The foundation for the spacecraft is made with .060-styrene sheeting. I drew out the graceful shape I wanted to cut out. The two pieces of styrene were sandwiched together with double stick tape so that they could be cut at the same time on the band saw. This gave two pieces that would fit perfectly together. Then the edges were glued together with Cyanoacrylate (super glue). When dry, a wedge-shaped piece of plywood was inserted to make the dome of the spacecraft. This also allowed a place to have an anchor for holding and displaying when completed.

Examples of recycled materials used

A variety of plastic parts, fence post end caps, showerheads, sprinkler parts, wall anchors, toys and other found objects were used. For example, sheetrock wall anchors became gun turrets. It is important to keep in mind the scale of the items you use on your ship. They need to be relative to the rest of the craft or they will look out of place.

Building the complexity

Here is where you need to think about the working of the spacecraft. How it will fly? Where will the engines be? Does it have weapons or not? Then, strategically place the parts to give the illusion of these functions.

I found after researching planes and other flying machines that the majority had a symmetrical design to keep an even weight distribution. This engineering concept was followed and made my spacecraft symmetrical and balanced in its design.

Painting

I painted the base coat of the ship nickel silver and then added accent colors, gave it a weathered look in addition to some battle scars.

Wiring and battery compartment

I decided early on that I wanted to have lights as thrusters, and that I wanted to be able to dim and brighten the lights with a rheostat. I made the tail of the ship have a panel that could be removed, so that I could access my wiring and batteries. I also had blue lights for the windshield and windows. In addition, I had a series of yellow lights that could blink. This all helps give the spacecraft a feeling of energy and intelligent life piloting the controls.

Completed spacecraft views

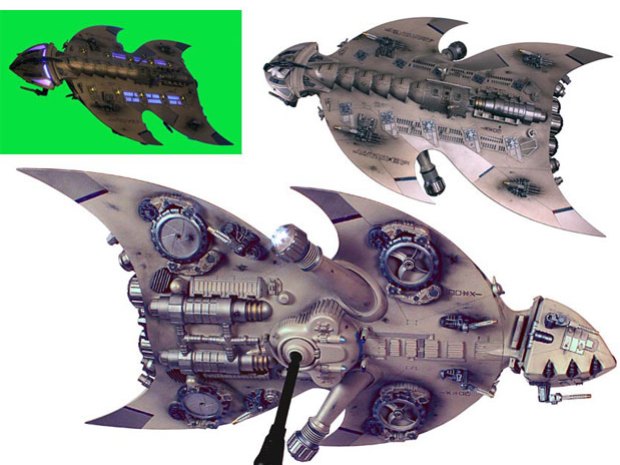
Here are some images which show the different views of the spacecraft. The top and bottom view and an angled view showing the lights on.

If you would like to see more of my work go to

www.stevewynessdesign.com