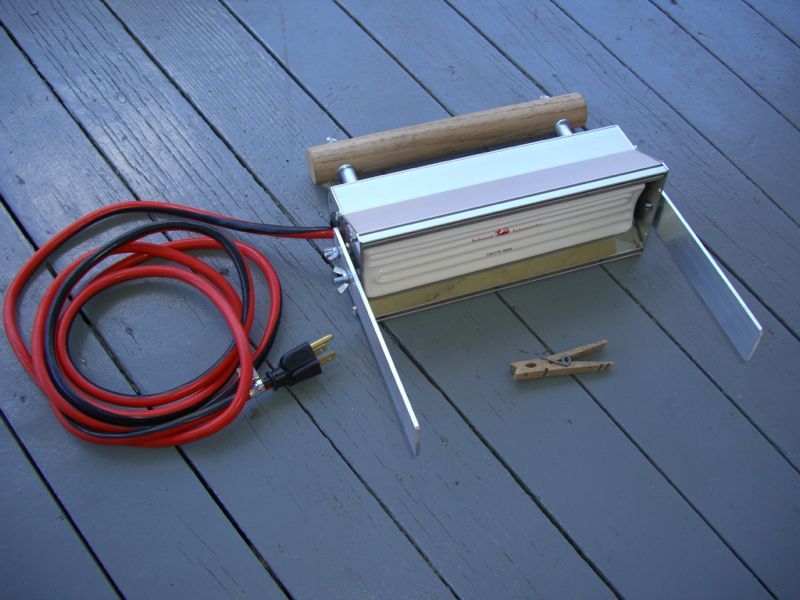
A modern method of removing paint from wooden surfaces is the use of infrared rays. This method has gained popularity over the past decade as an alternative to mechanical and chemical methods of removing paint. Mechanical methods such as sanding, grinding, or shaving usually increase hazards such as lead dust. Chemical solutions minimize the lead dust but result in a gooey mess that requires cleanup and more chemicals for neutralization. Infrared paint removers ofter an alternative which minimizes dust and eliminates chemicals. When exposing a painted surface to infrared rays, the rays penetrate the paint, warm the substrate below the paint, thus releasing the paint’s grip. In practice, the infrared paint remover (IPR) held over a painted spot will cause the paint to slowly bubble and lift, making it easy to scrape it off with a scraper. IPRs are seen most often used by people restoring old houses or windows. They are, however, increasingly seen used in a variety of applications. The disadvantage of an IPR is that it is not guaranteed to be effective in every situation. See the conclusion of this article for more detail. IPRs are most effective on thick layers of old paint, especially aligatored paint. They do not work well on calcimine, milk paints, and will not remove shellac or varnish.

Note that IPRs are not the same as “hot plates,” which heat paint via convection. Hot plates scorch and boil the paint through proximity to a heated element. That method risks scorching the wood substrate and releasing toxic gases. IPRs rely not on convection, but mostly on radiation. The goal is to penetrate paint and warm the substrate (wood), releasing the bond between paint and wood, slowly, without raising the temperature high enough to vaporize lead. When you stand at a sunny window on a cold winter day, and you feel the sun’s heat on your face even though the air outside may be zero degrees, you are being heated by radiation. In such case, energy is transferred directly to you and not via physical contact with an warmer object (conduction), nor using air as a carrier of heat (convection).

In August of 2004, frustrated at the high cost of commercial Infrared Paint Removers (“IPRs”), I cobbled together a home-made unit using a quartz heater and some miscellaneous hardware. I wrote up a small page outlining my experiments for the benefit of other old house restorers out there. The response was unexpected. It seems there are many out there like to tinker, save $, and DIY.

Here now is Version 2 of the IPR. Having traded my original scratch-built quartz unit for a Herbeau fireclay sink, and in need of an IPR, I elected to investigate this new and promising modality of paint removal: ceramic infrared.

Theory:

Commercially sold IPRs use quartz rods to generate infrared rays. My unit would be based on a ceramic emitter instead. Why ceramic? One reason is that a ceramic unit would be easier to build with fewer parts. Commercial ceramic emitters are readily available. Efficiencies for ceramic emitters run from 85 to 96% whereas quartz ran around 60%. Therefore, a higher percentage of the energy supplied to the unit would be transmitted as infrared rather than light. Quartz rods tend to have infrared hotspots. Cermaic on the other hand, produces a more evenly distributed heat.

The Unit:

Anyway, yet again, this is the time to point out some safety issues and make a disclaimer. Making your own IPR involves electricity. The project involves wiring as well as drilling, sanding, and cutting. (jeez doesn’t sound too bad) I am not advocating that you run out and build one, I am presenting my method here for your review. If you do make one, you do so of your own accord. If you electrocute yourself, or burn your house down, well, hey, that’s life, and your own responsibility. I am comfortable with the potential hazards. You may not be, and I urge that if you should make one anyway, you proceed with safety in mind and a good dose of common sense.

Thus my intention to build a new, ceramic based, IPR for the same or less money.

What will the next generation of Make: look like? We’re inviting you to shape the future by investing in Make:. By becoming an investor, you help decide what’s next. The future of Make: is in your hands. Learn More.

Project Steps

The first step was to order the ceramic emitter and gather some of the other parts that would be required to get this show on the road. The emitter I selected was a Salamander FTE module. This particular model (FTE-120-1000) is specified to operate at 120 volts. The emitter is manufactured by Mor Electric and can be purchased on their website.

Conveniently, Mor also offers reflectors and housings designed to fit their ceramic emitters. These housings are designed to be affixed to some stationary object like a wall or inner oven surface. With a little finagling, we will convert it to our use. Shown below is the housing/reflector as it arrived from Mor.

The reflector is in the center and is of polished stainless steel. The housing is made of extruded aluminum.

The housing and reflector are shaped and designed for the type FTE element shown previously. You can see that the housing has a ceramic terminal block installed. This makes it very easy to wire the element to house voltage.

The cap cover for the housing is seen in the previous image. This plate has grooves which slide onto the housing, covering the ceramic terminal block and wiring. All is held together by the end plates (steel). One end plate is seen at the left of the image above, the other end plate is affixed to the housing.

To help visualize it, here is an end view with the reflector installed into the housing.

Confused about how it all goes together? Don’t be. Let’s take it apart and start putting the pieces together in sequence. We have paint to strip.

The first step is to install the ceramic emitter into the reflector. Shown here is the backside of the ceramic emitter poking through the hole in the reflector. The hole of the reflector is designed to accept the “knob” of the emitter.

The knob has the two leads poking out of it. The knob also has grooves which allow it to be clipped in place using the supplied clip.

The clip is the only mechanical fastener for the emitter. It is sufficient to hold it securely in place. Any blunt trauma to the unit great enough to dislodge the clip would likely break the emitter first.

The leads emanating from the emitter are part of the emitter itself. They cannot be removed. They are metal wire encased in small interlocking ceramic insulators.

Be careful with these. It you bust one off then you’ll be breakin’ out that Mastercard to order another emitter. Shown here, the assembly is simply turned over, so you can see the front.

OK, we’re going to set aside the emitter/reflector assembly for a moment to concentrate on preparing the housing.

This image shows the housing flipped over, and a thin bed of fiberglass insulation is placed in the bay which will receive the reflector. I grabbed a handful from a roll of R13 wall insulation I had lying around. The housing has two holes for the leads. The insulation is cleared from covering these holes using the point of a pencil.

We’ve now hit the meat and potatoes of the assembly operation. The reflector/emitter assembly is inserted into the housing.

This can only be done one way. The leads from the emitter are first gently pushed through the holes in the housing. Then, the reflector’s studs are inserted into the housing’s holes. Two nuts (supplied) are placed on the studs to secure the two assemblies together. In the image I am tightening these with a nut driver.

Now we can turn the unit upright and begin to work on the electricals. Shown here, the emitter leads are secured into one side of the ceramic terminal block.

You can see the two nuts holding the reflector assembly into the housing. You can also see that one end plate is affixed (the housing/reflector comes assembled, I never removed it). You can also see the green ground lug next to the terminal block. This will come into play in a moment.

Next we remove the one end plate from the assembly, and modify it along with the other end plate. First we are going to install a grommet in the end plate that will hold the power cord. These images show the grommet before and after installation. The plates come from the factory with all the holes shown in these images.

The large hole holds a 3/4″ ID grommet very nicely. Only the plate through which the power cord will pass is fitted with a grommet. The other plate is left as is.

“Height adjusters” are the projections that keep the IPR sufficiently away from the wood being worked on. For this design, I elected to place these on the ends of the unit rather than along the sides, as is traditionally done.

I opted to do this because it is easier to place them on the ends rather than work them into the angles of the housing. We’ll get into the height adjusters more in a bit, but for now, we must prepare the mountings for them on the end plates.

The three images here show the end plates being drilled for two screws which will hold the height adjusters.

Let’s prepare the power cord. Mine is a medium duty from Home Cheepo. You must use a medium or heavy duty cord that includes a ground wire. Grab it by the neck, hold it down on the bench, and cut the head off. Don’t hesitate or you’ll get that twinge of guilt so common when ruining a good extension cord.

Separate the wires and strip 3/8″ off each one.

Here I am dry-fitting the end-plate without the grommet. This one goes on the end away from the terminal block. I removed it again shortly thereafter. The screw studs face outwards.

Next we take the grommeted end-plate and thread the power cord through it. Then we affix the power cord to the housing using an insulated wire clamp. We secure the black and white wires to the terminal block. White and black can go in either connector. The green ground lead is then secured to the green ground screw.

Try to arrange the wires so that they contact the housing as little as possible. The housing gets very hot, and I am concerned about the AC wires touching the housing. I intend to sheath the wires in Teflon tubing and will update this section when I do.

At this point you might be wondering where the power switch is. I’ve elected to eliminate the power switch. The unit is turned on or off by plugging it in. This approach has several key advantages: there is no chance the unit will be accidentally turned on; there is no voltage at the unit when it’s off; one less part to buy.

As for a fuse, I’m investigating ways to implement it into the power cord. In the meantime, I always make sure that the AC outlet is properly grounded. I never assume. A three-dollar outlet tester from Home Depot does the trick.

As with the quartz-based IPR, the primary safety net is grounding the chassis and ensuring that the AC outlet used is properly grounded.

The secondary safety nets are a fuse and the handle. Local fuses tend to be used to protect appliances. This “appliance” doesn’t really have any components to protect but it’s nice to know it’s there in case the ground fails and/or the house circuit breaker is slow to act.

Thirdly, as you’ll see below, in case all else fails, the handle is made from a non-conducting material (wood).

It’s time to slide the aluminum cover “cap-plate” on. This cover has internal channels that engage the edges of the housing. Slide it all the way on.

Now we can install the handle. The image here shows the two factory supplied mounting studs with their cam nuts. One is shown slid into the housing cover:

In order to elevate our handle off the housing, the studs will have to be a bit longer. I cut two studs from 1/4-20 threaded rod. Each stud is 3.25″. Shown here, the old and the new. Both are shown threaded into the cam nuts, with some washers and nuts thrown in for good measure.

The handle is a piece of oak dowel, 1.25″ diameter. It is cut to 10″ long to match the length of the housing. Here the holes are drilled in the handle using a jig (sorry, no drillpress). A small bit is used first for accuracy, then a bit slightly larger than the studs is run through.

Next, sleeves are made to cover the studs. They are made from half-inch hollow aluminum rod, from (where else?) Home Depot. Each is 1.25″ long. A quick swipe with sandpaper removes any burrs from the hack saw.

While these sleeves are not strictly required, they add a certain je ne sais quoi to the finished unit, and will hide the only visible vestige of DIY.

Here are the steps for installing the handle hardware: Washer on stud, sleeve, washer…

Then place the handle, and hardware.

At this point I can mention that the lengths of the studs and sleeves were selected to keep my knuckles from touching the housing when I hold the unit. It’s very important that your knuckles don’t touch, as the unit gets very hot. If you have super huge hands you may want to test clearance first. Make the studs longer if required.

The tradeoff is that with longer studs it can be more tiring holding the unit in certain orientations. The remaining end-plate is now attached.

All that’s left is the height adjusters. These I made from some 1.25″ aluminum left over from the previous IPR. I cut each to 7.5 inches long, and drilled holes to match the studs on the end-plates. I rounded over all edges and corners so that these would not scratch any wood work.

These are affixed with wing nuts so that they can be removed if necessary. Like the previous IPR, the height is not adjustable. I never found any need to adjust height once the proper height is found. The first image shows the adjusters and wing nuts.

To be honest, I prefer not to install them. They do add weight (even if just a little). I suggest that you do keep them installed, though; they have the very important benefit of ensuring that the unit is not accidentally placed face-down on a surface where it would more than likely start a fire if left unattended.

With the “adjusters” in place, and more specifically with these adjusters on the ends of the unit, it is almost impossible to place the unit any way except on its side. (If you really try hard you can balance it face down on its adjusters, but if you round off the ends of the adjusters even this will be impossible.)

Conclusion

The ceramic element requires about ten minutes to heat up. When fully heated, the red logo on the element turns black. This unit throws off some serious infrared radiation. Paint sees this thing coming and jumps off the wood in fear. I will add action photos soon.

Caution: the housing gets too hot to touch. Do not touch it when operating the IPR.

There some improvements to be made and concerns about the design. These are things I am working on:

1. The unit gets very hot, and while I have no concerns about the housing and element, I am concerned about the cord wiring. This is why, as I mentioned above, I intend to sheath the cord wires in Teflon tubing. Inspection of the unit after operation has not shown any melted wire insulation, but hours on this IPR are still low. I do not know what the temperature rating of the extension cord wire is. More study required. Also, after each use, I open the cover and inspect the wires. If you make one of these, you should too.

2. The infrared output of this thing is phenomenal. The 1000-watt element I am using almost seems too much. The height adjusters could actually be longer than 7.5 inches. Using a variac, I will lower the operating power and see if performance suffers. I suspect I might go with a 750-watt element from the supplier rather than the 1000-watt I am using now.

Update: The 750W element works fine. I suggest for an all purpose unit, you use the 750W element.

3. The unit weighs 3 lbs. 8 oz. This is a little too much. A weight-loss reduction program might include replacing the steel end-plates with home-cut aluminum ones. A series of holes could also be drilled in the housing itself. Enough holes would lessen the weight and perhaps vent the heat better.

Use: These devices are mainly intended for restorers of old houses and others seeking to remove many layers of old paint from wood surfaces. The thicker and older the paint, the better it works. IPRs will not work as well on fresh paint. Hold the unit over a spot until the paint begins to bubble and lift. Do not leave long enough for the paint to scorch or smoke. You want the least time possible. When the paint has separated from the surface, scrape it off.

Time over spot and Height Adjuster length:

It's very difficult to assign a standard time/riser length to the IPR unit. The reason is that different paint sites require different lengths and/or time held over a spot. The factors that weigh into this are:

  • Age of the paint.
  • Composition of the paint.
  • Thickness of the paint.
  • Color of the paint (white reflects more energy back)
  • Type of wood underneath (density)
  • Moisture of wood underneath

All of the above, and maybe a few I've forgotten, affect the "personality" of the job. You'll find some paints lift very quickly at 7 inches, while others need closer spacing for the same time frame. You may find that some paints just don't lift at all (like calcimine and milk paints). The rule of thumb is to use the most distance that your patience can deal with. The slower you heat the paint, the more the chance the wood beneath has to absorb the heat and release. Also the longer you take (slower you heat), the less chance lead vapor releases, because the paint gets a chance to release before being heated too hot. Due to the differing nature of old paints, one of three things will always have to be variable: the power of the IPR, the length of the risers, or the time you hold it over a spot. I tend to vary the distance so that the job at hand takes about 20 - 30 seconds to bubble a good patch. I have taken to simply removing the risers and letting the nature of the job dictate where I hold the unit, but you can also have 2 or 3 sets of risers on hand. I'd say one set at 5" and one at 4". A three-inch set may be ok, but you want to be careful when you start getting that close. I have seen some paints that would catch fire before they let go; if you need to get 3" close, then the IPR might not be suited to the job. Of course, if you built your unit with only one job in mind, you can cut the risers to suit that job's needs. One of the benefits of a "top heavy" unit is that nobody can accidentally leave it unattended face-down while on, thus starting a fire. If your unit can sit happily, it is a good idea to make a metal "tray" for it to sit in, so as not to burn whatever you put it on. Even after powering it off, it needs a good 10 minutes before it can safely be aimed at something.

I hope you enjoyed my second experiment.