IMG_9142

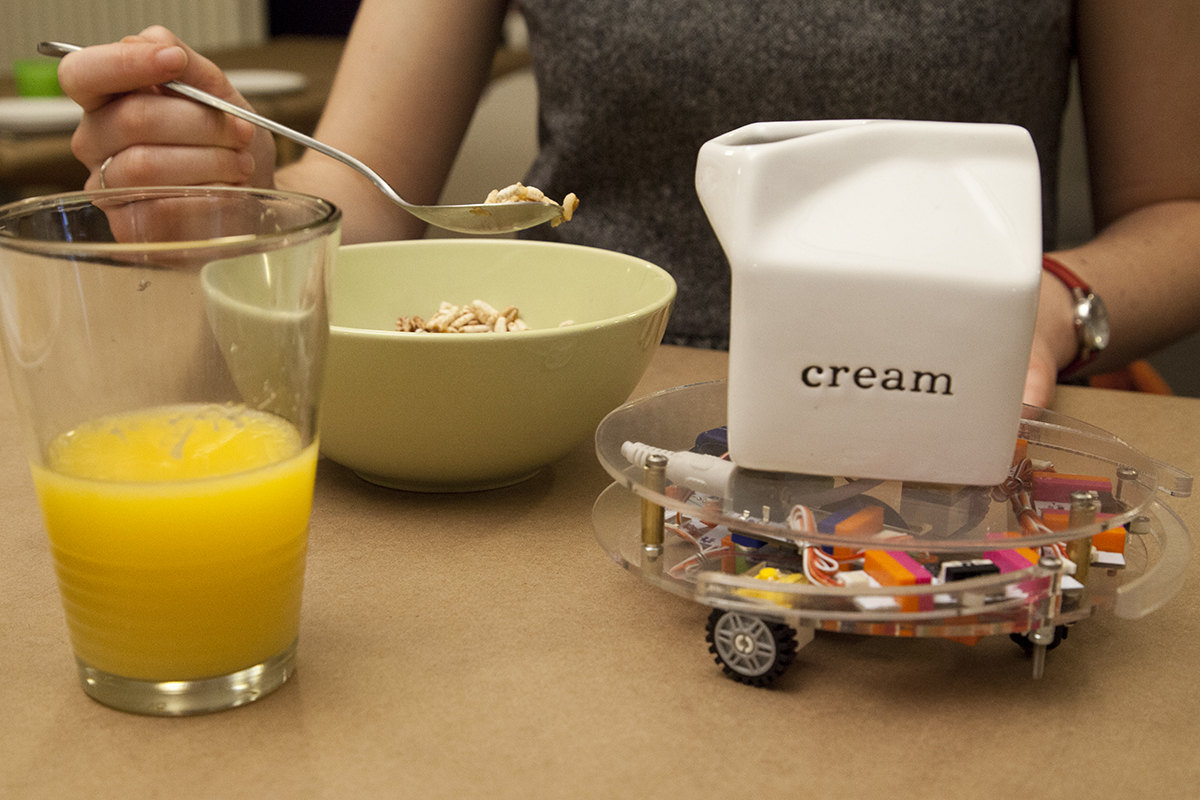
At mealtime, be sure to set out your littleBits Robot Butler. The Robot Butler roams your table and passes out food to your guests so that you can sit back and relax while it does all the work. The Robot Butler moves on a central wheel that is connected to a dc motor and has little plastic arms that activate three roller switches along the perimeter as they bump into cups and bowls, causing the robot to turn and try elsewhere. This happens because there is an inverter in between the first dc motor and a second dc motor positioned on the edge.

The littleBits Deluxe Kit contains a number of the modules that you will need to make a Robot Butler. However, you will need to supplement this Kit with 3 roller switches, 1 extra DC motor, and 1 extra wire module in order to complete the project.

Download template files for this project.

littleBits makes an opensource library of electronic modules that snap together with tiny magnets for prototyping, learning, and fun. Each bit has a specific function (light, sound, sensors, buttons, thresholds, pulse, motors, etc.), and the modules snap to make larger circuits. littleBits are sold in kits, which are available in the Maker Shed.

YouTube player

What will the next generation of Make: look like? We’re inviting you to shape the future by investing in Make:. By becoming an investor, you help decide what’s next. The future of Make: is in your hands. Learn More.

Project Steps

Assemble the circuit

Snap together: power + wire + roller switch + wire + roller switch + wire + roller switch + wire + dc motor + inverter + wire + dc motor.

How it works: The circuit is pretty simple yet still interesting. Three roller switches are in series and are all set to open mode. This means that the circuit is open (the signal is transmitting) when the roller switches are NOT pressed and the first dc motor will be turning. When one of the roller switched is pressed, the first dc motor will stop turning. However, there is an inverter between the first dc motor and second dc motor. This means that the two motors will behave opposite of one another. To recap, when no roller switch is activated (pressed down), the first dc motor is rolling and the second one doesn’t move. When any roller switch is pressed, the first dc motor holds its position and the second dc motor runs.

Learn more about the roller switch

here.

Cut out the body pieces

Cut out the body with all the holes for the Bit feet, wheels and screw positions. You can download our template and laser cut it from acrylic or, in the case that it is difficult to access to a laser cutter, you can print our file on regular paper or film and use it as a template for placing the modules and drawing holes.

Attach the wheels

Attach two wheels to the dc motors and two lego wheels to the bottom face of the lower body. The wheels we used for the dc motors have a 3mm cutout that matches the d-shaft on the motor.

The alignment of these wheels is the secret to how this simple circuit makes smart movements. The wheel on the first dc motor is located at the very center of the circle. When this wheel is running, this and the two lego wheels will be aligned, pulling the robot straight forward. The wheel on the second dc motor is positioned close to the edge of the circle. This wheel along with the two lego wheels are also aligned in a circle. When the outer wheel spins, the center wheel doesn’t move, making it a perfect pivot point, and turns the Robot Butler in circles.

Note: We wanted our Robot Butler to be somewhat small as our table is somewhat small. Our Robot Butler measures 6 inches in diameter. We, therefore, had to angle our outer wheel slightly (17 degrees) so that everything fit is a small space. However, if you have a larger table and are not using our template, you can make the second wheel perpendicular to the first in order to minimize drag when the Robot Butler proceeds forward. (We will leave it up to you to figure out why.)

For more information about the dc motor, check out these

tips & tricks.

Add a 5th caster wheel

Attach a 5th wheel to balance the weight. This wheel should be able to change its direction or it will generate drag both when the robot moves forward or spins. We found a small ball caster from our material stock but you can use a Lego turntable and a Lego wheel instead. Adjust the height of all five wheels so they are even. We used two thin square blocks for each of the lego wheels and one ¼” acrylic piece for ball caster.

Place the modules

Place all the modules in their correct positions on the top side of the lower layer.

Connect the sensing arms

Cut out the sensing arms and spacers from ¼” acrylic. Here is the other secret of this project; these sensing arms are laid out to follow the direction of the spin (if they do not, you should change the direction of the second dc motor). You will notice that the arms overlap slightly. This configuration makes it possible for the robot to keep sensing any obstacles until it turns completely away from them. The spacers we made both help the sensing arms to move smoothly and align them with the positioning of the roller switch. If you don’t have access to a laser cutter, we suggest to substitute cardboard or hard paper board for the arms and brass or plastic pipe for the spacers. You should be able to find these materials easily at any art supply store.

Attach the sensing arms and spacers using machine screws. We used M3x30mm screws and nuts. It is good idea to have two nuts in a row to prevent loosening of the parts.

Put it all together

Cut out another disc to make a surface for the food to sit on. Don’t forget to make holes for connecting this top surface to the lower disc.

Cut three brass tubes to the same length. Ours are ¼” diameter and ¾” tall. Secure the upper disk in place using these tubes. Pass the machine screws through and fasten them on the bottom of the lower surface with nuts.

Put dessert, gravy, sugar, milk, or whatever you like on your robot. Turn on the power and let it roam. Grab a piece of dessert as it passes by.