Dump1090Action

For more on microcontrollers and wearables, check out Make: Volume 43. Don't have this issue? Get it in the Maker Shed.
For more on microcontrollers and wearables, check out Make: Volume 43.
Don’t have this issue? Get it in the Maker Shed.

Software-defined radios (SDR) are gaining in popularity, and it’s not hard to see why — using them, your computer can tune into in an enormous range of frequencies, including FM radio, unencrypted police and fire bands, aircraft transponders, and in many countries, digital TV. The most popular SDR devices for the money are known as RTL-SDR because they’re based on the Realtek RTL2832U, a demodulator chip that supports the USB 2.0 interface.

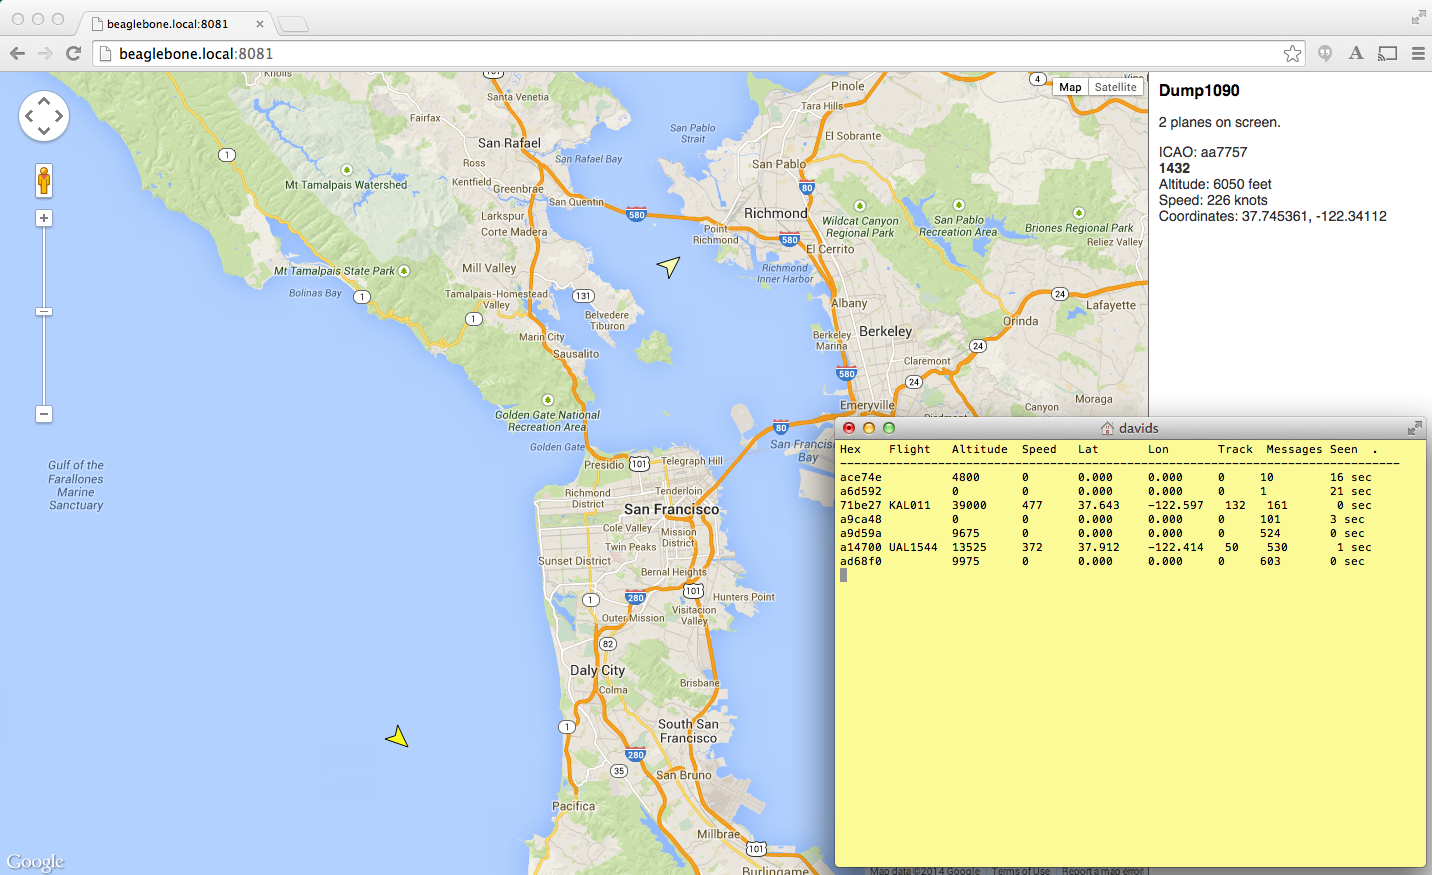
With an inexpensive RTL-SDR USB dongle and properly configured software, you can track commercial airplane flights and output their locations to mapping software to see exactly where they are in the sky. In this project I’ll show you how to do just that, using a very affordable single-board computer, the BeagleBone Black. While mine is not an original or exhaustive account of the technology, it’s a useful aggregation and an example of the amazing things software and specific hardware can accomplish.

There are two main software packages to configure. First the drivers for the RTL-SDR USB dongle, which require very little userland configuration, just installation. And second, dump1090, a program that tunes your SDR to 1090MHz, collects the data, and outputs it on a locally hosted website.

Dump1090_HERO

H/T to David Taylor of Edinburgh, Scotland and Drew Fustini of Chicago, Illinois for very helpful project write-ups.

EDITORIAL CORRECTION: Originally, Step 9 said that Cloud9 runs by default on port 8081. Reader jkridner provided a corrective: “[It] is Apache that is running at port 8080, not Cloud9 IDE. Port 80 is the BoneScript web server built on node.js, and Cloud9 IDE is on port 3000.”

Project Steps

Physical build

The build is very straightforward. Attach the antenna to the SDR dongle, then plug the dongle into the BeagleBone Black’s USB port. Verify the connection between the dongle and antenna is secure.

Connect an Ethernet cable to the RJ-45 jack and a 5V power supply to the barrel jack.

NOTE: If a barrel jack supply is not handy, power can be supplied over the micro-USB port, but remember, amperage is limited at 500mA per USB specification.

That’s it! The physical build is done.

SSH and update Debian

The BeagleBone Black should be booted and the blue LEDs flashing quickly. Rather than connecting a monitor and keyboard to the device, connecting remotely over SSH is preferable.

Windows users:

Download and install an SSH program such as Putty. Setup a connection to beaglebone.local as the root user. By default, there is not a root password set.

OSX and Linux users:

You already have an SSH client installed on your system by default, but you need to open a terminal session and type the following:

ssh root@beaglebone.local

If a password prompt appears, simply hit return.

NOTE: If for some reason beaglebone.local does not resolve, use 192.168.7.2 in its place.

Now, regardless of platform you should have a command prompt on the Beagle. Refer to the first image if unsure.

Update the Debian package list:

apt-get update

and then upgrade the system:

apt-get upgrade

NOTE: The upgrade command is not required, however, it’s advisable.

List USB devices

List what USB devices are attached to the BeagleBone:

lsusb

The output should contain a line with RTL in it, such as:

Bus 001 Device 002: ID 0bda:2838 Realtek Semiconductor Corp. RTL2838 DVB-T

If no device is listed other than the two Linux Foundation root hubs, make sure the RTL-SDR USB dongle is firmly inserted into the Beagle and try the command again.

Install cmake and libusb

Debian does not come with a compiled package for rtl-sdr, so you’ll need to build it from source. Don’t worry, it’s not difficult to do and the following steps walk you through all the command line jargon.

First, install cmake. For those not familiar with cmake, it’s an alternative build system that’s used by a number of open source projects.

apt-get install cmake

To find out more on cmake, check out their project history at cmake.org/overview.

Building rtl-sdr requires a specific USB library. Install it like so:

apt-get install libusb-1.0-0-dev

Clone the RTL-SDR repository

Clone the code from the git repository of the project.

git clone git://git.osmocom.org/rtl-sdr.git

NOTE: At the time of writing there is not a Debian package for rtl-sdr, so building from source code is required.

Configure and build

Change directories to the cloned repo:

cd rtl-sdr

Configure the build with cmake:

cmake ./ -DINSTALL_UDEV_RULES=ON

Build with make:

make

Install:

make install

Clone dump1090

Change working directories to the root:

cd

Clone the dump1090 repository:

git clone https://github.com/antirez/dump1090.git

Change directories to the dump1090 cloned directory:

cd dump1090

Finally, build dump1090:

make

Running dump1090

To run dump1090 simply type,

./dump1090

Data should immediately fill the console window, and at a rate that’s too fast to read. You’ll see that airplanes are transmitting their flight number, altitude, and other data.

There are more features available in dump1090, however, the options need to be invoked when the program is first run. Press the keys Ctrl-C to close dump1090.

Plotting planes: Web interface for dump1090

Now run dump1090 in interactive mode, with the web interface running on port 8081:

./dump1090 --interactive --net --net-http-port 8081

Each word after a double dash is a command argument, which

NOTE: By default dump1090 runs on port 8080, however, on the BeagleBone Black, the Apache webserver already runs on that port. That’s why you just told dump1090 to switch over to port 8081.

Point a web browser to beaglebone.local:8081 to see the dump1090 web interface. You’ll see a marker for each plane in the air, accurately plotted on a Google map! Clicking on the bogey shows flight information such as longitude, latitude, and airspeed.

NOTE: If for some reason beaglebone.local:8081 does not resolve, use 192.168.7.2:8081 instead.

Go further

Since dump1090 is open source, other developers have been able to fork the code and add new features. One great example of this is Malcolm Robb’s version at

https://github.com/MalcolmRobb/dump1090.

To add Robb’s version, change directory to root:

cd

NOTE: When cd is used with no directory specified, it returns the working directory to the home directory of that user. It’s a good trick and saves you from typing a tilde (~), a more typical symbol for the home directory.

And then clone the repository:

git clone https://github.com/MalcolmRobb/dump1090 MR-dump1090

NOTE: MR-dump1090 is used as a directory name only to diferentiate it from the previously cloned dump1090. If no directory is specified, cloning the repo will overwrite the dump1090 directory.

This version of dump1090 not only tracks longitude, latitude, and airspeed, but also displays the flightpath the plane has taken.

Additionally, you can use a dark map scheme instead of the more familiar Google Maps colors, and even use the alternative mapping solution, Open Street Map.

I hope this project captures your imagination and demonstrates how powerful SDR-based projects can be. Watch for more cool SDR projects on Make:, coming soon.