Braverman-1H2A7707

This article first appeared in Make: Volume 41.

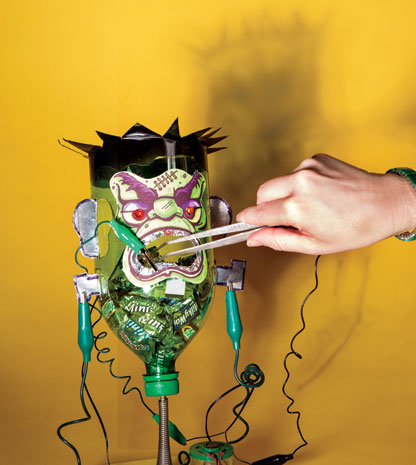
Here’s a classic toy reimagined for you to make just in time for Halloween candy-giving and party fun. It’s the Mad Monster Candy Snatch game, which combines the nerve-wracking dexterity of the old classic Operation game (BZZZZZT!) with a fun monster head–shaped candy dispenser. Make those little goblins earn their treats with this tricky game!

It’s simple to make and you can customize the play to be as easy or difficult as you like. You can even personalize it with your own voice, choice sayings, and sound effects.

The see-through green monster head is filled with fun-sized candies. Do you dare to snatch a snack? Use the forceps to carefully reach inside its mouth. If you can maneuver out a candy, you’ve won a treat! But be careful — if you touch the side you lose! The monster wakes up with crackling, shocking sound effects and announces “YOU MAKE MONSTER MAD! YOU LOSE!” as his angry eyes flash red. No treat for you!

Mad-Monster-diagram

What will the next generation of Make: look like? We’re inviting you to shape the future by investing in Make:. By becoming an investor, you help decide what’s next. The future of Make: is in your hands. Learn More.

Project Steps

Make the Monster’s head

Empty the soda bottle and save the cap. Rinse it out and remove the label. Cut off the bottom of the bottle and cut points along the opening to form the monster’s spiky hair; don’t be too neat, he’s a mess! Mask off the remaining part of the bottle (again, don’t be too precise). Paint the jagged tips of the bottle with black spray paint. When dry, bend each of the triangular points outward to make the pointy “hair.”

Download the cutting template. Print it on plain paper. Cut it out on the thick black dashed lines, and fold it over on the thin fold lines. Wrap the pattern around the bottle and using a black permanent marker, trace the cut lines onto the bottle. Use a hobby knife to carefully poke a starting slot. Using a sharp scissors, cut along lines. Punch out the eyeholes with the 3/16″ punch to fit the LEDs. Fold the ears and neck bolts at 90° so they stick out.

Cut a piece of aluminum tape 1/2″×6″ and cut small slits 1/4″ apart all along one long side. Then cut more slits on the other long side, alternating the cuts so you don’t snip the strip all the way through. Then stick the tape to the inside edge of the mouth hole: Place the uncut center part of the tape along the edge, folding over onto the outside and inside of the bottle. It should create a foil-lined edge all along the mouth opening. Cut more pieces of aluminum tape and stick to both sides of the ears and neck bolts.

To finish the head, download the face label. Print it on an adhesive label sheet and cut it out along the dotted line, being sure to cut out the eyes and mouth too. Carefully center it over the holes on the bottle and adhere it to the outside.

Make the base

Cut the wood panel to size. I painted mine yellow.

Remove the rubber tip from the doorstopper and find a round-head wood screw that will be a good, tight fit inside the end of the spring. Drill a hole in the center of the bottle cap just big enough for the screw. Thread the wood screw from the inside of the cap and tighten it into the spring.

Drill a pilot hole and fasten the doorstop’s mounting base into the center of the wood panel. Twist the spring until it fits tightly. Twist the upside-down bottle onto the cap. Test the spring by filling the monster head with a couple handfuls of candy and giving it a push. The candy-filled head should deflect and wobble but not bend over.

Hack the sound module

First, test the sound module: Add a 9V battery then press and hold the REC button and speak clearly into the microphone. Let go of the button to stop recording. You can record up to 20 seconds of sound. If you like, download and play the sound prerecorded just for this game, by clicking this link. If you prefer, you can instead record your own voice and sounds.

You’ll need to slightly modify the sound playing circuit so that the PLAY button contacts are triggered by the game’s tweezers and foil sensors. You can see the whole game circuit in the diagram here.

Carefully remove the PLAY button from the circuit board by prying up the metal tabs on the back of the board. Remove the metal retaining ring and the gray elastomeric button.

Insert 2 small wires through the holes on either side of the switch pad (SW) and very carefully solder one wire to each of the 2 traces. Don’t short out the traces! When you touch the ends of the 2 wires together, the sound player should be triggered. Test it! If that works, you’re good to go.

Make the circuit

NOTE: If you want to skip the flashing red eyes/LEDs, just hook up the foil labels on the monster head to one of the wires by using the alligator jumpers, then connect the other wire to the metal tweezers. When you touch the tweezers to the foil bits, the sound plays (just like your test above). You can play the game just like that — no flashing eyes — if you want. Done. Easy.

To add the flashing LED eyes, you’ll connect them to the speaker so that they light up when the speaker plays a sound. The current to the speaker is not enough to power the speaker and LEDs at the same time, so you’ll add a second battery (just for the LEDs) and a transistor that acts like a automatic switch, turning the power on (and off) when the speaker plays.

Add the power transistor to the perf board and after noting the its emitter (E), collector (C), and base (B) legs, wire up the connections to the speaker. Solder a wire to each of the two speaker leads. Solder the other end of one speaker wire to the base of the transistor. Solder the other speaker wire to the emitter of the transistor and also solder the black lead (ground) from a 9V battery connector to that same emitter connection.

Now solder the connections to the resistor and the 2 LEDs. Wire the LEDs in parallel about 2-1/2″ apart on 12″ leads that will reach into the monster’s head: one wire to the cathodes, one to the anodes. The cathode wire goes to the collector of the transistor. The anode wire goes to the 220Ω resistor (this “dropping” resistor limits the current so as not to burn out the LEDs). Solder the other end of the resistor to the red, positive lead of the 9V battery clip.

Wire up the 9V battery clip, add the second 9V battery, and test the circuit. The LEDs should flash brightly as the sound plays. If not, check polarity on the LEDs, transistor, and battery.

Mount components to board

Use a small cylinder or plastic cap from a milk bottle to make a resonant chamber for the little speaker. It won’t take much to improve the naked speaker’s tinny sound. Super-glue the speaker to the cap.

You don’t really need the knife switch but it adds a cool “mad scientist’s lab” look to the game. Use wood screws to mount the switch to the board. If you want, you can wire the switch to turn the power on and off. Just wire each half of the DPDT switch in series with each of the 9V batteries as shown in the diagram in Step 3.

Use the double-back adhesive foam tape to mount all the components to the board.

Assemble the game

Screw the head back into the spring/cap base. Twist the bottle a little if needed to make the mouth face forward.

Thread the wired-up LEDs through a neck-bolt hole and insert them into the eye holes from the inside. They should fit snugly; if not, tack them with a bit of hot glue or super glue. The wire leads should be loose so they don’t restrict the bottle from bobbling.

Now connect everything together using alligator clip jumpers. For an even more mad-scientist look, wrap the wires tightly around a pencil first to give them a “coiled cord” look.

Connect one of the wires from the PLAY sound trigger to the tweezers. Connect the other PLAY trigger wire to the foil on a neck bolt. Use more jumpers to connect the foil mouth, foil ears, and the other neck bolt.

Final test: Close the switch and touch the tweezers to the foil on the edge of the mouth — the monster should talk and flash its eyes! Test the other contact points on the neck bolts and ears with the tweezers, too.

Load up the monster head with some fun-size candies and you’re ready to play!

How to Play

Easy game: Reach into the monster’s mouth with the tweezers — try to get a candy without “waking the monster” (touching the sides). BZZZZT! Your turn’s over, pass the tweezers to the next player. If you’ve succeeded, eat your candy or add it to your trick-or-treat bag! You can make the game easier to win by simply cutting larger holes for the ears and neck bolts

Simple strategy: Add a die or spinner labeled “Mouth,” “Ear,” and “Neck.” On your turn, spin the spinner and try to snatch a candy from the opening indicated. If you’re successful, you can try again, but if you miss you lose all your candies — put them back into the monster’s head and let the next player go! Will you risk it — or play it safe?

Name that candy: Player to your right names which specific candy you must try to lift. You may have to do some extra careful digging with the tweezers to win!

More modifications: You can make the game easy or hard by making the ear and mouth holes bigger or smaller to suit the size of candies you put inside.