Mycroft is an open source voice assistant that respects your privacy. With Mycroft you can listen to music, check the weather, set timers or alarms, ask questions about the world, and much, much more. Unlike other assistants, however, Mycroft is the voice assistant you can trust.
Mycroft is private by default, and doesn’t save any of your usage data unless you choose to share it anonymously to help the project to improve. Unlike other services, Mycroft is not using your data to sell you things, and because it’s open source, you can see exactly what it’s doing and be confident that it isn’t listening when it shouldn’t be.
You can buy a readymade Mycroft speaker or install Mycroft on a computer, but it also has a dedicated image for the Raspberry Pi, making it quick and easy to build your own device. You’re free to remix, extend, or improve Mycroft however you wish. To this end, we’ve seen some very creative custom enclosures over the years, including integrations into full-fledged robots.
In this article we’ll start with the basics, building your first voice assistant using just a Raspberry Pi and a microphone.
Project Steps
FLASH THE PICROFT IMAGE
Download the latest Picroft image. It’s fairly large, 2.5GB, so you might want to grab a coffee while it downloads.
Tip: For added security, you can verify the checksum of the downloaded image against the SHA256 hashes listed on our Picroft Github repository. If you don’t already ahve a hash or checksum calculator, try the browser-based one.
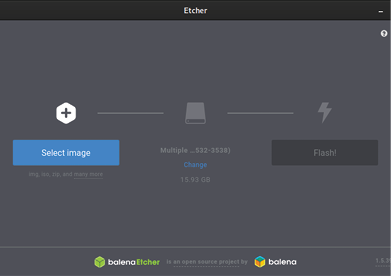
Next, flash the image onto your microSD card. We recommend using Etcher; it’s free, simple to use, works every time, and runs on Linux, MacOS, and Windows. Once you’ve installed Etcher and plugged your microSD card into your computer, hit the Select Image button and point it to the Picroft .zip file you downloaded.
Double check that it has selected the correct device, then hit the Flash! button.
CREATE A MYCROFT ACCOUNT
While you wait for your microSD card to flash, it’s a good opportunity to create a Mycroft account at home.mycroft.ai.
You’ll be asked if you’d like to contribute to Mycroft as a paid Member, or by opting in to the Open Dataset. Both are completely optional, and you can change your selection at any time. As a free and open source project, Memberships help cover the costs of running our servers and the wages of our small team who curate the software and ensure the privacy of your data. The Open Dataset is a free way to support our work by anonymously contributing your usage data that we can then use to improve our services.
SOFTWARE SETUP
Once Picroft is flashed to the microSD card, eject the card from the computer and insert it in the Raspberry Pi. On your first boot you’ll see the bright red Raspberry Pi logo; the Picroft image is based on the official Raspbian operating system.
After a short period of automatic setup, you’ll get to the guided Mycroft setup. If your Pi isn’t plugged into a network cable, Mycroft will guide you through connecting to Wi-Fi. Once connected, it will automatically search for any updates available for the Picroft setup and Mycroft’s core software.
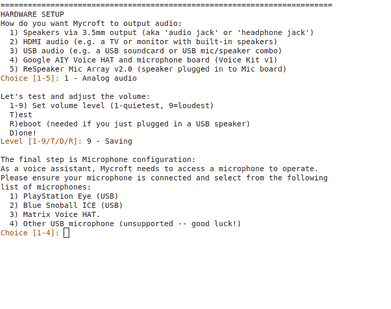
Next is the audio setup, starting with audio output. In our case, we’re using the 3.5mm audio jack on the Raspberry Pi, so we’ll select option 1. Select the option that best fits your hardware. If you’re using dedicated hardware like the Seeed Mic Array v2.0 or an AIY Kit, Mycroft will also update the firmware for those to ensure the best possible experience.
Now you set your audio output levels. Here you can play around with the levels 1 through 9. Each time you select a new level, Mycroft will change the volume and say “test.” Unfortunately, the built-in audio output of the Raspberry Pi is quite underpowered, so you’ll probably need to set this relatively high. Once you’re happy with the volume, press D (for Done) to proceed.
The microphone setup provides a similar list of options as the previous output selection. If your specific microphone isn’t listed, don’t despair, it may still work, and we’ll test the audio in the next step. If you chose the Seeed mic board for output, it’ll automatically choose it for input as well.
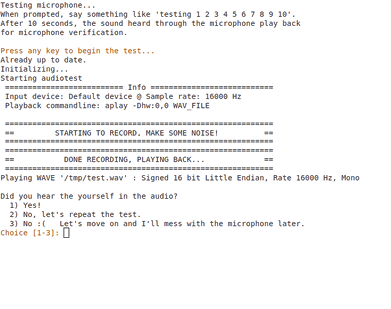
To test your microphone and speakers, Mycroft will ask you to record 10 seconds of audio, then play it back. If everything goes well, you can celebrate and continue! If you can’t hear the test recording, run through the setup wizard again. Check the Audio Troubleshooting Guide in our documentation for the most common problems we’ve seen. And you can reach out for help in the Mycroft Community Forums.
Finally we have a few more advanced questions. For your first time trying out Mycroft, it’s best to stick with the recommended settings using the stable and automatically updated “master” version of Mycroft.
While writing this tutorial I’m on my secure home network, so I will keep the normal Raspbian configuration of no password for sudo. I will however change the default password, as this can be used to remotely connect to the device.
Now the system will do some final setup based on your answers, and check for any underlying Raspbian system updates. Once complete, you can press any key to launch Mycroft!
MYCROFT CLI
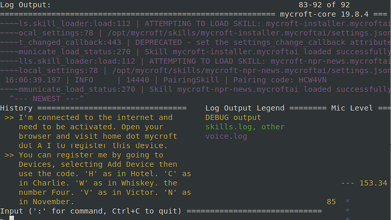
Mycroft is a voice assistant, but sometimes it’s really handy to see what’s going on behind the scenes. This is why we have the CLI— a command line interface that provides a log output stream of what the system is doing, a list of the most recent spoken commands, an input line to type utterances or issue other commands to the system, and a mic level to visually see that Mycroft is receiving audio.
PAIRING THE DEVICE
In the CLI you can also see that your Picroft is attempting to communicate with Mycroft’s servers. To do so it needs to be paired with your home.mycroft.ai account that you made earlier.
To ensure no one else can connect to your device, Mycroft will read out loud a six-character code. Everything Mycroft says is also output to the History panel. Keen eyes will also notice that the code is written in short form in the log output.
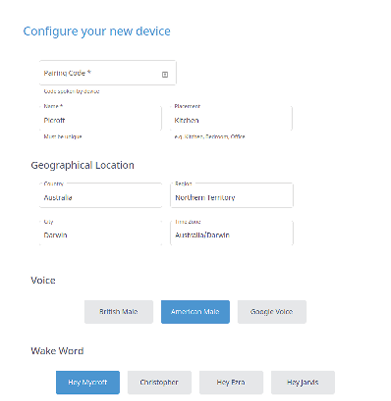
Add your device, using the pairing code provided by your Picroft, a name for the device, a description of the placement, and a geographic location so that it can provide the correct time, weather, and news station. Here you can also change the voice used by the device, and the wake word you’ll use to issue commands. You’re all set!
USE YOUR NEW PICROFT
Try a few voice commands to make sure Mycroft is working as expected.
Hey Mycroft, what time is it?
Hey Mycroft, how tall is the Eiffel Tower?
Hey Mycroft, play the news.
Hey Mycroft, why are fire engines red?
As you try more phrases, you might find that Mycroft can’t complete your request. By default Mycroft can do a lot, but you can extend it by installing new Voice Skills from the Marketplace. Here you’ll find a whole range of skills built by the Mycroft Community — skills to find cocktail recipes, connect to your smart home devices, play music, check your email, and many more. To install a skill, simply ask with your voice: Hey Mycroft, install Cocktails.
Chat to Movie Master to learn about different movies and get recommendations. Learn about specific Pokemon, their evolution, and their effectiveness against other Pokemon. Use the multi-sided Dice skill for your next tabletop adventure. Track the International Space Station and find out which country it’s passing over.
If you have smart home devices, your Picroft can let you speak to them, rather than opening an app just to turn off a light. We have skills for systems including Home Assistant, OpenHAB, and the Mozilla WebThings Gateway (build yours on page 50). Just say, Hey Mycroft, install Mozilla Gateway. Then head to the Mycroft Skills Page, select the skill, and click Connect.
Conclusion
WHAT NEXT?
Now you have your very own open source voice assistant. To learn about Mycroft technologies and how to develop your own Skills, check out our documentation. If you have questions or want to share, join the Mycroft Community Forums or Chat. Finally, we have so many ways you can get involved, including improving Mycroft’s pronunciation, testing or writing new Skills, translating into new languages, or squashing bugs. Join the thousands of us at mycroft.ai/contribute who are contributing to open and accessible voice technologies for all humanity.