If you want to play with MIDI, complement your music equipment with a pocket keyboard, or learn electronics, this project is for you. LEET is my vision of a new kind of modular affordable synth, complete with vibrant blinkenlights, that you 3D print and build yourself. 

Figure A
This article appears in Make: Vol. 76. Subscribe today for more great projects and tutorials.

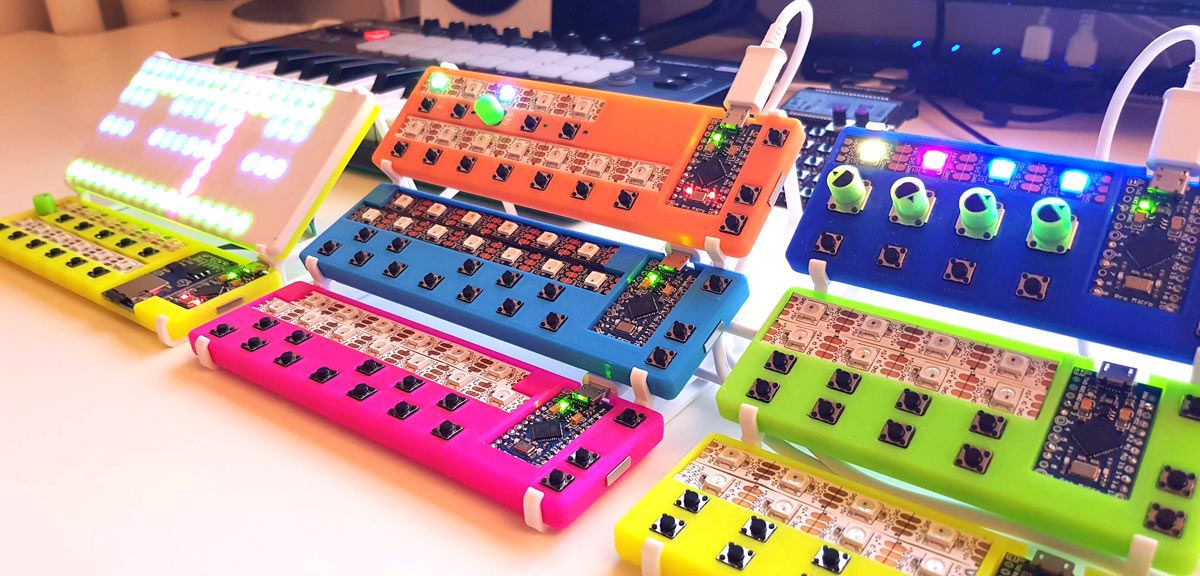
Along with the keyboard, I have designed a drum pad, chord keyboard, control unit, arpeggiator, and a step sequencer (Figure A). One special feature is that the units have RGB LEDs for each key, enabling playback visualization (so each device is both MIDI out and in). This is helpful for music training and editing, but it also looks great. They can be used as input devices to any computer with a DAW (Digital Audio Workstation) like Ableton, Logic, Cubase, GarageBand, etc. They run on Windows, Mac, or Linux (including Raspberry Pi). They can even be connected to your mobile phone (Android or iOS), providing a tactile, super portable music development platform (Figure B below).

Figure B

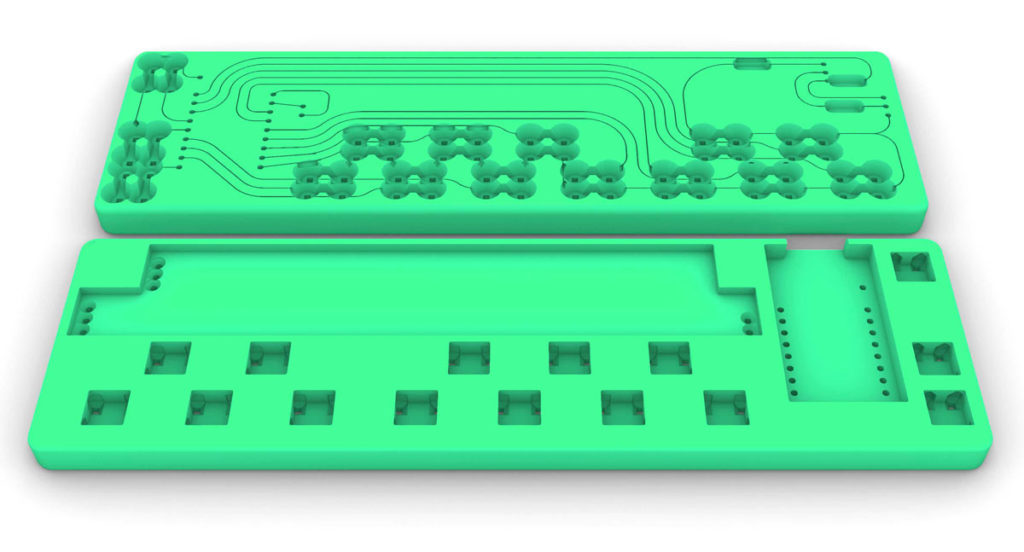
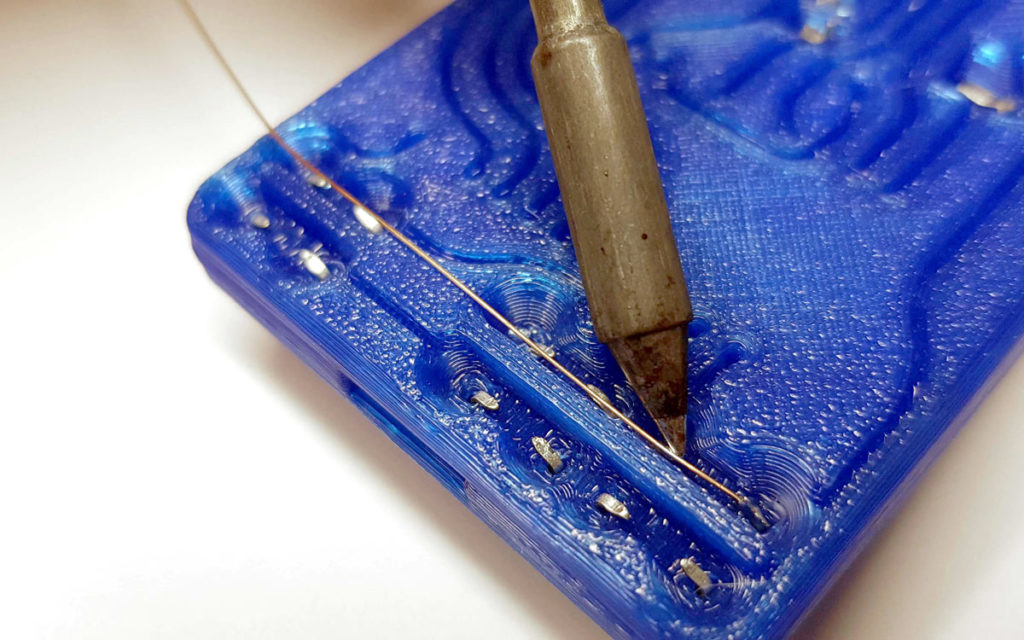
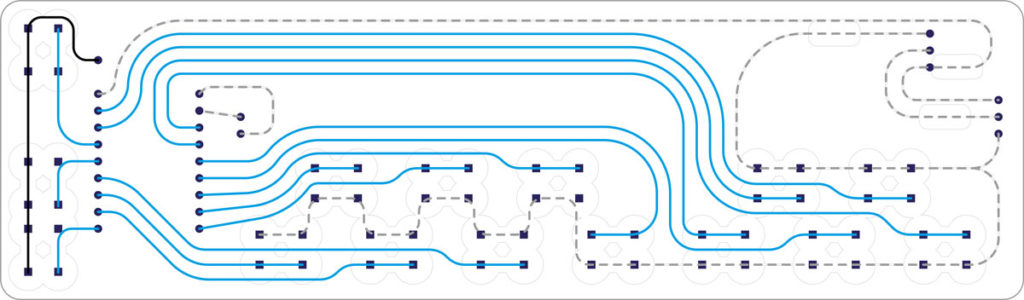
The LEET devices are built around a single 3D-printed core (3DPCB) that creates the exterior of the product, holds all components in place, and has integrated wire channels that connect the components in a foolproof way. 3DPCB makes the devices easier to replicate, less expensive, and you don’t need to wait for PCB delivery.

Figure C

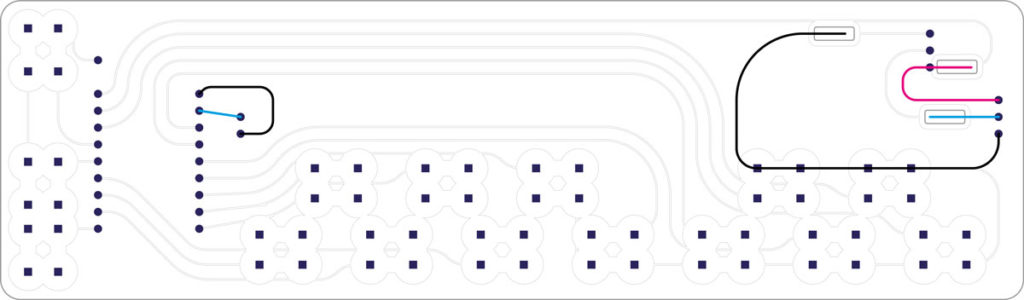
Everything is open source at vonkonow.com (Figure C) and can be tweaked, improved, and complemented with new functions to fit different needs. Build a wooden stand, add a light sensor to control the timbre, connect to a Speak & Spell, or build something completely new!

Project Steps

Print the 3DPCB

Print the core using a standard filament-based 3D printer. I recommend starting with the smaller leet_test part to verify that your printer is calibrated before embarking on the 3- to 4-hour-long print.

I used a Prusa i3 MK3S with 0.4mm nozzle and the following settings:

Material: PLA @ 210°C

Layer height: 0.2mm

Infill: 20%

Support: None

Program the Arduino

While printing you can download, set up, and program the microcontroller:

1. Install the Arduino IDE and download the latest LEET keyboard firmware from github.com/vonkonow/LEET-Synthesizer/tree/main/Keyboard.

2. Download and install the libraries for MIDIUSB (github.com/arduino-libraries/MIDIUSB) and NeoPixelBrightnessBus(github.com/Makuna/NeoPixelBus).

3. Connect the Arduino to your computer with a Micro-USB cable.

4. Select Tools → Boards → Arduino Pro Micro, and select the corresponding COM port

5. Compile and upload the code.

Cut 24 pieces of bare 0.3mm copper wire 10″ long. I stripped some “RK wire,” a stranded cable that’s used for internal wiring in 230V electrical cabinets, to get at the strands inside. In the U.S., you could look for something like 14 AWG cable with 28 gauge strands, or 15 AWG with 29 gauge strands. (The last number is most important — the diameter of the strands.) But you can also use plain bare wire (not coated “magnet wire”) approximately 0.3mm in diameter. 

Attach the Electronics

1. Secure the Arduino Pro Micro (without pin headers) in place with a dab of hot glue on the backside. Ensure that the holes are aligned.

2. Next, insert the switches and fold the pins on the backside to lock them in place. I recommend using a small flat screwdriver.

3. After that, cut a section of LED strip with 7 LEDs. On the back, remove the protective liner and the double-sided adhesive that covers the three connections on each end.

4. Solder two strands of wire to the exposed DIN and GND pads on the backside (note that one end of the LED strip is DIN and the other is DO). Solder three strands of wire to the other end (DO, 5V, and GND). 

5. Thread all 5 wires through the 3DPCB, remove the liner, and press the LED strip into place.

6. Thread the DIN wire through the wire channel to the microcontroller, ensure it’s tight, and solder it in place on the front side. Cut away excess wire close to the solder.

7. Thread the neighboring GND through the channel, stretch, solder it to the Arduino board, and trim.

8. Thread the three remaining wires on the other end through their channels to each dedicated opening.

9. Now prepare another section of LED strip, this time with 6 LEDs.

Attach the Electronics continued

10. Remove the protective liner and the double-sided adhesive that covers the three connections on the DIN side.

11. Solder three strands of wire to the exposed DIN, GND, and 5V pads on the backside.

12. Thread the 3 wires through the 3DPCB, remove the liner and press the LED strip in place.

13. Thread the 5V wire through the channel, stretch, and solder it with the wire from the other LED strip in the dedicated opening. Trim the wire from the other LED strip, then continue to thread it to the microcontroller, stretch it tight, and solder in place.

14. Thread the DIN wire through the wire channel to the opening where it meets the DO wire from the other LED strip. Ensure both wires are tight, solder them together, and trim the ends.

15. Thread the GND wire and solder it to the other GND wire at the dedicated opening. Trim the wire from the other LED strip and continue to thread this wire through its channel to each of the 12 keyboard switches. Tighten, and solder the wire to each switch (24 pins) along the way.

Connect the Switches

Solder a wire to both available pins of a switch. Insert it in its wire channel, thread it through the Arduino, add some tension, solder it, and cut the excess. Repeat for all 15 switches. Don’t forget to take a break every now and then to stay focuse

Inspect

Check the solder joints, and ensure that each wire is secure and tight within its channel and that everything is flush against the backside. If anything is loose, protrudes, looks funny or sharp, re-solder until it’s perfect.

Good job — give yourself a well-deserved high-five.

Use It!

Connect the keyboard to a computer or a mobile phone with a USB micro cable. The startup animation should turn on every LED, and the device should appear as MIDI in your DAW. Insert a coin and start playing!

Check out the other LEET devices at vonkonow.com, especially the sequencer that allows recording and playback of songs from your keyboard. This is also the place to share your build in a forum, as well as exchange ideas, assist with development, and get support or help from other LEET builders.