Wouldn’t it be nice to have an internet-connected alarm clock that automatically sets itself, based on your calendar? You would never miss an early appointment, never forget to set your alarm, and enjoy more restful sleep knowing you’ve solved the nightmare of regulating your alarms. An internet-savvy alarm clock could even watch your inbox and wake you up if friends or family send you an important email.
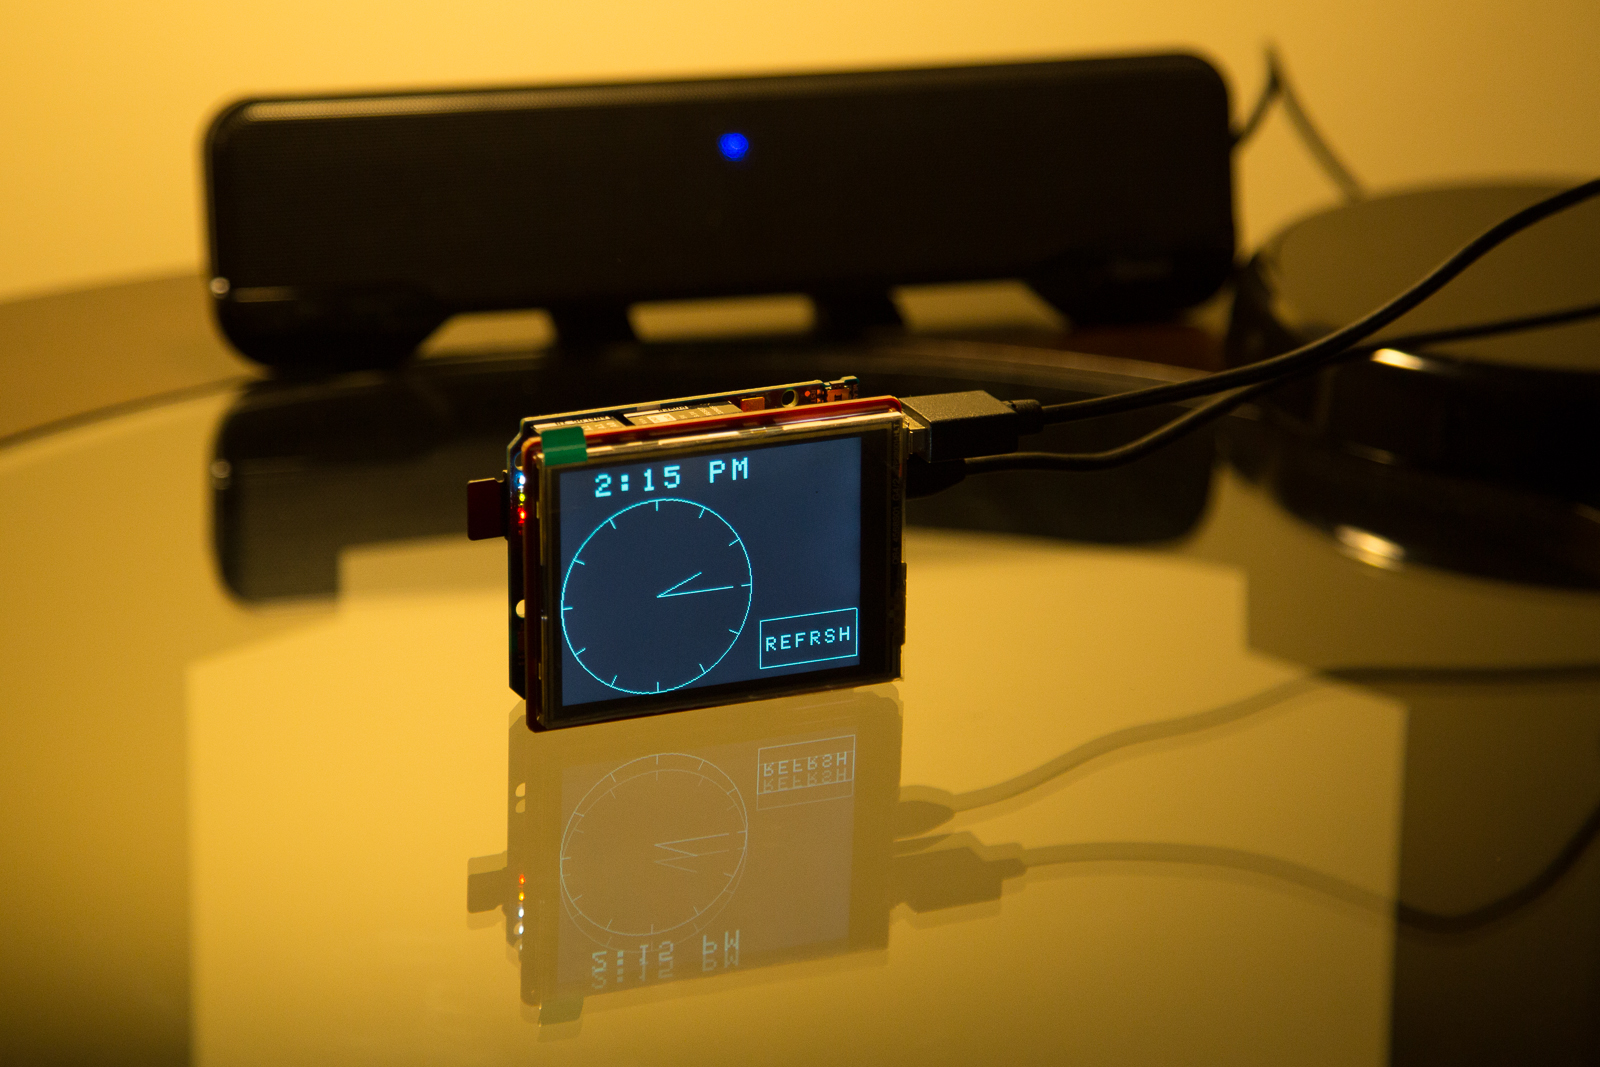
This S.M.A.R.T. Alarm Clock (Setup for Meetings, Appointments, Reminders, and Tasks) uses the Arduino Yún, which is a special Arduino with two processors. One processor runs an embedded version of Linux and is connected to the internet over wi-fi or Ethernet. The other processor uses the same chip as the Arduino Leonardo microcontroller, allowing the Yún to work with most Arduino shields and accessories. By using the Arduino Yún, this project can talk to complex web services with the Linux processor, and interface with hardware — an LCD touchscreen — on the second processor.
The software for the S.M.A.R.T. Alarm Clock uses the Temboo service to communicate with calendar and mail utilities. Temboo is a platform for simplifying access to many web services, and it has great support for the Arduino Yún. To build this project you’ll need to sign up for a free account on Temboo’s website.
S.M.A.R.T. Alarm Clock currently works with Google’s Calendar and Gmail services. If you don’t have a Google account, make sure to sign up before starting the project.
In addition to those accounts, you need only an Arduino Yún with power adapter, microSD card, TFT touchscreen Arduino shield, and a USB speaker. The TFT shield will display the clock interface, while the USB speaker will play the alarm. Make sure to use a USB speaker that receives both power and audio over the USB connection, such as RadioShack #40-380. (some speakers send audio over a separate cable which won’t work with the Yún). The project software includes an annoying alarm clock sound that will jolt you awake, but you can substitute your own MP3 to wake up to something more pleasant.
If you’re new to the Yún, take a moment to read this guide and watch this setup video. You’ll want to make sure your Yún is connected to your wireless (or wired) network and has access to the internet before starting this project. Also, connect the microSD card to the Yún before it’s powered on, so it will mount the card as a root for storing the data used by this project.
When you’re ready to get started, download the software, then follow the instructions below to build your S.M.A.R.T. Alarm Clock. The code for this project is a basic example of an internet-connected device that you can learn from and modify to build your own smart gadgets. If you have issues with the code or want to contribute, visit this Github page. Meanwhile, enjoy some quality sleep!
I want make this but was wondering if the tft v2 from seeed works? I am sure I most likely need to change the code around to work with it.
Tony: Any recommendations for 1) customizing it so the TFT shield fits flush, and, 2) creating/obtaining an enclosure/case for the unit once completed? Thanks!
sherrie g
1) To make the TFT shield sit flush you will need header extenders obtainable at adafruit or ebay.
2) You can buy a case for the Yun on ebay or amazon which has holes that let you put everything together.
Thanks, YellowCoin.
If you order extenders to make it flush keep in mind two different things.
1.) You MUST also order ICSP 6 pin (3×2) headers since the arduino yun doesn’t use typical arduino uno SPI pin configurations where pins 10, 11, 12 will be used for SPI. The only way it will work is that you connect the ICSP header pins on the Yun to the TFT Shield. This would only be required if you get the version 2.0 or 2.1 shield . Other wise, you are fine and don’t need an ICSP header extender to make it flush.
2.) Make sure you order the long headers, not the stubby short ones.
Hi Tony. I’m a complete noob with all things Arduino, APIs, have almost no programming experience, etc, etc… I picked this project to get started with Arduino and bought my first 2 boards (an Uno and a Yun) to play around with.
I followed all the steps up to the OAuth authorization, and get this back from Google:
—————————–
400. That’s an error.
Error: redirect_uri_mismatch
Application: SimonGoogAPITest
You can email the developer of this application at:[censored]@gmail.com
The redirect URI in the request: https://jude999.temboolive.com/callback/google did not match a registered redirect URI
——————————–
What did I do wrong?
Fixed .Went through the steps again and had forgotten an “s” in https…
Hi Tony, me again. All good until this step 11. I don’t see my Yun in the ports when connected to the wall power. If connected to the computer via USB is shows in t Arduino IDE (had to lay around with drivers for a while to make it work). My Yun shows in Bonjour Browser and I can connect to the setting page on arduino.local, so it’s there.
In my device manager I have an unknown device, but not sure it’s that, It won’t recognize a driver when I point the device to the driver in the Arduino folder.
I read things around: I opened port UDP 5353, no firewall (except for Windows) on this computer, running Win7.
I am determined to make it work, any advice would be appreciated. Thanks!
did you set up your YUN for wireless? If you did IDE should show it when you select the ports.
Yes it is all set up, I can access it on the network, I did the firmware update wirelessly, I see it in Bonjour and have accessed it via ssh and putty on the network. So it is there and it works.
When I open ports on IDE, all I see is a “COM3” option. I tried it just in case but does not work. No “Arduino at Arduino Yun” option as indicated…
try the new beta version of IDE. You should be able to see the yun via IP as a port on the list. There shouldn’t be any additional software you need to install. Unless that is you’re using the micro usb port to see the yun. Worse case you can try the NIC port on the Yun.
Another thing you can try is make sure the YUN is boot up completely before you open IDE sometimes IDE doesn’t refresh the port list.
I am using the beta, downloaded 2 days ago (unless there is a new one since?). It works fine when connecting to micro USB (but the instructions of the project say specifically to upload the sketch wirelessely).
My only issue is the IDE to Yun via wifi. Everything else works…
I have disconnected/reconnected probably 50 times by now, making sure the yun boots completely before I launch IDE.
I’ll try with my wife’s Mac tonight, see if that works, but even if it does, I will have to find a way to make it work on my Windows machine.
FYI You can program it through the wired NIC connection as it doesn’t necessary need to be wireless. You can’t use USB because I think the WWW folder won’t be copied over correctly. This project has it’s own quirks for me as I wasn’t able to get the old TFT model listed on the instructions. I had to deal with the newer V2 model and did a bunch of reprogramming of the code.
Thanks for the tip, I’ll try that.
I think I have the TFT v2 model too. I just bought it directly from Seeed in China (I live in China). Reprogramming the code might be beyond my current capabilities…
it’s not that hard to do. You just need to compare the V2 files with the V1 provided by the tutorial. You will need to copy some of the functions that was added by frankie chu for screen direction. If you have any problems just let me know and i’ll try the best to my ability.
Thanks, I’ll probably need help when I get to that part, but I ran into another problem:
So I tried with my wife Mac, and I see my Yun in the ports, however, evertime I try to upload the sketch, I get prompted for my password, then it starts uploading, but very fast i get a message saying “Double check connections and try again, or use -F to override this check”. What’s wrong? Tried many times.
Figured out I didn’t have a network cable lying around at home so could not try wired NIC connection. I’ll try that tonight too.
Also don;t really get why i don;t see my Yun in ports on Win7 but do on the Mac.
I am on the mac too. For the avrdude error try uploading it without the LCD connected. I found with the V2 it freaks out whenever the LCD is connected while you do the upload. Upload first then connect LCD.
OK. Uploaded the sketch, disconnected the LCD and that did the trick. Thanks!
I still have a blank/white screen though, I suspect that is because I have the V2. Any help to get it to work will be appreciated.
YellowCoin, I’ll need the name of your local pub so I can put a couple beers on a tab there!
https://github.com/yellowcoin
You can get the download for my version of the files here for the SEEED v2 TFT Touch. Make sure you [download zip] after you click on each sub link. Download button should be on the right side.
I am from New York so not sure if you can get me a beer from china haha. If you like you can send me some Donations via bitcoin at this address 15kFAbgWsSM28N7x5ZbWAehABkGnp9dPPT
Houston… (Edit, Houston can go back to sleep. issue fixed)
Downloaded your files (Thanks!), however:
Sorry for the length of this, and please excuse my noobiness… I am really new to Arduino… Did I do something wrong?
Arduino: 1.5.7 (Windows 7), Board: “Arduino Yún”
C:UsersSimonDocumentsArduinolibrariesTFT_Touch_Shield_V2-masterTFTv2.cpp: blah blah blah…
Cut the 100 lines long list of errors, because I fixed them.
I was reading through the errors and figured our it looks like quite a few “;” and “)” were missing at the end of sentences. I added them where the errors pointed me to and, to my huge surprise, I now have a working clock!!!
Trying to figure out how to share the file (TFTv2.cpp) on github, I just created an account there so fresh noob again.
Sorry about that I was cleaning up the code via github at work and didn’t notice it deleted the ; marks when I was fixing the comments. I triple check it and made the corrections.
Flip side you got your hands dirty with coding haha!
We are up and running. I edited the file that had errors with the corrected version on github here: https://github.com/jude999/TFT_Touch_Shield_V2 (hope it’s fine, it’s the file that worked for me)
A million thanks to YellowCoin for the help! 3 beers on me when i’m in NY (bound to happen, and I keep track of beers I owe), I have learnt a lot from this project already.
NICE! Glad to see everything is working out for you. There is a bunch of settings you can change on the smart alarm INO file. If you want to see if your alarm works with google you can set the #define ALARM_LATEST_HOUR to 24. That setting is used in case you do not want the alarm to go off after a certain time.
Eventually I will change my version of it to remove the clock and make it straight up numeric. It will be later in the future hopefully.
Cheers and beers!!!
Yeah, I chose that project because I want to play around with a connected clock. End goal would be to have an alarm clock that shows key notifications from my phone or the internet next to my bed, but can leave my phone/pad far from my bed… So I can focus on sleeping when in bed.
I don’t have a USB speaker lying around so for now it’s not making any sound. I’ll try to play around with code to learn first, then see if I can make it show other things (weather first maybe). I’d like to switch the screen for e paper too, or something that lights up when my hand gets close. The LCD is a bit too bright for bedroom. Anyway, jumping ahead of my capabilities, but it gives me goals to learn.
@disqus_GQ0X9RPpAg:disqus did you set up your YUN for wireless? If you did IDE should show it when you select the ports.
anyone encounter the red L13 constant light?
Everything else is working fine on the board itself. WIFI, SSH, SD mounting.
I checked the sd card and it has the file structure and what looks like the sketch uploaded. I have rebooted with the card in and without, and with the tft and without and the same thing shows. THe sketch never loads into the screen so Im stuck. Help ??
I have it constant on, but is it an issue? Looks like it is on in the video too…
Edit: can’t ltell from the video, looks on in the picture above though.
You tired updating YUN to 1.3?
How do you know what yun version you are using? Where would I look to see? Also, I am using the TFT from the directions. Is there another version I should download?
Figured it out. updated to the latest version of the yun. still just get a white screen.
did you tried updating to 1.3?
Well, I have been playing around with this for a few days now and I can get no results. Im not even close. Its funny but the google and Temboo part was the easiest. In a Nut shell I have tried loading this sketch on Windows with a windows format of the sd card, Ive tried it on mac with various IDE and mac format and it fails consistently. Ive checked everything in the advanced config of the Yun over my wifi yet when I load a sketch I get fails. Is there anyone out there who has made this work?
which version of the TFT you are using?
I made mine work, and it is my very first experience building anything remotely close to electronics, let alone arduino. I am actually going through tutorials now. So it is doable. Yellow Coin helped me a lot as you can see from the other comments.
What version of the TFT are you using, and where did you get your sketch from? I am using the seeed v2 and it didn’t work with the original sketch because it was made for v1. So I used the one YellowCoin made, linked further down in the comments (it needed some fixes, but I believe he fixed it already).
To format my SD card, i used this: http://arduino.cc/en/Tutorial/ExpandingYunDiskSpace, it takes care of the formatting. Not sure if that would help you.
I’m going to try and make this. Two quick questions: can you easily configure the alarm for snooze? Maybe make it set the alarm for every event before noon, not just the first one? Second, what size TFT touchscreen should I be buying? 2.8″? Thanks in advance!
Hi I made this project and have gotten the touch screen working.
Where I am struggling I believe is getting files onto the SD card. I can compile the sketch and upload over WiFi, but it seems to end much faster than specified in the steps, and I get a “Warning: problem accessing board folder /www/sd”
I have formatted the card to FAT16 and FAT32, and both times saved a folder arduino/www there.
Is this not the correct folder name? I also have never seen my mac recognize the sd card through the Yun, but am not sure if I checked correctly. I used the disk utility and found nothing, but it shows up in my card reader.
Any help would be great! Seems like such a cool project.
Hi there,
So I went through this project and was able to get the touch screen working, but I don’t have any communication with any Google services. I uploaded over WiFi, but when I get a warning message saying there was ano issue with the /www/ directory. I’m not able to view the card from the arduino Yun, but I put it into a card reader and the arduino/www folder I created is empty.
Does a gone. Have any ideas what I might be doing wrong? This is my first arduino project so i am still getting my bearings with it. I’d really appreciate any help though!
Sorry for the double post… the first I one didn’t show up originally.
Did no one else notice that 12:15 in the afternoon is displayed as 12:15AM and 12:15 in after midnight displays as 12:15pm?
Small fix
// Convert from hour (24 hour format) and minute to minutes in day.
int time_to_minutes(int hour24, int minute) {
return hour24*60+minute;
}
// Convert from minutes in day to hour (12 hour format), minute, and AM/PM.
int time_to_hour_minute(int time, int& hour12, int& minute, bool& am) {
hour12 = time / 60;
minute = time % 60;
am = true;
if (hour12 > 12) {
hour12 -= 12;
am = false;
} else if (hour12 == 12 && minute > 0) {
am = false;
} else if (hour12 == 0) {
hour12 = 12;
am = true;
}
}
I don’t think I will be attempting this one, since all I see in comments are people who can’t get it to work. That, to me, means inadequate documentation and vague incomplete instructions. From looking this over, there seem to be many of the details needed missing or glossed over with general statements.
Pass.
Is there a way that I can make the Ethernet wireless..so I don’t have to run a Ethernet cable through my bedroom floor
Yes, go here http://arduino.cc/en/Guide/ArduinoYun
Scroll down to “Configuring the onboard WiFi”
The clock works and gets the time from the internet when I refresh, but the alarm part doesn’t work. I’ve gone through the instructions three times but always the same results. Looking at the sketch, I see where the python program for getting the alarm data is supposed to be at “/mnt/sda1/arduino/www/SmartAlarmClock/find_alarm.py”. However I connected with PUTTY and do not see any files or folders in “/mnt/sda1/arduino/www/”. How are the python files created and how do I get them into the folder?
They should be a a folder named “www’ in the same folder as your SmartAlarmClock.ino sketch. when you upload the sketch they should be uploaded with it.
Thanks – found my error. I made a copy of the original sketch to experiment with, but I did not copy the www folder to the new sketch folder.
Looks like it’s working now.
New question – I want to learn more, but I cannot find the references to any of the libraries used in this project. Tips would be appreciated.
Thanks again
Can you be more specific?
I am having the same error but not with python code. The clock image works but the alarm does not. What is even sopposed to be in the www folder?
When you say “the clock image works”, does the “Alarm” text display but the alarm never sounds or does the alarm text not display?
Somewhere in the text of this article it says the time of the event has to be early in the day.
I don’t remember what time it said.
If you SSH to the YUN you can run the python script and see if it’s returning what you’d expect.
Try this:
SHH to YUN
#cd /mnt/sda1/arduino/www/SmartAlarmClock
#python find_alarm.py TEMBOO_ACCOUNT TEMBOO_APP TEMBOO_KEY CALENDAR_CREDENTIALS CALENDAR_ID | hexdump
Of course replacing what you put in the Arduino script for #define TEMBOO_ACCOUNT etc.
The last bit “| hexdump” will let you see the output if it works because the output of the python script is in binary.
You should see something like this:
0000000 091e 0a00
0000003
The 091e in this case means 9:30am (09=9 1e=30).
Otherwise you’ll see a bunch of text trying to tell you what went wrong.
www should contain:
dateutil
temboo
temboo_new
159,141 Annoying_Alarm_Clock.mp3
2,269 check_email.py
2,496 find_alarm.py
how?
how are they uploaded with it??? you can manually upload them but you need explain what you trying to say above “when you upload the sketch they should be uploaded with it.”
Total noob here, have done some minor programming in the past. SMART clocks looks great, I want to build this with my son. Do you know what I would change to have it report, say the weather, such as how to use the NOAA choreo? Want to try this, since my kiddo can’t get a gmail account…
Could the Arduino YUN be replaced with a Raspberry Pi?
been working on this project for several days… got all components working. NEVER got this ‘smart’ clock to work in any way… just a white screen
I just get a white screen also
Still have not got it to work either… no help from author or here.
I got it to work by using the files located at: https://github.com/yellowcoin
The white screen comes up but then give it time and it will refresh with the clock.
Thnaks.. Ill try that!
DONE and it’s working now! Thanks for the help…
Glad you got it working!
you are glad! and you say you took files from yellowcoin but you are not consistent as at the beginning you said you made an arduino folder….how did you upload the www folder to the YUN??? Is it working at all??
what is working??? the alarm & cancel not showing on the screen yet. It means that is not working. thx
I built the clock about two months ago and have played with it since then. I have followed all of your instructions according to the web site exactly as I understood them. I have been on countless forums from GETHUB, to ARDUINO, to YOUTUBE.
Here’s the basics.
The alarm clock shows the clock.
It refreshes the time when touched on the touch screen and the time is correct.
I can see the alarm clock ip address when I select it in my arduino ports menu.
There is no problem uploading the code.
The problem is…
The clock will not update according to my google calender.
The clock will not sound an alarm when I send it the WAKE UP. email with the WAKE UP headder.
I double checked all of the settings on my Temboo account including double checking all my #’s.
I contacted Temboo. Their stumpped. All they told me was to, “rewrite the code on Temboo and upload it to my Arduino from there,” or “modify the code to use Terminal” I believe the way I read your code it already does that.
I’ve double checked my router, computer, and network firewall settings.
I just cant make it work.
Any help would be appreciated.
Brandon.
Brandon – I’ve the same issue where I cannot sync the clock to Google Calendar. Were you able to resolve your issue?
Thanks for the help!
did you ever find out how to get it to talk with your google calenders? I’m having the same issue you had. I need this to work, its part of a final project i need to graduate. thx
This is what I needed today. Volume on cell was way down got a call last night and this morning for a project install. They cancled it, costing me 100.00 out of a 450 dollar project. The problem I have with this project…where is the shell ?? one jolt of the table and this thing hit the floor in pieces.
2. It needs a battery for backups!!
3. Can it do a fetch of dates, in the event the internet is lost?
How do you format the SD card and create a folder called www? where do you go to do this at?
I am stuck at that part too. I connected the TFT Shield to the Yun, and inserted the SD card. I powered it up but it shows a blank screen.
Im having problems on the InitializeOAuth step. I put the info in and when i click run i get the AuthorizationURL and CallbackID. When i go to the link for the AuthorizationURL to accept it, it gives me a page that starts with 400. That’s an error.
Any help would be appreciated!!
Im stuck on step 5. I got the Arduino IDE Version 1.5.6-r2 BETA. Now, do i just download the TFT library fork, go onto the IDE version i got, and import the library? Also i’ve downloaded the touchscreen library but how do i install it?
to install the library go to… Sketch, Import Library, Add Library then tell it where the folder you saved is at.
Thanks for the reply. Alright so i downloaded the file and then did as you said and imported the file. Is there anything else i need to do for that step?
Also have you figured out how to format the SD card?