

We’re going to explore ways to make audio speakers more wearable — not by sewing ordinary hard speakers into garments, but by creating new kinds of speakers out of textiles and conductive thread. Then we’ll make a soft speaker of our own!
HOW DO SPEAKERS WORK?

Inside every common loudspeaker are three simple elements: a stationary permanent magnet and a moving voice coil that’s attached to a speaker cone or diaphragm. An amplifier feeds an audio signal into copper wire, which is wound into a the coil. As this electrical signal passes through the coil, a magnetic field is created, which interacts with the magnetic field of the permanent magnet. As the signal’s frequency fluctuates, the coil’s field also fluctuates and the speaker cone vibrates, pushing and pulling the surrounding air. This creates a pressure wave in the air that extends forward and backward from the cone. Sound!
For a speaker to function well at all frequencies, we must prevent the pressure waves created by the back of the speaker cone from canceling out the waves created by the front of the cone. This is why speakers are typically built into an enclosure. If you take a speaker out of its enclosure you’ll notice a change in tone, because sound from the back is now interfering with the front.

SOFT SPEAKERS & SQUISHY FUTURES
Soft speakers use these same technical concepts to explore what a speaker might look like made entirely out of textile. Think a hat with a fully integrated speaker, or answering your phone by listening to your gloves in the winter. Although the lack of rigid components can make resonating difficult, soft speakers are fun and experimental ways to imagine what a world made out of soft and squishy tech might look like.
To take a small detour away from what makes a good speaker into my artistic practice, I think it’s important to ask: Why make a soft speaker at all? Everything about making an effective speaker relies on rigidity and non-soft components, so why make a not-so-great speaker out of fabric?
For me, it gets back to the core idea of this column, Squishy Tech, which aims to imagine what it means to question what makes up technology, and to understand why we built the world the way we have. A squishy future might be filled with electronic cyborgs made out of textile tech, but it also might be uncertain, unknowable, and untapped, so we should experiment and understand what makes up the technology we take for granted.
I’ve been experimenting with soft speakers for a while but I’m not alone. There are a ton of other e-textiles practitioners I’ve learned from and this work wouldn’t be possible without people like Hannah Perner-Wilson, Leah Buechley, Becky Stewart, Claire Williams, Ryth Kesselring, Lee Jones, Sara Nabil, Audrey Girouard, Joanna Berzowska, Marguerite Bromley, Afroditi Psarra, and Mika Satomi, who have all written about their experimentation with soft circuits and/or textile coils long before I made my first spiral!
FACTORS OF MAKING A GOOD SOFT SPEAKER

To make a good soft speaker we’ll need to re-create the components of a traditional speaker — coil, magnet, and cone — then connect it to an amplifier circuit and an audio source. Let’s start by understanding how it all goes together. Soft speakers are typically made out of conductive thread stitched into a spiral on a textile base, serving as both coil and diaphragm (Figure  A). A magnet is suspended above or behind the textile so that it doesn’t interfere with vibrations. An amplifier circuit, often in the form of a breakout board, is attached as well. It can be placed in a pocket or attached to another textile surface.

Textile coils: A typical soft speaker coil is made out of conductive thread or enameled wire stitched into a spiral. There are a couple of ways to achieve this, depending on your skill, patience, and access to equipment. The easiest way is to hand-stitch a spiral of thin conductive thread or wire using a running stitch or a couch stitch, but you can also cut out conductive fabric (Figure B ), or use conductive nylon or copper tape.

A basic running stitch is the first stitch you’ll learn to sew: it goes over and under the fabric in a straight line (Figure C ). Try to make your stitches fairly small and evenly spaced. It’s tempting to make big stitches and go faster, but I promise, not only will your speaker look bad, it’s easy to mess up and get your thread tangled. If you break your thread, you can tie a new piece to it, but that’s not ideal; it’s tricky and it will show on your final coil.

If you’re feeling more advanced, a couch stitch is a great way to go (Figure  D). This method uses a non-conductive thread to hold down your conductive thread, which lies flat along the base textile. I find this works best if you want to use a thicker wire to make the coil.
When hand sewing coils, I like to either use a fabric marker or chalk to draw the spiral on the material, or print out a spiral template and use transfer paper to put it on the fabric. I also use an embroidery hoop so it’s easier to see my full design and not lose track of where I am.
For your first design, I suggest going bigger rather than smaller, to give yourself the space to learn to use the tools. There are a few factors to balance when designing a coil. The first is to understand how resistance works in your circuit. Depending on the amplifier you use, it will work best with a speaker of a specific resistance, aka impedance. Most small amplifier breakouts are meant for speakers with 4 to 8 ohms (4Ω–8Ω) of resistance, including the one I suggest in the tutorial below. You’ll need to calculate how long your conductive thread should be by dividing the desired total resistance by the resistance of your wire per meter. For example:
4 ohm speaker resistance / 0.25 ohm per meter thread
= 16 meters of thread

It can be a bit tedious to embroider your spiral by hand without knowing how big it will get! If you want to know the diameter of your spiral before you begin, you can use the Soft Speaker Coil Calculator tool that I worked with Kyle Chisholm to develop (Figure E ). It can calculate the size and shape of your spiral — smooth spirals or geometric shapes — with the exact parameters you want. You’ll want to adapt the default settings to suit your needs. I like to leave at least 1cm between each spiral turn if I’m hand sewing, and at least 2cm in the center of my spiral.
You can use this tool to lay out your spiral by hand using a ruler, or input the values into Adobe Illustrator and print out a template on transfer paper. If you’re using an embroidery machine, you can use these settings to create your digital pattern too; by default it exports the spiral as an SVG path, which can be opened in any vector program (Figure  F).
F).
If you want to try using a Cricut or laser cutter to cut out the spiral and iron it on using adhesive conductive nylon, you can increase the size of the stroke (Figures G and
and  H) and expand the shape to create a thicker line that can be cut out, like in the thicker speakers in Figure B.


You’ll find every conductive thread, fabric, or yarn has a resistance measured in ohms, although you’ll need to convert any length units to metric for the calculator.
Once you know how much material you’ll need, you can begin to design your spiral. The effectiveness of your speaker will depend on how tightly the coils are wound, but be careful — if your thread is not coated, your wires must not touch or you’ll create a short circuit. The magnetic field is created by the overlapping fields of each circle of wire, so they should be close together, but not touching. For this reason I like to use magnet wire, which has an insulating enamel coating.
You can also experiment by making your coil a weird pattern full of wobbly lines, or convert an image into a spiral; these will still work but might be less “effective.” In general, you want to squeeze in as many revolutions as possible in the smallest space possible.
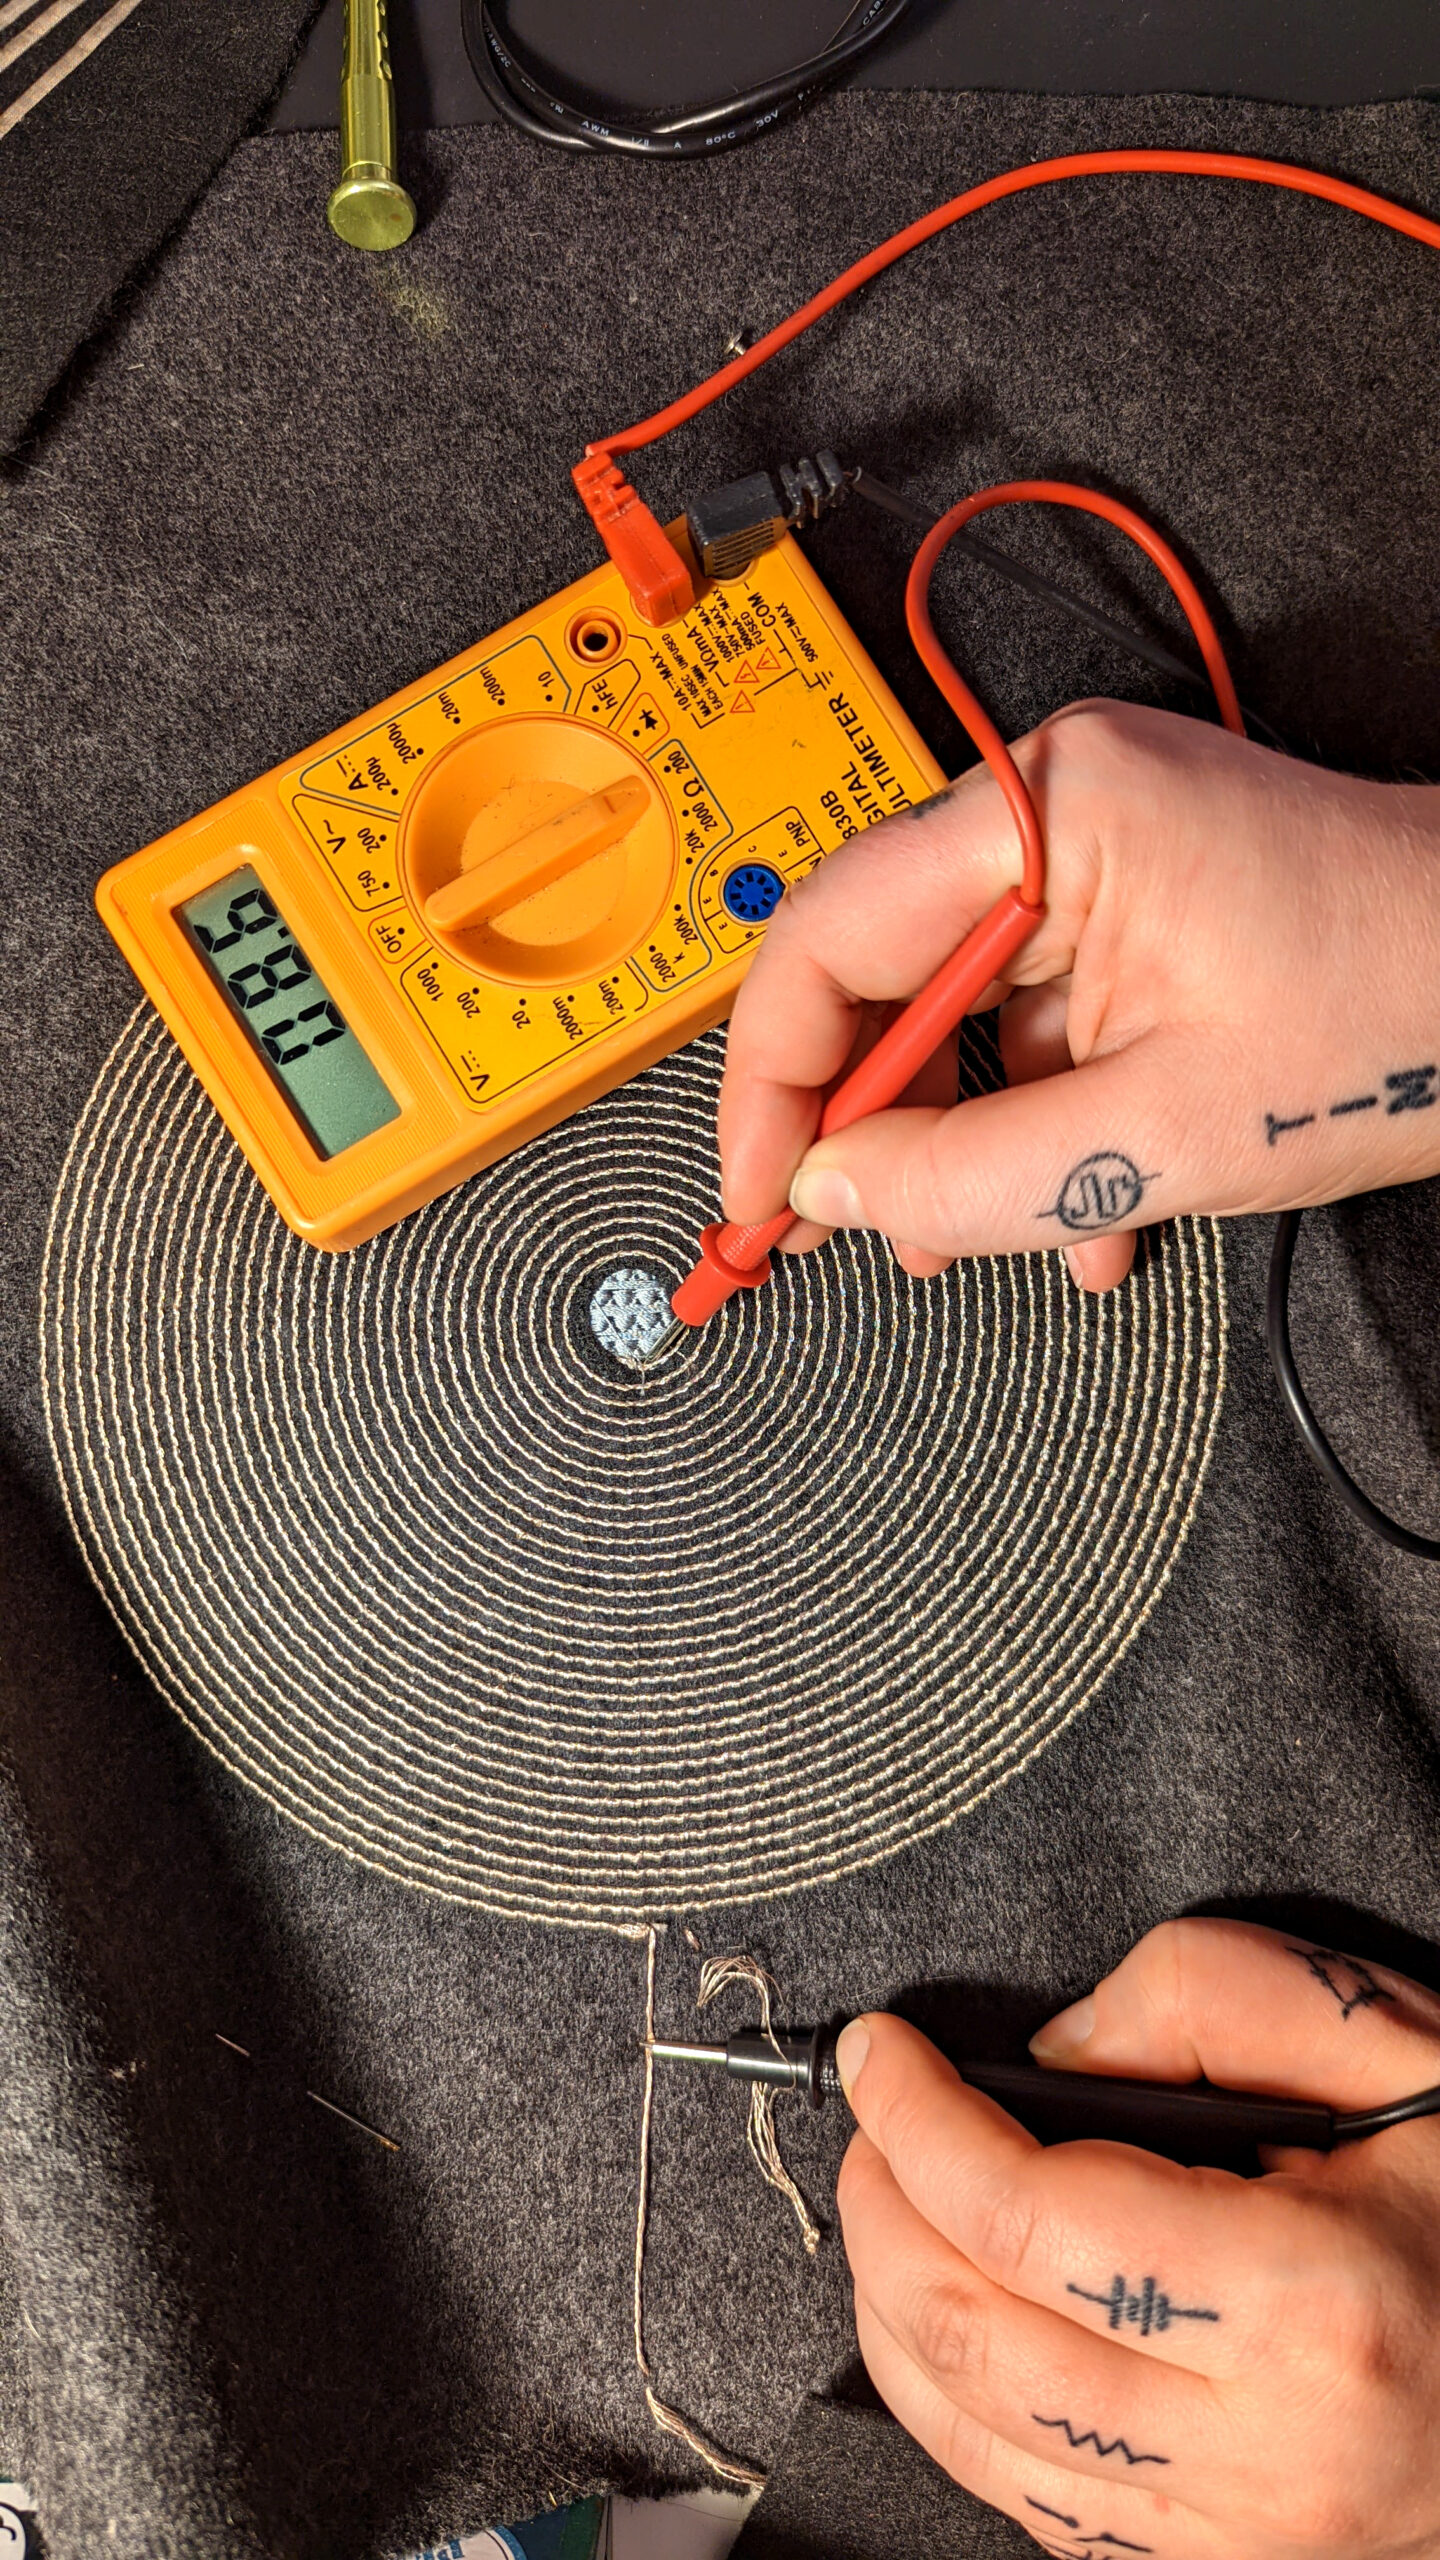
To measure the resistance of your coil, you can use a multimeter on the ohms (Ω) setting. Every meter is different, but you’ll want to find the setting that measures under 20 ohms. Place the probes at the center and end of the coil to get a reading (Figure I ). You want to make sure the signal goes through the entire coil to get the full resistance reading. If you finish your spiral and it has way too much resistance, you can use the multimeter to find the right part of the coil to cut your circuit.

If you’re lucky to have access to a sewing machine or a digital embroidery machine, you can machine-sew these too. If you’re sewing with conductive thread make sure to go slowly; I find it easier to put it in the bottom bobbin and turn the wheel manually. Take your time!
When using an embroidery machine (Figure J )
)
I like to make vector files using the spiral template from our coil calculator, and then make fun designs with them using Adobe Illustrator, Inkscape, or Affinity Designer. You can experiment with the stitch, but be careful to remove the backing before trying out your speaker.

Base fabrics: Once you’ve decided on your spiral design and material, you can choose a base fabric. As with most artistic endeavors, it’s hard for me to say one fabric is “better” than another, as each will produce different qualities of sound. You want a base fabric that is strong enough to vibrate and create a wave, but not fully rigid. I do suggest avoiding loose or stretchy fabrics which can be harder to work with. My go-to is a light, tightly woven muslin fabric, but it’s a good idea to try out lots, from silk to canvas! Light fabrics can produce tactile sensations, whereas leather or thicker materials produce deeper audible vibrations.
Magnets and amplifiers: You’ll need a magnet to activate your speaker; the sound is directly proportional to the strength of the magnet. I like to get mine from Radial Magnets but there are a ton of sources out there, and magnets can also be salvaged from all kinds of computer or electronic parts.
You’ll also need an amplifier. My preference is the stereo 20W Class D audio amplifier MAX9744 breakout from Adafruit, but if you want to get a more powerful sound, there are tons of options out there. Class D amplifiers like the MAX9744 or the mono PAM8302 use transistors to modulate the pulse of the signal to amplify it. It’s possible other sorts of amplifiers work; I’ve seen Kobakant use a Darlington pair circuit to the same effect. Some amplifiers are 1 or 2 channels, usually reserved for left and right, and they will each specify a desired resistance for your speaker, so it’s best to consult the data sheet for each one.
It’s really important to ensure your speaker does not have less resistance than the amplifier requires, or you can risk damaging your audio devices. I connect my amplifier to my phone and then explore different songs. Try out something with lots of bass, lots of vocals, and different ranges of tones in combination with your fabric and coil choices to see how it changes the sound.
You can also experiment with larger amplifiers, like the TPA3116D2, bigger coils, and stronger magnets to get some pretty rad effects. You can even add a resonator to your soft speaker if you want, or put it in a cup to hear the effects.
1. MAKE YOUR COIL
Depending on the tools you have on hand, you can either digitally embroider or hand sew your coil. If you are hand stitching, I suggest drawing your spiral on the textile using a washable marker, chalk, or fabric pen.
First, determine the total length of your wire by dividing the required speaker impedance by the resistance per meter of your wire. I need to make a 4Ω speaker with wire that has 0.25Ω resistance per meter, so I’ll need 16 meters of wire total. You can use the Soft Speaker Coil Calculator to determine the diameter of your spiral and revolutions, and mark them on your textile using a ruler before you begin, to keep it consistent.
If you want to be very precise, you can use Adobe Illustrator, Affinity Designer, or Inkscape to generate a spiral pattern using these parameters, then print it on transfer paper or use an embroidery machine or Cricut to cut out your SVG as described above. (Thank you to the Milieux Institute and Genevieve Moisan for helping me wrangle the Tajima embroidery machine!)
When you’re ready to start sewing, stretch the muslin fabric over your embroidery hoop. Pull it tight, but not too tight or it will slip out of the hoop. Give yourself plenty of space to work and try to center your spiral on the hoop. Begin stitching on the interior of the spiral using a running stitch (Figure K ), keeping the stitches a few millimeters long and consistent for best results. Take your time, and make sure to fully pull the thread through the fabric before beginning your next stitch.

When you’re done, tie off your wire and leave some length remaining to attach your amplifier. If you’re using magnet wire (Figure  L), use sandpaper to remove the enamel from both ends of the wire by carefully sanding them.

2. WIRE YOUR AMPLIFIER
Every amplifier breakout is different, but most will have a few consistent connection points. On the PAM8302 amplifier, you can solder header pins that will plug into the socket end of the DuPont jumper wires. I made two cables to attach to the board, for the power and audio input connections (Figure M ). For the 5VDC and Ground pins, I cut a USB cable and soldered DuPont wires to the end.

Then I did the same for an 1/8" audio cable and connected it to Audio Input+ and Audio Input– pins. This is a mono amp, so you’re only connecting two audio wires — use a mono cable or only one channel (L or R) of a stereo cable. (You can make two speakers if you want stereo!)

Solder the screw terminals to the 4–8Ω Load pads on the other end of the board (Figure  N). Then you can push the conductive thread from your speaker coil ends into the screw terminals and tighten them (Figure
  O). You can also use alligator clips, or solder directly to the board.

Plug the audio cable into your phone or computer.
3. JAM TO SOME BEATS!
You’re ready to hear some beats! Start playing sound through your audio device and hold the magnet just above your soft speaker (Figure P ). You should be able to hear the sound coming from the speaker as well as feel it in the magnet. Happy listening!


