YouTube player

My wife fell in love with Alice Planas and Hatti Lim’s glowing bracelet project from CRAFT Volume 06 (“Solar Jewelry,” page 123), so of course we had to make one. I built the circuit and she did the fabric, and it came out nicely, but I felt it could be brighter. So I decided to combine the solar jewelry idea with a Joule Thief circuit, which converts low voltages into short bursts of voltage high enough to light an LED.

This project is the result: the Solar Joule, which combines Solar Jewelry with a Joule Thief. (Note that the joule is a standard measure of energy, and is pronounced like jewel.)

Joule Thief Theory

The Joule Thief circuit is a fairly simple way of converting very low voltages, like from dead batteries, into an oscillating voltage that’s high enough to do something useful. There are many versions online (for example, see bigclive.com/joule.htm). The heart of the circuit is a pair of inductor coils wound together into a transformer or choke. When current runs into one coil of a choke, it’s resisted until it builds up a magnetic field, which then draws current through the other coil, going in the opposite direction. In the Joule Thief, one coil provides the kick of voltage that overcomes the LED’s forward voltage requirement, and the other generates feedback that drives a transistor into oscillations.

What will the next generation of Make: look like? We’re inviting you to shape the future by investing in Make:. By becoming an investor, you help decide what’s next. The future of Make: is in your hands. Learn More.

Project Steps

How the feedback works.

Here’s the feedback diagram. When you first connect power to the circuit, the transistor is off. There is no magnetic field in the choke, and there’s not enough power to turn on the LED. Some power leaks through the resistor into the transistor’s base, turning it on a little bit. This lets a small amount of current run backward through inductor coil 1–2 of the choke, creating a small expanding magnetic field. As a result, current is forced through inductor 3–4, which turns the transistor on even more. This positive feedback loop continues until the transistor is completely activated.

Once the transistor is done opening, the current through 1–2 stops increasing, so the magnetic field stops expanding and the current through 4–3 equalizes. This causes the transistor to close a little bit, which initiates a feedback loop in the opposite direction. Current reverses through 4–3, which closes the transistor and draws current through 1–2. When the transistor shuts off, the inductor’s magnetic field winds down and unloads a blob of charge at pin 2. Once this exceeds the LED’s forward voltage, the LED lights up. The current is quickly exhausted.

The capacitor between the resistor and the choke provides a little “spring” to the feedback action, speeding it up and buffering some of the voltage changes across inductor 4–3.

Build the solar battery.

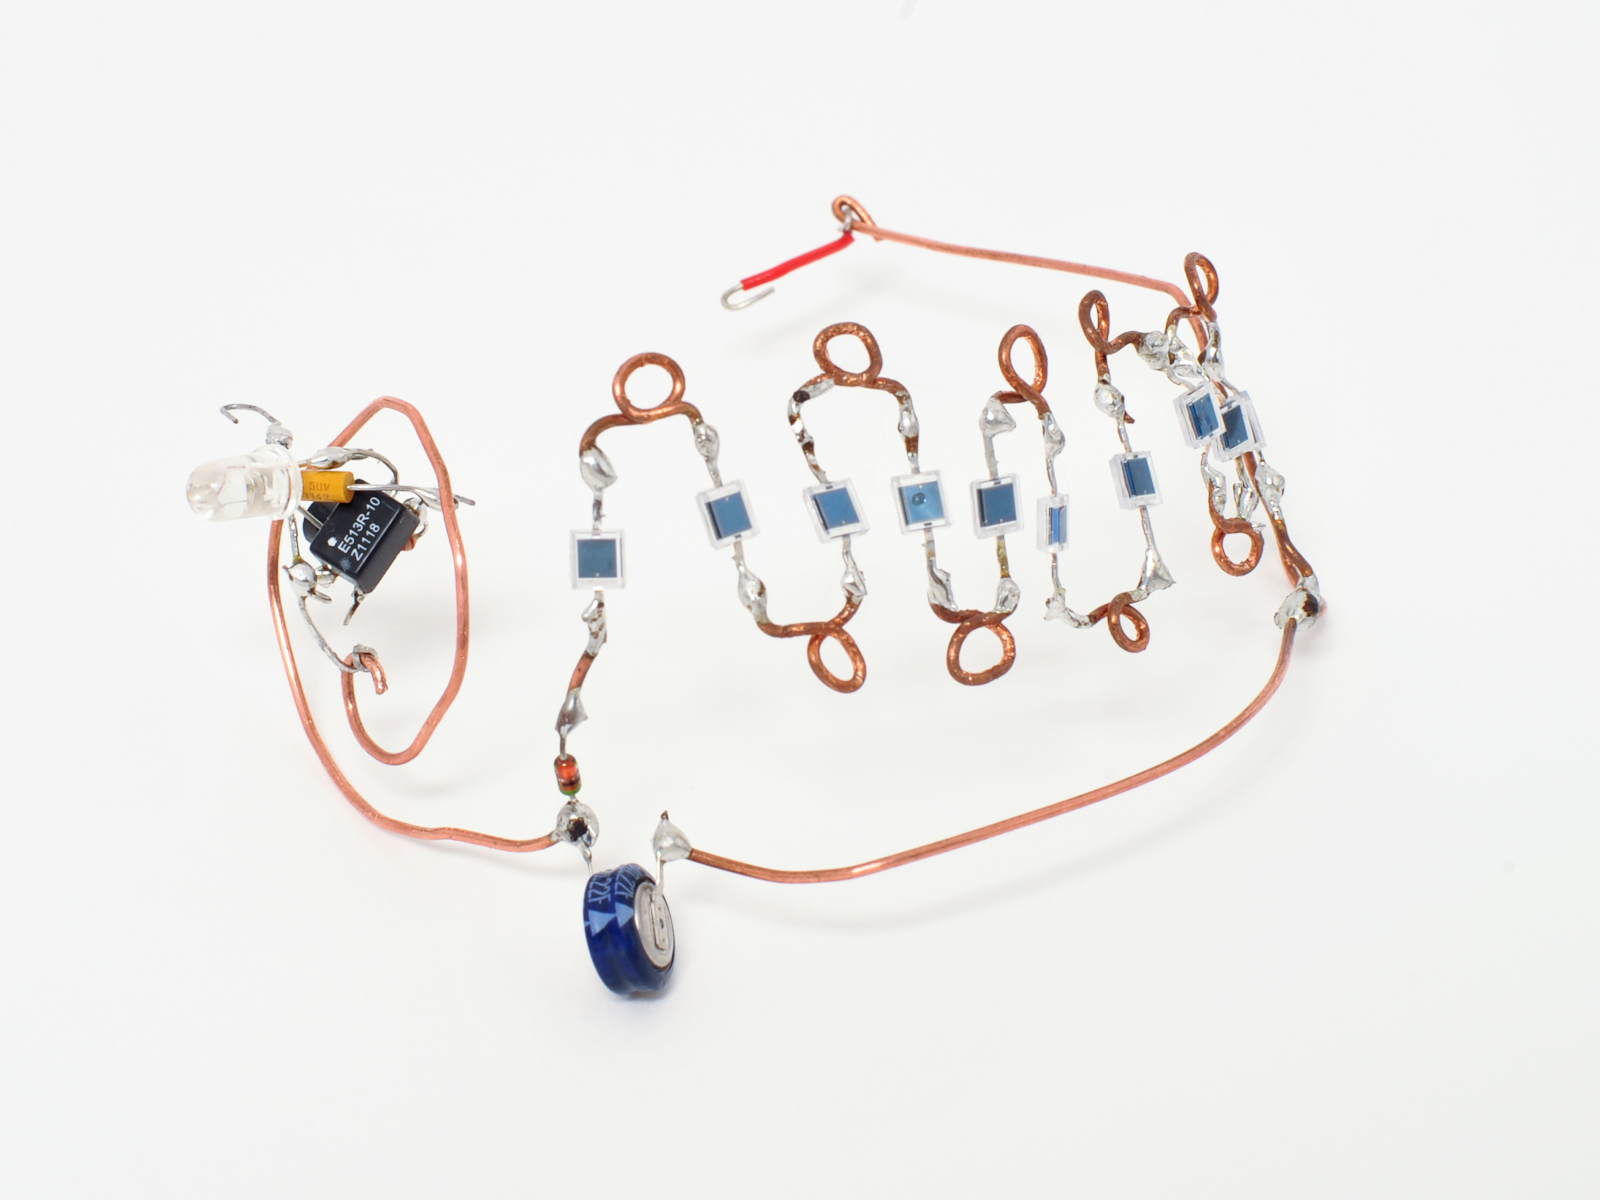
The solar battery is a series of photodiodes bridged by a supercapacitor that stores the energy they collect. The photodiodes also act as the links in the chain bracelet, and I connected them with loops of wire to provide some spring and make it easy to sew them onto fabric.

Make the photodiode chain.

To make the loops, wind solid wire around a small bolt (image 1), cut it at every other turn, and re-bend the ends of each loop into small solderable hooks (image 2).

TIP: Use a second pair of pliers to hold the screw, and try cutting at every third turn if your loops are too small too work with comfortably.

Solder 10 (or more) photodiodes in series, + to – (image 3). The silver stripe on each diode’s face indicates the + side. (If you want to go crazy, make 2 strips of photodiodes and connect them in parallel, side by side, + to + and – to –.)

Add the supercap and Schottky diode.

Solder the Schottky diode to the + end of the series, with the diode’s black stripe (the – end) pointing away from the PIN photodiodes.

NOTE: The Schottky ensures that power flows into the capacitor when the photodiodes are in bright light, but won’t flow back out when they’re dark. Any diode will work here, but a Schottky diode consumes less voltage in the forward direction, saving more for the LED.

Solder in the supercapacitor, with its + side connected at the signal diode and its – side (marked with an arrow) connected with a wire lead all the way at the other end of the PIN diodes.

Finally, solder a wire to each end of the capacitor, to connect to the Joule Thief later, and set the solar battery in the sun.

Be careful not to desolder the diode when you’re soldering the extra leads to the capacitor.

Build the Joule Thief.

Many versions of the Joule Thief circuit have you winding the transformer yourself, but since I’m lazy, I bought one. A common-mode choke, it’s a surface-mount device (thus, very small) with a ferrite core. The white dot on top indicates pin 1, and the pins are numbered clockwise.

Start by bending the emitter pin (E) on the NPN transistor back 90° away from the flat side.

Then bend the collector pin (C) and base pin (B) so that you can solder C to pin 2 of the choke, and B to pin 4. (Note where pins 1 and 4 go when you turn the choke upside down.)

Add a resistor.

Position the resistor across the base pin, bending its leads down the sides of the choke, and solder it between pins 1 and 3.

Trim the pin 3 lead, but leave the pin 1 lead long to connect to the battery’s positive (+) terminal. Any resistor from 1K to 3K should work. (A larger one will be more efficient, but I happened to have a 1K resistor on hand.)

Add the axial capacitor.

Flip the assembly over and solder the axial capacitor between pin 3 (or the resistor lead connected to it) and the transistor’s emitter pin. This capacitor isn’t required for the circuit to work, but speeds it up and increases efficiency. An axial capacitor fits better here than a regular disc-shaped cap would, making the circuit more compact.

Add the LED jewel.

Bend out the LED’s shorter cathode lead (–).

Solder the anode lead (+) to the choke’s pin 2 or transistor’s collector. Solder the cathode to the transistor’s emitter, which should be conveniently poking up.

Trim the LED’s anode but leave the cathode lead long.

Connect the Joule Thief to the solar battery.

Using wires or alligator clips, wire the Joule Thief and the solar battery together, + to + and – to –. (The Joule Thief’s positive side is where the resistor and LED come together; its negative side is where the transistor and axial capacitor meet.) The LED should glow!

NOTE: If you watch the LED’s positive lead with an oscilloscope, you should see it pulsing up to the LED’s forward voltage at 300kHz to 500kHz. Since that’s too fast for your eyes to discern, it looks like a steady glow.

Troubleshoot.

Use a voltmeter to confirm that your solar battery has a charge. It doesn’t take much! Half a volt or more is plenty.

If there’s no voltage from the solar battery, make sure the signal diode and capacitor are both oriented in the right direction.

NOTE: It may take many minutes to charge the cap the first time in bright sunlight, and maybe hours in indoor light.

If you have voltage but no light, make sure the Joule Thief is connected to the battery the right way. Check that the LED is in the right direction, the inductors in the choke are wired correctly (which is to say, opposite from each other), and that the transistor’s emitter connects to the battery’s negative side and its collector connects to the choke’s pin 2.

Mount your Solar Joule on a bracelet.

The final part of the project is up to you: a crafty mounting that you provide for the 2 parts. That’s up to your imagination!

We laid out the parts with the LED jewel at the head of the caterpillar of photodiodes. Then we sewed it to a simple cuff of neoprene salvaged from a laptop sleeve. Felt works great too and is easier to work with.

Here the LED’s free lead is used as one-half of the “clasp” to connect the circuit, but you could strengthen or extend these connections any way you want, depending on your design.

Plan ahead and you can lay out the parts of the circuit in almost any shape you can bend in the solid wire!

Conclusion

This project originally appeared in MAKE Volume 19.

Related Posts on Make: Online: