


They’re ubiquitous: those clicking ballpoint pens. Find them at the bank, the doctor’s office, or almost any place where forms and signatures are needed. Go grab a freebie pen and make this fun bagatelle: the Ballpoint Penball game!
Make It

They’re ubiquitous: those clicking ballpoint pens. Find them at the bank, the doctor’s office, or almost any place where forms and signatures are needed. Go grab a freebie pen and make this fun bagatelle: the Ballpoint Penball game!
For the ball launcher, use the ink cartridge as the plunger, the button as the tip, and the compression spring for the launching force. Reassemble the parts as shown, and discard the little cam and the barrel (above and below). The cap holds things together, and you’ll use the clip to help mount it to the game.

Make the game parts from styrene sheet following the downloadable template. To cut the pieces, score the plastic along a straightedge with the knife, then bend it backward. It will snap cleanly along the scored line. Cut out the playfield and plenty of rail strips.


Lay out the rail pattern onto the playfield with light pencil lines. Hold a rail piece in position, mark the length needed, then score and snap.

Hold the trimmed rail piece back in place and, using the solvent bottle, apply a drop of MEK directly to the joint. The MEK will flow along the seam. Carefully continue to hold the rail in position while the solvent bond hardens in just a few seconds.

Keep adding rails as you go. The corner joints will provide strength. Check the spacing between the rails to ensure your marble rolls through freely.

Last, add the stand on the back to give the playfield an angle.

To mount the launcher, glue the pen clip to a piece of styrene strip. Drill a small 1/8″ hole in the bottom rail so the ink cartridge can pass through — but not the spring.

Slide the launcher assembly into position, then move it down just enough so that the spring is slightly preloaded and still leaving plenty of travel for launching. When you’ve found the best position, solvent bond the cross piece to the rails. When the bond has fully set, test-fire the launcher. If needed, break the launcher free, reposition, and re-glue. By carefully pulling down on the ink cart “plunger” you should be able to regulate the shooting force and aim the marble into various tracks at the top, just like a real pinball game.

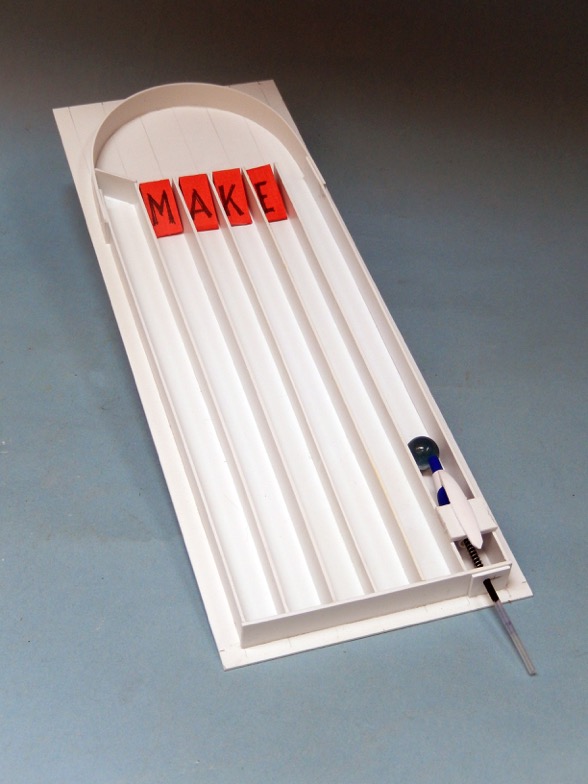
Make the four MAKE target sleds from lightweight chipboard. Trim and check: they should slide easily down the playfield tracks when pushed downhill by the rolling marble.


Set all the targets at the top of their tracks and load the marble. For a simple one-player game try to score all four targets with the fewest number of shots — a perfect game is just four balls. Or, up the tension and play against time: How quickly can you score them all? For a two-player game, take turns shooting, but aim only for your targets (one player is “vowels,” the other is “consonants,” kind of like stripes and solids in pool). Make up your own game variations, too!


