Written and photographed by Larry Cotton

The Simple Sifter Coffee Roaster in Make: Volume 71 does a fine job of roasting coffee. But it can be made even better by replacing the bean-agitating paddles with a wobble disk (Figure A below). No other coffee roaster can claim this unique method of stirring the beans. If you haven’t yet built one, build it with the wobble disk instead of paddles; you’ll be glad you did.

Figure A

Here’s how to replace the paddles with a wobble disk.

Project Steps

Disassemble

Remove the paddles and shaft from the Simple Sifter by reversing assembly instructions. You shouldn’t have to pull the shaft (axle) all the way out if its straight portion is threaded. The motor can be loosened, but doesn’t need to be completely removed.

Most shafts are fully threaded except for the cranking handle end; they are easiest to mount the wobble disk on. Others come with a few threads on the end opposite the handle, for a nut. If you have one like that, you can cut threads (usually with a 10-24 threading die) on the first few inches of the smooth part of the shaft. Clamp the shaft in a vise first, of course.

Most shafts are fully threaded except for the cranking handle end; they are easiest to mount the wobble disk on. Others come with a few threads on the end opposite the handle, for a nut. If you have one like that, you can cut threads (usually with a 10-24 threading die) on the first few inches of the smooth part of the shaft. Clamp the shaft in a vise first, of course.

NOTE: 10-24 seems to be the standard thread for 8-cup flour sifter shafts. If yours differs, copy it. Dies are available in most hardware stores.

If you want to make an entirely new shaft from 10-24 all-thread (threaded rod), just copy the dimensions from the existing shaft. Threads on the motor-driven end of the shaft won’t interfere with the roaster’s operation, but you can sleeve it if you wish. (Telescoping antennas are an excellent, cheap source of small tubing!)

Make the Wobble Disk

Cut a 5¼” diameter wobble disk from 1/32″-thick sheet aluminum or steel. Aluminum can be cut with metal-cutting shears, but for steel I used a jigsaw with a metal-cutting blade, firmly clamped upside down (blade pointing up) in a vise. (I don’t own a metal-cutting bandsaw, which should be ideal.) In any case, be very careful and wear
safety glasses!

An alternative is to use several sheets of thinner (.010″) flat metal, such as aluminum flashing, riveted or screwed together. The finished wobble disk needs to be stiff; bendy ones cannot push the beans around
with authority!

Smooth the outside diameter of the disk, working up to about 320-grit sandpaper. Drill an elongated hole in its center (measure carefully) to allow the disk to be mounted on its shaft at a 45° angle. Here’s how: Use a 7/32″ bit, preferably in a drill press, to drill the hole. When the bit breaks through, and while it’s still turning, hold the disk tightly, and slowly tilt it back and forth to 45° angles. Presto — an elongated hole! Or if you don’t feel comfortable with that technique, lengthen the hole (both ways) with a small rat-tail file until the disk tilts at a 45° angle on its shaft.

Mount Disk to Shaft

There are two ways to mount the wobble disk on the shaft: with a small bracket or with two short pieces of aluminum tubing.
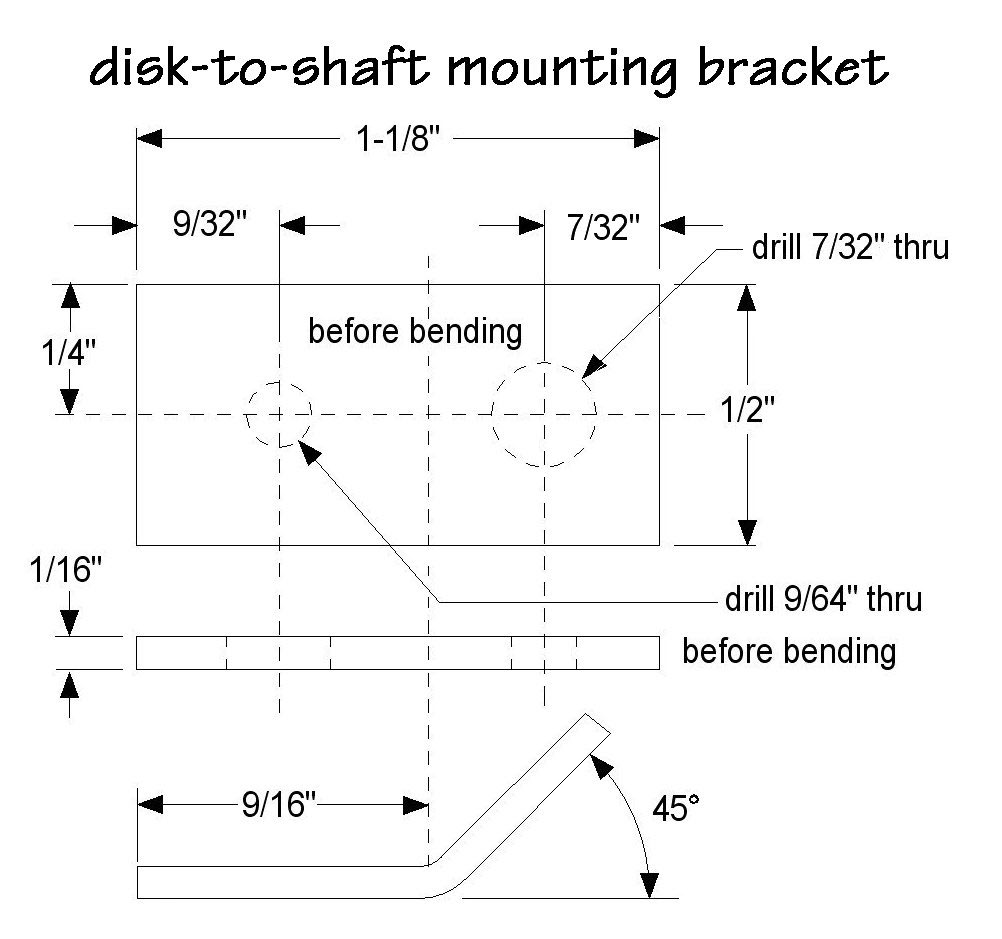
3a. If you have a small piece of 1/16″-thick aluminum, make a disk-mounting bracket to the diagram. If you don’t have the aluminum, skip to Step 3b.

Push the disk about halfway down the shaft. Thread a 10-24 nut until it touches the disk. Push the bracket over the shaft until its longer (bent) end is flush with the disk. Mark on the disk through the small hole in the bracket, remove the bracket, and drill a 9/64″ hole where you marked it.

Put the parts back onto the shaft in the same order, then fasten the disk and bracket together with a ¼”-long 6-32 Phillips screw and nut (Figure E). Go to Step 3c.

3b. For this disk attachment method, use 1″ or so of approximately ¼” ID aluminum tubing. Cut with a hacksaw two roughly ½” lengths, each with a 90° and a 45° end.  One 45-degree hacksaw cut is all that’s necessary.

Thread one 10-24 nut onto the shaft near the middle. Slip one piece of the aluminum tubing onto the shaft to the nut, with the angled end away from the nut. Slip the disk onto its shaft and seat it against the angled face of the tubing.

Add the second short piece of tubing (angled end first) so the disk is trapped at a 45° angle. It’s OK for the tubing pieces to be slightly askew relative to the shaft!

3c. Regardless of the disk-holding method, thread another 10-24 nut onto the shaft so that it traps the disk as close to the center of the shaft as possible. Holding both nuts with wrenches or pliers, tighten them until the disk is firmly mounted.

Figure B shows the tubing method holding the disk. If your tubing material is slightly too big in diameter, add #8 washers between the nuts and the pieces of tubing.

Reassemble and roast!

Reassemble everything, keep fingers clear, run the motor and check (listen!) for any spots where the disk might drag the sifter sieve. No rubbing? You’re good to go. 

If the disk does touch the sieve occasionally, there are three things you can do:

Cut a 6″-long, 1″-diameter wood dowel and round one end with coarse sandpaper. Gently press the rounded end into the interfering area(s) of the sieve.

Reposition the disk, with its mounting hardware, away from the interference.

Re-cut the disk 1/8″ smaller diameter. (Flour sifters’ sieves aren’t identical, unfortunately.)

Happier roasting!

Conclusion

This article appeared in Make: Volume 76.