When I had the pleasure of visiting the workshop of my buddy and YouTube personality Jimmy DiResta last fall, I came away with one of the numerous, plasma-cut logo stencils that tend to litter his workspace. I don’t know exactly how it came into my possession, actually. It just sort of found its way in my bag. I really don’t know how it got there.
At first, I was unsure what to do with it. But, when I got back to my own workshop, I devised a ridiculously obnoxious, Wi-Fi-enabled alarm that flashes DIRESTA in red and sounds an ear-splitting horn every time Jimmy uploads a new video to YouTube. Dubbed the DiRestAlarm, it’s one of the dumbest things I’ve ever made. I couldn’t be more proud.
I’ve developed a simplified version to share with you here. With a bit of existing Raspberry Pi knowledge and an internet-connected Pi at the ready, you’ll be able to create your very own alarm to notify you when your favorite maker has published a new video.
Materials
- Raspberry Pi single-board computer with a Raspbian-flashed microSD card and internet access set up
- LEDs: red (1) and green (1)
- Switch, momentary button
- Resistors, 330Ω (2)
- Solderless breadboard for testing
- Jumper wires
- GPIO breakout board (optional) like the Adafruit Pi Cobbler — handy for prototyping, and for soldering the circuit permanently if you choose
- Enclosure (optional) of your choice
Tools
- Computer keyboard, mouse, and monitor for setting up the Pi; not necessary to run the alarm after that
- Soldering iron and solder (optional) to make the circuit permanent

Build Your YouTuber Alarm
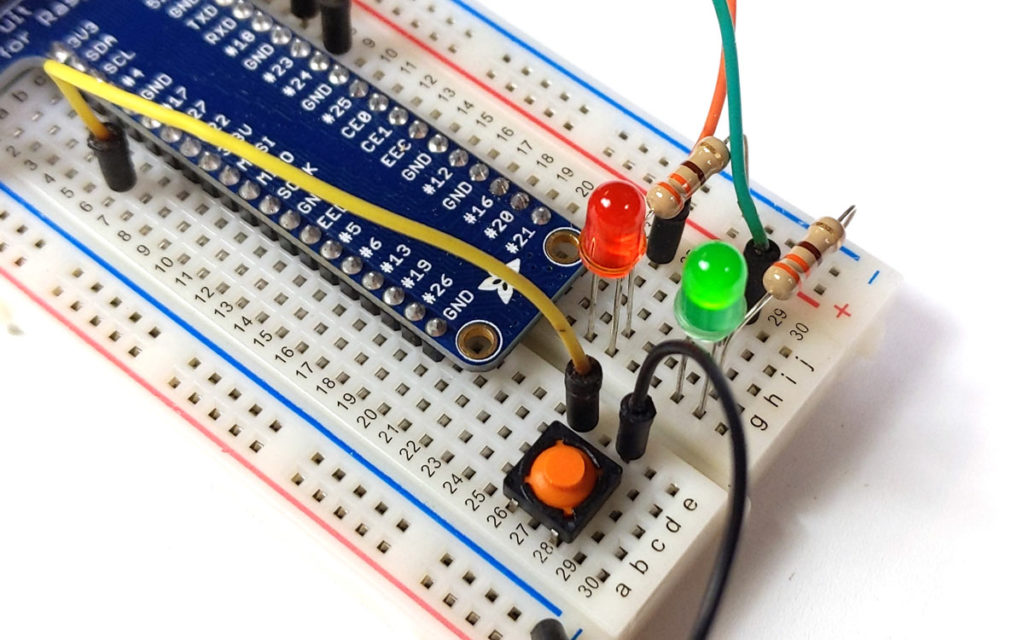
1. Wire Up the Circuit

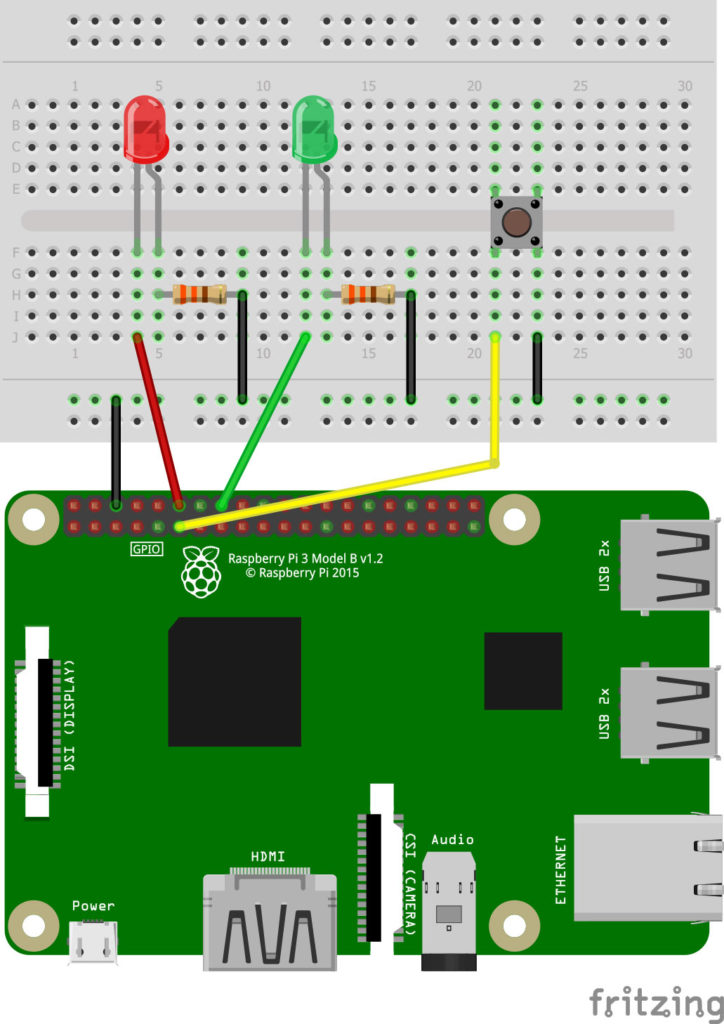
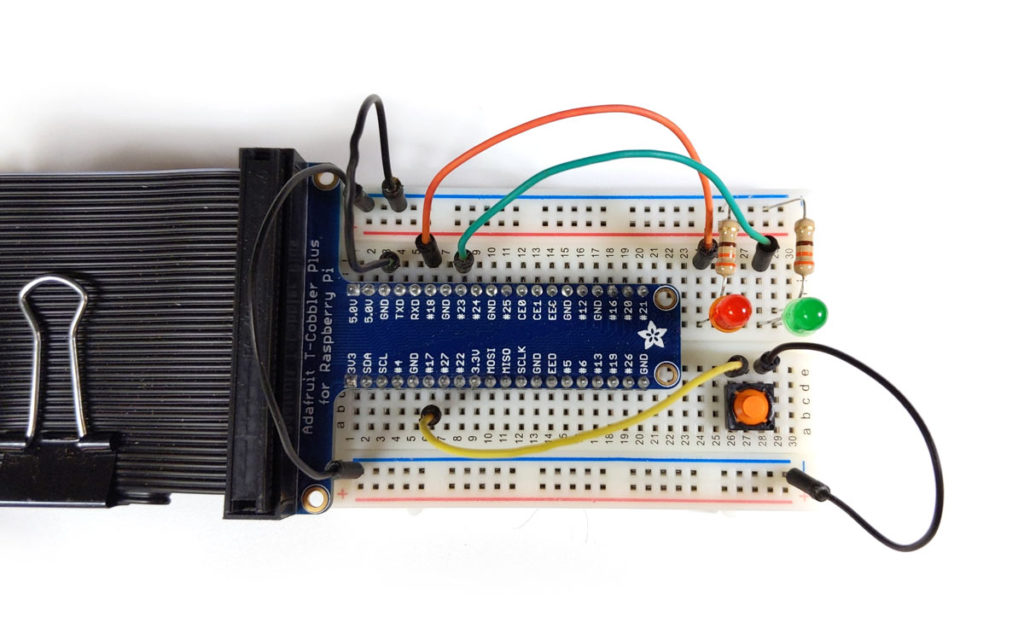
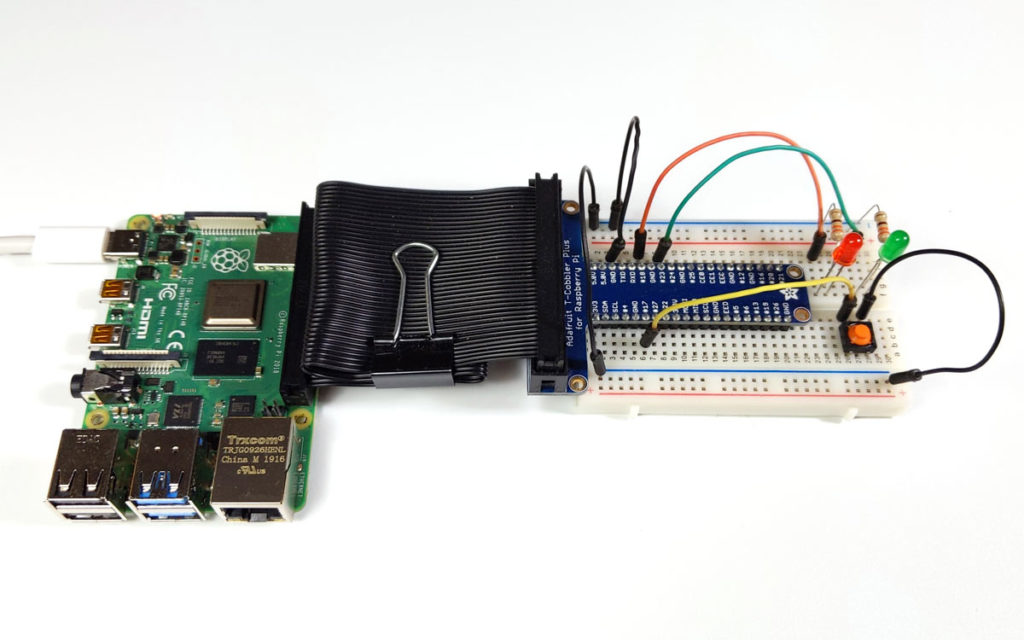
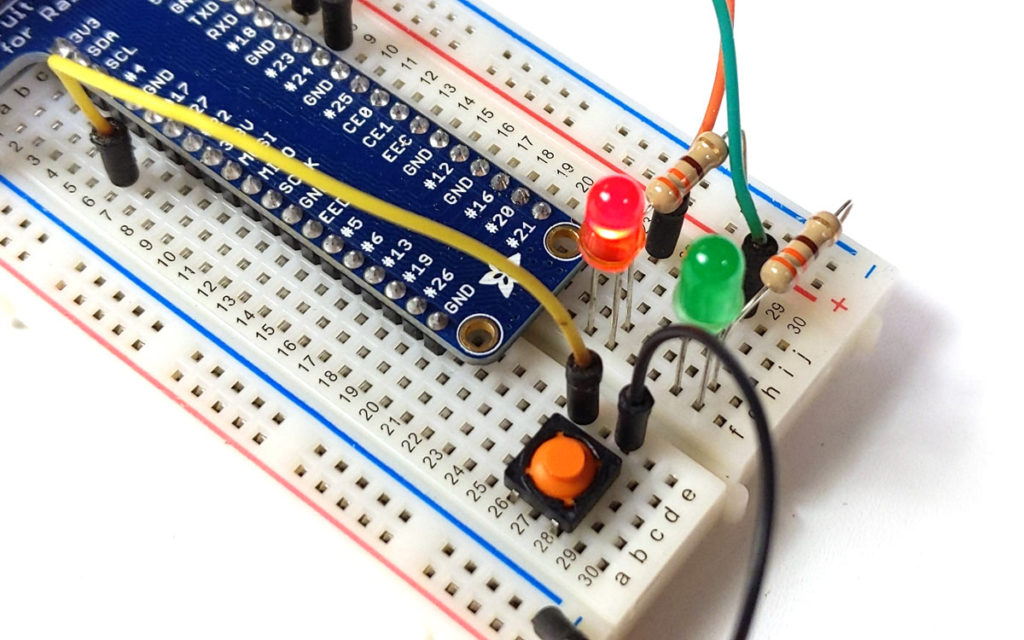
The schematic for the simplified alarm is fairly straightforward. The red LED, along with its resistor, is connected to the Raspberry Pi’s GPIO via pin 18. The green LED, via pin 23. A momentary button, which will serve to reset the alarm once it goes off, is connected to pin 17.


The completed circuit is really all you need to get started.
2. Give Your Pi a Google Account
To prepare your Raspberry Pi to receive YouTube notifications, start by going to Google and setting it up with its own account. The name of the account can be anything you want. This will create both a unique Gmail account and a login for YouTube.
3. Turn on YouTube Notifications
Log in to YouTube with the new Google account, then subscribe to the maker for whom you want to receive notifications. Make sure the bell icon next to the Subscribe button is set to All.
Next, go to Settings → Notifications → Email Notifications, and turn on “Send me emails about my YouTube activity.” Also, make sure Subscriptions is selected under Your Preferences.
Now you should receive an email notification to the new Gmail account every time your favorite maker publishes a video.
4. Install the IMAPClient library
To more easily download and parse your email, we’ll be using a library called IMAPClient, which you’ll need to install on your Raspbian-running Raspberry Pi. You can install it simply by typing the following at a terminal command prompt:
pip install imapclient
5. Program your Pi
The real heart of the alarm is the Python script MakerAlarm.py, which you’ll need to upload to your Raspberry Pi. The full code is available as a free download at makezine.com/go/ytmakeralarm.
Having a look at the script, a few variables may be of interest to you. FROM and SUBJECT are the attributes the script will search for when checking for new email. All other messages are ignored. MAIL_CHECK_FREQ defines how often to check for new mail. The default is 600 seconds, or every 10 minutes.
For testing purposes, you may change the FROM and SUBJECT variables if you would like to send your Pi a test email from your own personal email account. Just remember to change them back when you want to check for official YouTube notifications.
The only variables you need to customize are USERNAME and PASSWORD. USERNAME is simply the new email address you created above. PASSWORD, however, is not the password for your Google account, but a unique password you will need to create in the next step.
6. Give Your Pi Access to Gmail
Before your Pi can log in to check its Gmail account, it will need its very own password, or what Google calls an “app password.” To set one up, log in to the new Google account, select Manage Your Google Account, and proceed to Security.
Under the section labeled Signing in to Google, select 2-Step Verification. You’ll need to set this up before you can create app passwords. Simply follow the instructions and enter the code to verify that it’s you.
Return to the Security page, where you should now be able to select App Passwords. Under the Select App option, choose Mail. Under the Select Device option, choose Other and enter a custom name, like “Maker Alarm.” Finally, click Generate. Google will then create a 16-character password that you can use exclusively for the alarm. Copy this password before proceeding, because Google will not display it again.
Lastly, paste this password into the variable PASSWORD in MakerAlarm.py and save your changes. That’s it.
Monitor That Maker!
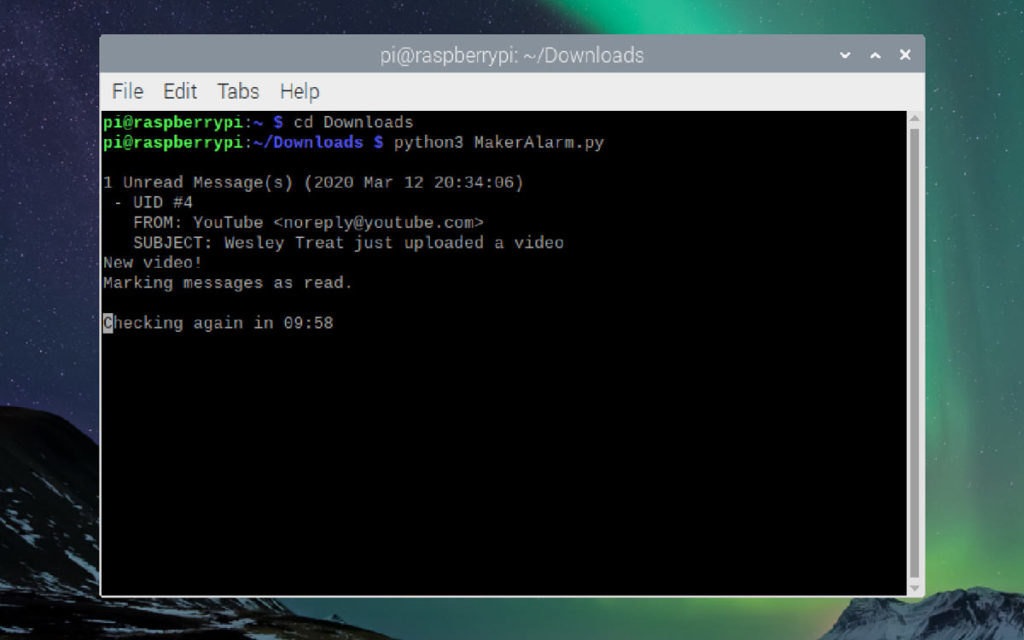
To use your YouTube Maker Alarm, make sure your Pi is connected to the internet, then open a terminal window, navigate to the directory where you uploaded the script, and type the following:
python3 MakerAlarm.py
When the program starts, two things will happen: the red LED will turn on and the Pi will check its Gmail account.


If it doesn’t find an unread notification email from YouTube, the red LED will remain lit and the script will display a timer in the terminal window, counting down till it tries again.


If it does find a notification email, the green LED will flash several times, then remain lit as a reminder to let you know your favorite maker has uploaded a new video!

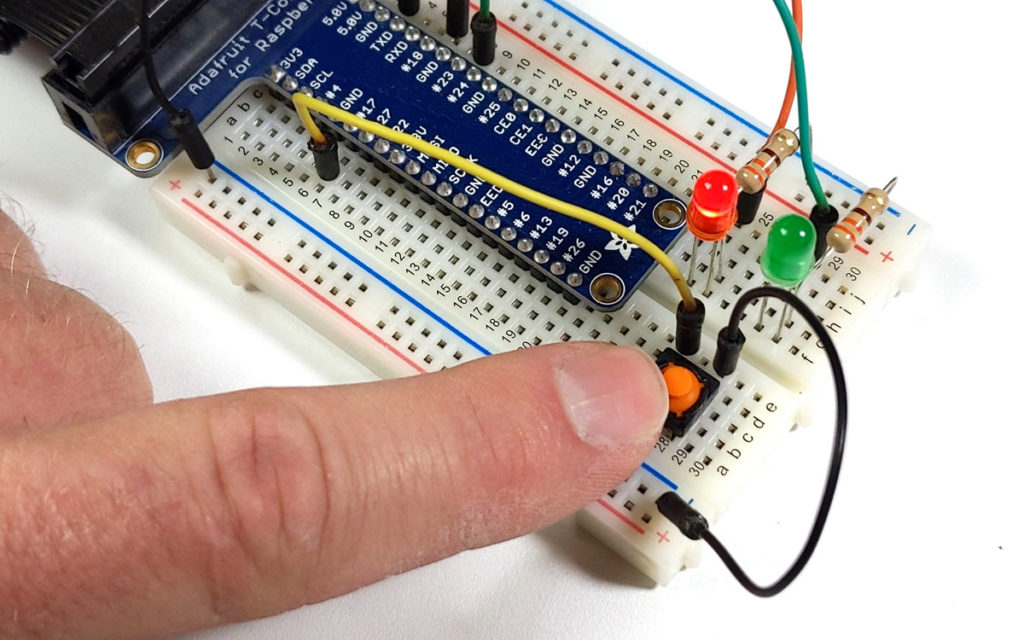
Once you get a chance to watch it, simply press the momentary button to reset the alarm back to red (Figure H).
Until then, the script will continue to check for new email in the background, and the alarm will flash again if a new, unread notification email is found.
Amp It Up
Now that you’ve got the basic alarm working, you’ll probably want to customize it. Create a nice enclosure by 3D printing a fancy case, or fashion one out of wood. You can amplify your alarm’s effects by adding more or larger lights, or by incorporating audible alerts with a piezo buzzer.
Of course, if you want something that will really grab your attention, you can do like I did and hook it up to a startlingly loud motorcycle horn. (This involves a lot of power considerations, like a large 12V supply, a relay module to trigger the horn, and a step-down circuit to power both the Pi and the relay module.) But I don’t recommend it if you’re keeping the alarm in your workshop where you’ll be operating any dangerous power tools!

See the original DiRestAlarm build on youtube, and learn more about how IMAPClient works.
This article appeared in Make: Vol. 74.