
Last year I worked on a project, “Plotting Curves,” to produce organic vessel-like forms that printed well without the use of support material. The goal with the work was to print big and iterate new forms quickly. All of the forms were printed on my large format Printrbot Plus and later on the Makerbot Z18 and were hollow with no roofs, bases, infill, supports, or rafts. The challenge when crafting the CAD in Rhino was to plot out profiles that could be revolved and lofted without going over the 45° rule as regards support material (i.e. anything less than 45° is likely to need supports). The resulting forms turned out to be aesthetically very exciting reminiscent of naturally occurring coral formations and so forth.
In addition to working on forms that would be challenging for an FFF 3D printer to accomplish, I also “hand colored” each of them, drawing inspiration from Thingiverse user jamai’s “Filament Colorizer” published in 2013. Sometimes I would color in a few feet of filament at a time, other times I would shade in as much of the roll as I could access at a given time with multiple colors overlapping and bleeding into each other. The results from these interventions were very successful with high contrast banding of colors highlighting the striations found in the layered plastic.
It did occur to me, though, that it would be interesting to try to control the application of color better. Could I draw shapes, a pattern, or even an image on a surface? After all, isn’t the horizontal movement of the extruder similar to the shuttle in weaving, each layer of plastic analogous to the woof (weft). Could the warp be unlocked by controlling the frequency of marks on a given portion of filament? That was the question — one that I wanted to start answering during my residency at the Maker Media Lab.

One of the great things about the Lab is the collaborative atmosphere. My initial plan was to use Arduino activated solenoids to move the marker pen back and forth until Cameron Mira, one of the Maker Media Lab interns, pointed out that that would probably be a bad idea. Solenoids draw a lot of power, heat up, and aren’t generally that good for high frequency repetitions. So scratch the solenoids.
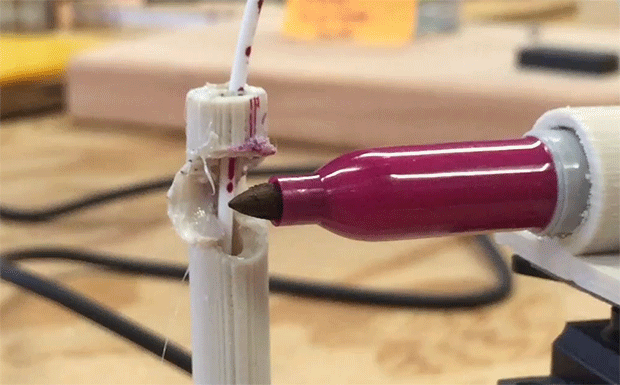
Cameron suggested I use Servos. Initially, I did not have much success with this either. It turns out that I was using the wrong type of servo (facepalm). Maker Media Lab speaker Sam Brown pointed this out and a quick change from continuous to standard type servo and we were in business with a little device moving the marker back and forth from 10° to 0° and back again with a delay of 1 second.

From there it was a relatively simple task to mock up a prototype in Rhino using STL files from Thingiverse of a “Futaba S3004” by txoof and “Sharpie Fine Point” by beardicus to scale the soon to be 3D printed parts around. Amazingly, both the STL files were spot on and all my connections worked first time (this never happens). However, I did need to make some alterations with a soldering iron to the filament guide in order to get the tip of the marker to connect with the plastic properly. It’s not the prettiest mod but it got the job done at lot faster than printing a new piece entirely.

At first, I ran it using a magenta marker (forgetting that the pigmentation would be very faint), then brown (which came out ok), and finally black which turned into a pale blue after printing. While the banding on the print is quite clear, I’m still a long way off from “drawing” on the surface. There’s a lot of irregularity in the mark making — partly due to the movement of the extruder creating fluctuations in the movement of the plastic through the filament guides. I may mount my next iteration either above the printer or design something that causes less friction on the line. I need to print some standard objects, cylinders etc, and increase the number of servo mounted pens to 3 or 4 for stronger color. Then, I’ll start working on the programming more — trying to dial it in and get some clearer results.
For now, this is a win. It is a step in the right direction and is a micro controller project I can sink my teeth into. Files for the STL’s, CAD and Arduino are posted here on Thingiverse.
[youtube https://www.youtube.com/watch?v=lLH2GXxwnaU]ADVERTISEMENT


