


One of the challenges of getting started with CNC routing is deciding how to hold down parts reliably. As a luthier, I make a lot of odd-shaped parts out of a variety of materials, and I’ve developed methods that work well for each situation. They’re also applicable to many other kinds of prototyping or manufacturing in the small shop. Making fixtures for your CNC is a great way to get to know your machine, and it will open your eyes to all the great things you can do with it!
The heart of my CNC setup is an MDF “spoilboard”. I never cut into it on purpose, as you would with a traditional spoilboard. The working area has been surfaced with the CNC, and has two T-tracks for using hold-down clamps. It also has a series of bronze bushings installed along the centerline that receive ¼" steel dowel pins for indexing many of my fixtures. Each fixture has matching bushings. I just place the fixture on the spoilboard, locate it with two pins, and hold it down with four clamps. This takes a matter of seconds, and I know that the fixture is reliably positioned and is secure. Once I’ve “homed” my machine, I can cut without resetting my X and Y axes coordinates, because I know exactly where the fixture is on the table.
I use a variety of methods for holding the actual workpiece to whichever fixture I’m using. Each has its strengths and weaknesses, based on the geometry of the part and the time you can a lot to making a dedicated fixture for it.
| Hold-down method | Best applications | Strengths | Limitations |
| T-track clamps | Large pieces of flat stock, securing other fixtures | Fast and easy to use | Can get in the way of cutter or dust shroud. |
| 2D vacuum clamp | Production parts larger than 10 square inches with a flat bottom surface | Fast once set up. Holds down the entire part with even clamping pressure. | Time consuming to make. Additional cost of vacuum setup. Parts normally can’t have holes. |
| 3D vacuum clamp | Production parts with a machined 3D bottom surface that must be held while you machine the other side | Fast once set up. Holds down the entire part with even clamping pressure. | Time consuming to make. Additional cost of vacuum setup. Parts normally can’t have holes. |
| Universal vacuum | Relatively large parts cut from sheet stock (e.g. cabinet parts) | Fast to use, can hold an entire sheet while you cut parts from it. | Requires a large vacuum source. Parts need to have a large surface area. |
| Double-sided tape | Flat parts of nearly any size | Fast and easy to use, perfect for one-off parts and prototypes. Easy to remove yet very strong if it sticks well to the stock. Has some flexibility. | Can release unexpectedly if not enough tape is used or tape doesn’t adhere well to surfaces. Can be expensive if you use a lot. |
| CA | Small flat parts | Holds even tiny parts securely. | Works best with impervious materials, must be dissolved with acetone to release. Can be brittle. |
| Vise | Small to medium-sized parts that don’t have a large flat side on the bottom or can’t be held securely by other means. | Can hold odd-shaped parts very securely. | Requires a machine with higher Z-axis clearance. |
Clamps
I use my T-track clamps mostly for holding down other fixtures, but they’re also great for holding down large pieces of stock if you’re sure they won’t get in the way of the cutter or dust shroud. I have a few chunks missing from my clamps from cutting into them accidentally!
Vacuum
For parts with a large surface area (larger than about 10 square inches) and no internal cutouts, vacuum clamping excels. It takes some time to make vacuum clamps, so they’re usually best for parts that you plan to make repeatedly. The vacuum system need not be too expensive — for around $150 you can get a small pump and all of the necessary fittings. The CFM required depends largely on the porosity of your fixtures and your workpiece, but I manage fine with a 3-CFM pump. If you have a large-capacity compressor, you can also use a venturi system, which will create a vacuum from compressed air.
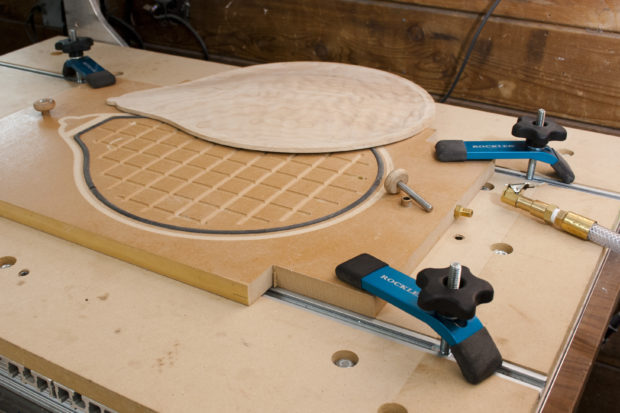
I like to use quick-release fittings that make it easy to attach the vacuum hose to each fixture. A vacuum-clamping fixture has an internal air hole running from the quick-release fitting to the interior area of the part outline, where it is then connected by a vertical hole to the top surface of the fixture. A grid of grooves under the part helps distribute the vacuum evenly. Finally, a gasket just inside the perimeter of the part seals the vacuum. For this I like to use ⅛” or ¼" close-cell foam rod set in a groove. When the vacuum is turned on, the rod compresses in the groove so that the workpiece sits completely down on the surface of the fixture, ensuring that it is located accurately in the Z (vertical) dimension. Non-porous materials such as acrylic or HDPE work best for most vacuum fixtures, but as in the example above, MDF also works surprisingly well if you seal all its surfaces with a few coats of shellac or other wood finish. Because there will be some air leakage, you have to make sure your pump can keep up with it.

In addition to flat vacuum fixtures, you can make 3D ones, which can hold an odd-shaped part after you’ve machined one side and flipped it over to work on the other side. I use 3D vacuum molds like the HDPE one above to hold the arched surface of mandolin and guitar tops and backs while I carve the concave interior side.

You can make vacuum fixtures for holding multiple small parts if you devise a system for distributing the vacuum to each part. For making fretboards I have a fixture with several “zones” that I can turn off and on individually in case I don’t want to use them all at once. Each zone corresponds to a “fixture offset” on the CNC. I’ve found that ¼" drip irrigation and tubing work very well for distributing the vacuum to each zone, and are inexpensive. You can get little valves that you can set right into the surface of the fixture. In the photo below you can see the network of tubing in the underside of the fixture.

There are also “universal” vacuum clamping setups, where a high volume of air is pulled through holes in the entire table (or just through porous MDF). This is widely used by cabinetmakers, but requires a much larger vacuum pump, and parts with a larger surface area than I work with.
Double-Sided Tape
For holding down one-off parts where you don’t want to take the time to make a dedicated fixture, double-sided tape works great. Thin carpet tape holds well but can be hard to remove and will gum up cutting tools if you’re cutting all the way through the part. I’ve found that Scotch “Permanent” double-sided tape works wonderfully. It won’t gum up bits and is easy to remove, yet holds even very small parts well. I use it for wood, plastics, and sheet metal. If I am going to be cutting all the way through a part, I’ll clamp a sacrificial piece of MDF down and then use double-sided tape to secure the workpiece to that. You can also use a combination method like I did below, where clamps help hold the stock to keep it from shifting during aggressive cutting passes, and double-sided tape keeps each part from shifting as it is released form the stock.

Cyanoacrylate
For the tiniest parts, cyanoacrylate excels. I cut a lot of inlays out of mother of pearl and abalone, and I use medium-viscosity CA to stick the shell blanks to a thin piece of phenolic backer board, which in turn is held down to an indexed fixture with double-sided tape. I scan a sheet of positioned shell blanks on a flatbed scanner beforehand, so I can import the image into my CAD software, allowing me to know exactly where each shell blank is positioned in X-Y coordinates. Then when I need to cut some inlay pieces I can just put the whole fixture on the machine, index it with the two steel dowels, clamp it down, and cut away. I regularly cut pieces smaller than 1 mm wide with this method. After cutting out my inlay pieces, I cut through the phenolic sheet around the perimeter of the “used up” shell blank, free just that blank from the double-sided tape, and soak it in acetone for a few hours to release the tiny inlay pieces. For sheet brass and other metals, you can try CA, but sometimes heat expansion of the metal during cutting while cause it to release from the brittle CA. For this reason double-sided tape may work better because it allows for slight movement.

Vises
Vises are great for holding awkward parts that don’t sit flat on the work surface. They can hold even small parts quite securely, so you can make bold cuts without fear of them shifting. However, vises take up valuable Z-axis space on your machine, so be sure you have enough vertical space before buying vises. Adequate Z-axis height is an important factor to consider when purchasing a CNC router, especially if you plan to stack spoilboards and fixtures. I have my vises permanently attached to a sheet of MDF with indexing bushings installed, so they’re easy to put in place.

ADVERTISEMENT


