


What flies like a quadcopter, but can spin like the spinners that seems to be everywhere these days? The SpinnerDrone of course! I decided to make mine out of a cheap Hubsan drone and a ceramic bearing that goes in the center of a spinner.

For the drone parts, I chose the Hubsan H107C. I’ve used the H107L quite a bit, crashing it and fixing it many, many times, so I knew what it would take to transfer the internal parts from this model into my own custom frame. The “C” model features larger motors in order to compensate for an onboard camera, which I thought would work well for the added weight of a bearing in the middle of the quadcopter.
For the frame, I chose extremely durable clear polycarbonate. It’s an excellent material, and I had quite a bit of it lying around from my ClearWalker Strandbeest project. As it just so happens, I worked on a design for a new Hubsan frame out of wood a while ago, and though I never really completed it, I still had the drawings available. It was fairly simple to adapt this design to accommodate a bearing—just put a big hole in the middle!

Once it was done, I sent the design to my CNC router. After some deburring the frame actually looked quite nice. You may notice that there are three slots for weight reduction on the arms, and it would be a normal assumption to think that I missed one. This isn’t quite true as my initial plan was to mount the battery opposite the heavier non-cut arm, and let that help compensate for the discrepancy in weight. Things didn’t quite turn out that way, but it ended up not really mattering.
Even with one non-cut arm, my new frame was actually much lighter than a stock Hubsan frame. Though, to be fair, it didn’t include any landing gear or protection for internal components.

Once the bearing arrived (I cut my frame out based on the advertised dimensions), I was very happy to find that the central ceramic bearing fit into its designed hole perfectly. I could press it in with my fingers, and it would simply stay there. Two of the motors did the same, though the remaining pair had to be hot glued to stay in place. Apparently there was either some variation in my process or in the motor diameter. Still three out of five isn’t too bad in my book, and after some hot glue, the two looser motors stayed in place without issue.
At this point, I soldered the motors to the central control board, extending the connections with extra wire and heat shrink tubing. I then attached the control board and battery at 90 degrees to their normal orientation below the quadcopter. In my mind, this would minimize how much of the center of gravity was offset. However, it seems that this orientation also made it think that it was on its side when resting on a table or the floor.
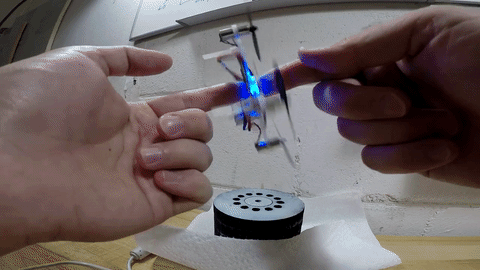
After several unsuccessful attempts at flight—though a quite successful spinning session—I hot-glued the control board to the edge of the spinner. After dealing with one final minor issue with a reversed positive and negative lead, I finally had a spinner that could fly, or perhaps a quadcopter that could behave like a spinner.
Overall, this project has been a great success. The only minor complaint is that it can’t quite be spun one handed between one’s index finger and thumb. However, it works well when held using fingers on two hands. Additionally, I finally learned that my frame design works as I’d planned, and that zip ties make great landing gear for something so light!
Of course, this isn’t my first rather off-the-wall hack involving a quadcopter. I actually reused the guts of a broken quadcopter to control a miniature Strandbeest, and, in a very different build, I mounted a heavy GoPro OMNI rig to an Inspire 1 drone. Each of these builds were a lot of fun, and with every success and failure it seems I learn something new!
ADVERTISEMENT


