Finished Vortex Air Cannon

I built this giant vortex air cannon to “bring the boom” to Maker Faire Atlanta in 2015.

My first design used a 32 gallon round plastic trash can. I followed one of the many tutorials on YouTube to figure out how to do this. It worked great but it just wasn’t big enough (the “boom” was lacking) so I went back to YouTube looking for giant vortex air cannons and I found the Candle Cannon.

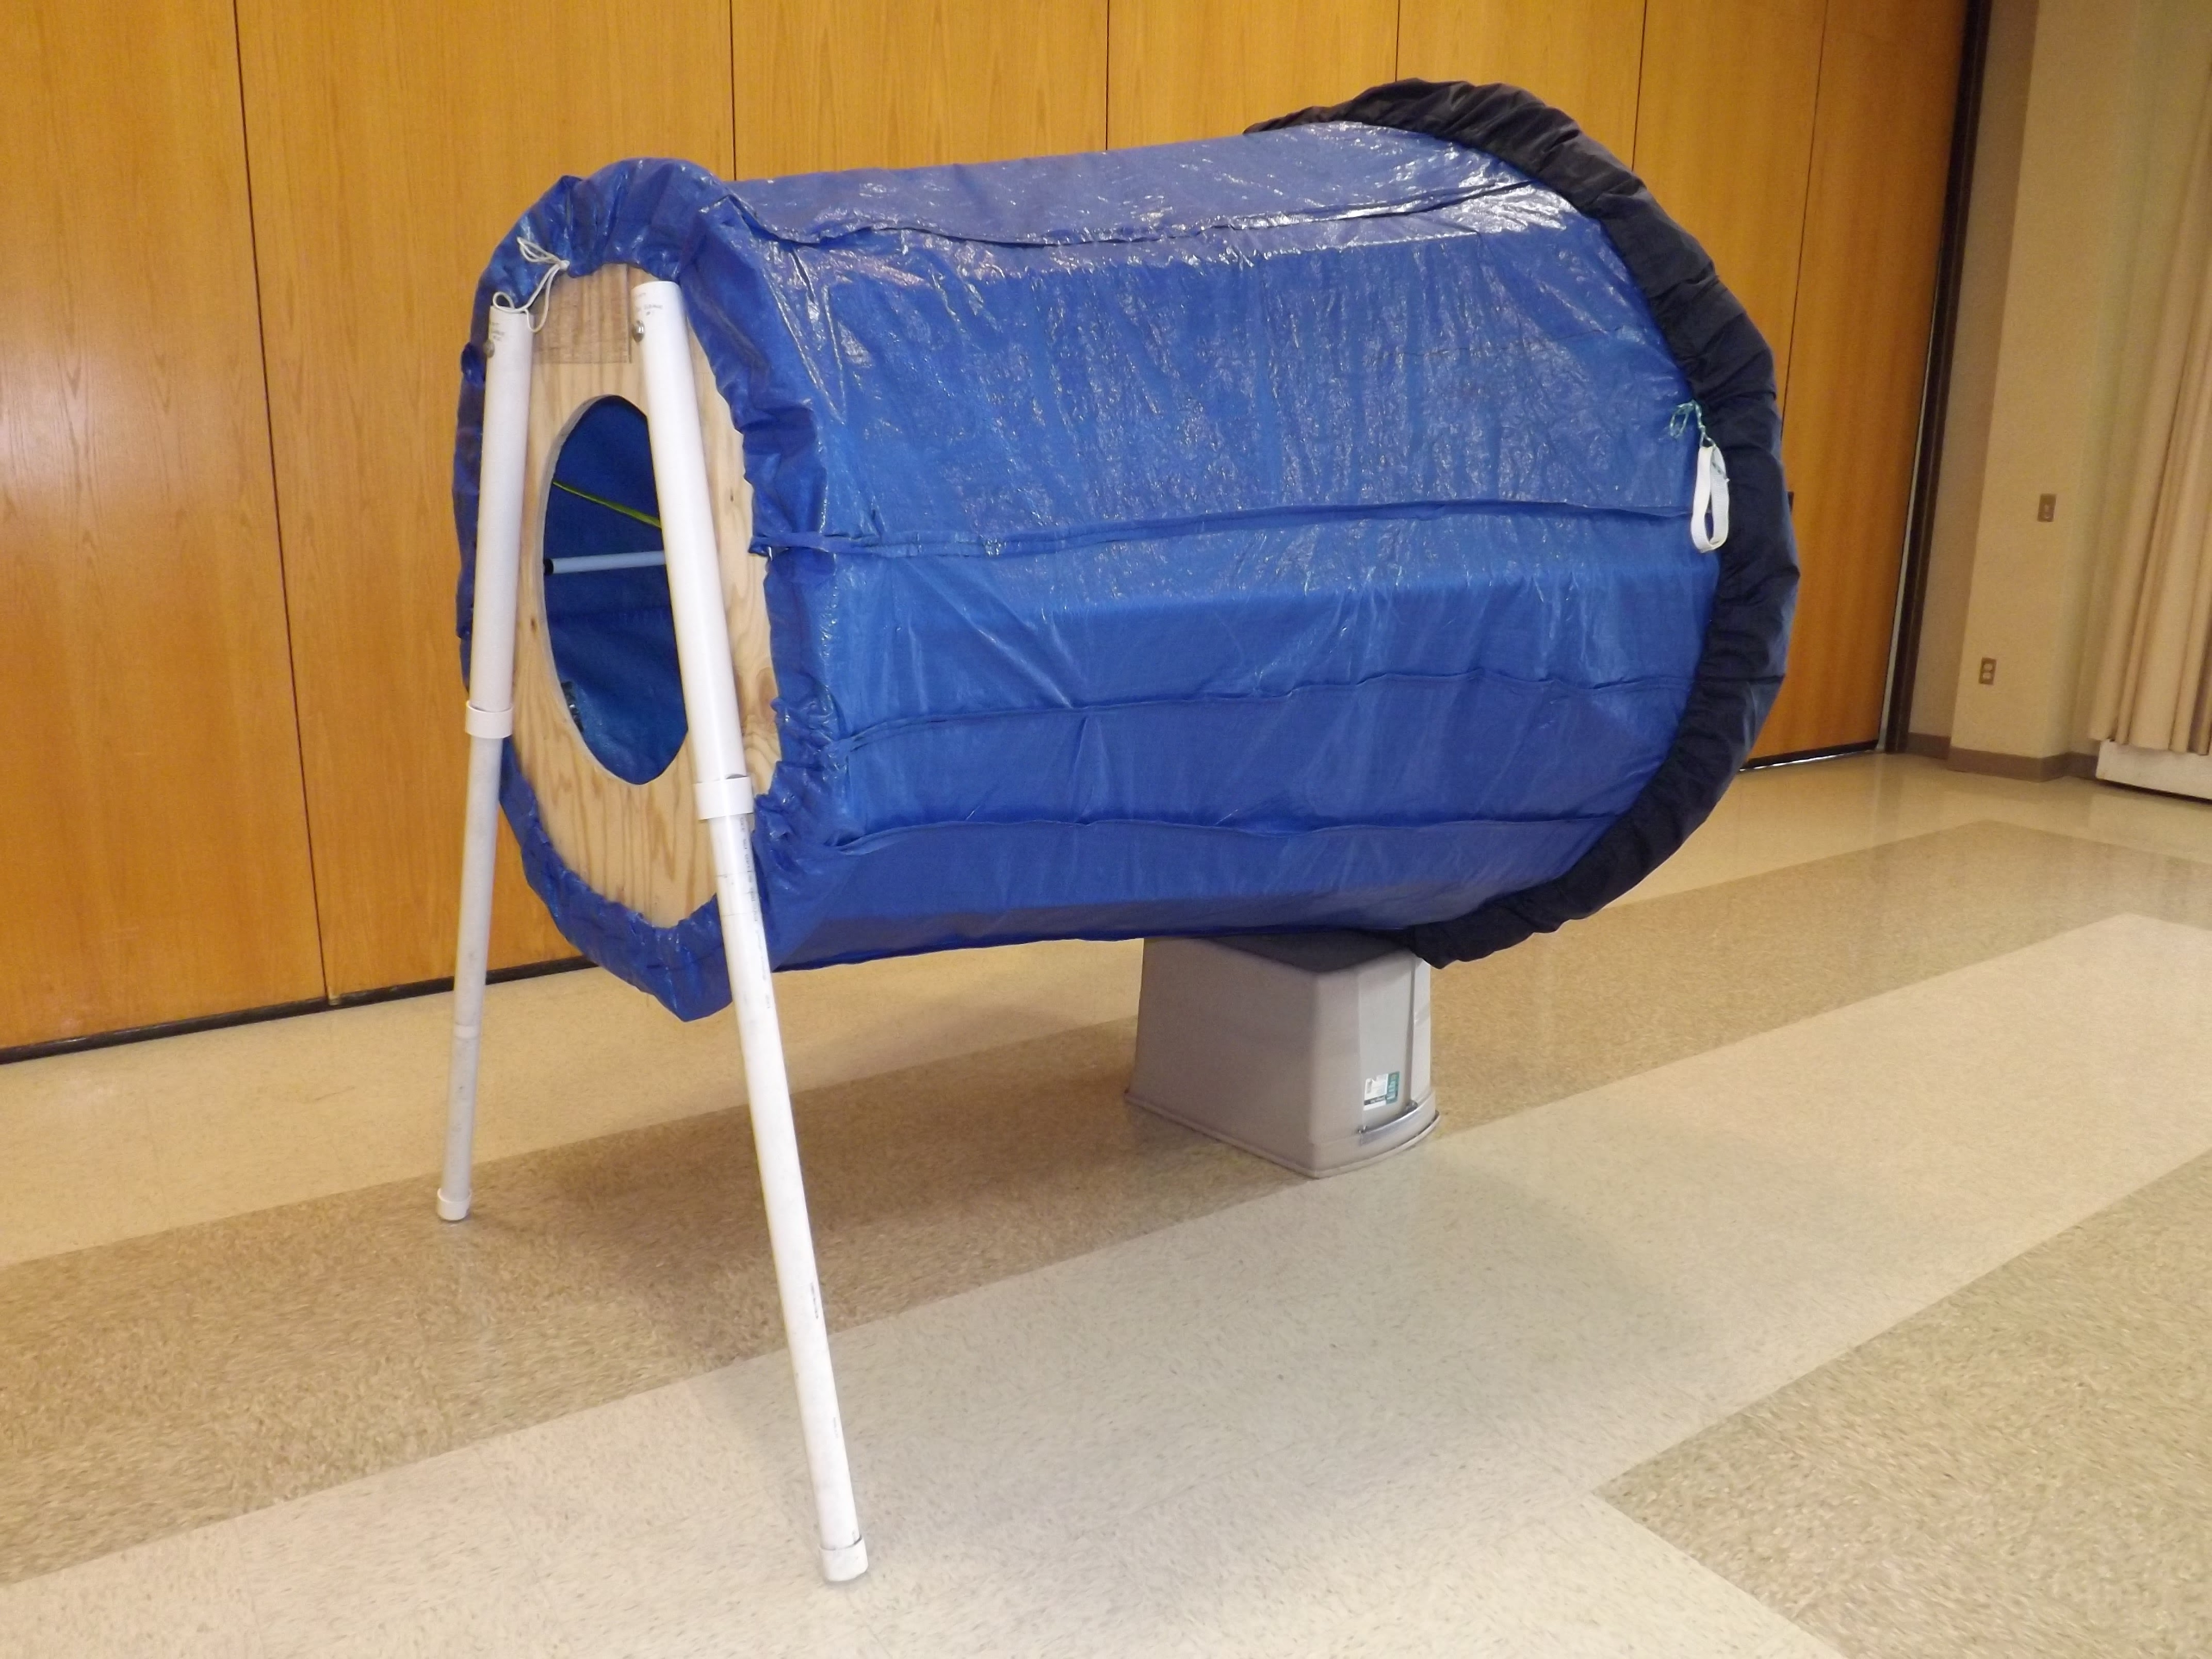
The Candle Cannon is amazing but it’s expensive to build and requires a trailer to transport and a team to assemble. I wanted a giant vortex air cannon that was easy to transport (one that would fit inside my car), easy to setup and breakdown, and inexpensive to build.

YouTube player

Fabric walls would be critical to the success of my design. However, I searched high and low and couldn’t find documented examples of vortex air cannons (small or large) with fabric walls. Did the community of vortex air cannon makers know something I didn’t?

Knowing my finished product might not work, I moved forward with the build. In the end, I was rewarded with success: my air cannon shoots beautiful giant smoke rings long distances and I can easily store and transport the device.

Get Vortical!

Illustration by Damien Scogin
A toroid is the donut shape that forms when a smoke ring moves through the air. First a puff of air travels forward, and then low pressure aft forms a toroid vortex. Illustration by Damien Scogin

To launch giant vortices of air, pull back on the membrane handle and release it. Boom!

It helps to have a friend stabilize the cannon as you pull. Use a Halloween fog (smoke) machine to fill the inside of the cannon with fog and you’ll be able to see huge smoke rings flying through the air.

Project Steps

Prepare PVC fittings

PVC pipe and fittings are designed to fit tight, glue, and leave alone. To make it easy to disassemble your air cannon you’ll need to sand some of the PVC fittings so the pipe slides in and out easily.

Sand the inside of all 16 of the “T” PVC fittings using a rotary tool (Dremel) with a cylinder sander.

You’ll only sand that aspect of the T fitting that is the perpendicular cylinder. This is where you’ll eventually insert the five foot long PVC pipe “ribs” of the structure. DO NOT sand the ends of the T fittings.

Do the sanding outside and cover your face and eyes. Don’t breathe in the tiny PVC particles.

Build the small octagon (front of the cannon)

Cut eight 15″ pieces of ¾” diameter PVC using the handheld PVC cutting tool. In this photo we see the octagon already mounted to plywood, but we’ll actually get to cutting and mounting the plywood in a later step.

Note: You’ll be able to make all the side pieces out of a single 10-foot section of PVC pipe.

Assemble the small octagon. This is the same process as the large octagon.

Assemble the octagon on a flat surface using only the 45° angle fittings and the 15″ sections of PVC pipe (do not use the T fittings yet). Glue it together.

After the glue cures, measure halfway between each side of the octagon (halfway between fittings) and mark.

Cut the pipe at each of the marks.

Add T fittings between the cut you just created, but do not glue the T fittings yet! The T fittings will be glued later on in Step 4 once you can determine how they will be angled out to connect with the large octagon.

Set this octagon aside and build the large octagon.

Build the large octagon (rear of the cannon)

Cut eight 2′ sections of ¾” diameter PVC using the handheld PVC cutting tool.

Note: You will need two 10-foot sections of PVC pipe to make all 8 pieces of this large octagon. However, you’ll end up with 4 feet of waste.

In the same way you created the small octagon, assemble the large octagon on a flat surface using eight of the 45° angle fittings (do not use the T fittings yet) and glue the pipe sections into the fittings.

After the glue cures, measure halfway between each side of the octagon (halfway between fittings) and mark.

Cut the pipe at each of the marks. Add T fittings between the cuts you just created but do not glue them in place yet. Just as with the small octagon, the T fittings will be glued later in Step 4 once you can determine how they will be angled in to connect with the small octagon.

Add PVC ribs

There are eight 5-foot long ribs made from ¾” diameter PVC pipe. Because PVC pipe is commonly sold in 10-foot lengths, it will require four lengths of pipe to create the eight ribs.

Place the large octagon on the floor (flat surface) so that the opening of the T fittings are facing up (away from the floor).

Insert eight ribs into the T fittings. The ribs should now be standing on their own (reaching up).

Place the small octagon on top of the ribs, matching up the openings of the eight T fitting openings in the small octagon with the eight ribs. This step requires you to rotate the T fittings on both the large and small octagons so the eight ribs slide into the T fittings easily.

Once the eight ribs and T fittings are lined up it’s time to glue the T fittings in both the large and small octagons. This can be a tricky affair. I recommend gluing one T fitting at a time to make sure you keep everything lined up.

Note: DO NOT glue the T fittings to the ribs! If you do this you won’t be able to disassemble the air cannon frame.

After all the T fittings are glued on both the octagons, push all the ribs into the T fittings.

Mark the ribs and T fittings

Marking the ribs and T fittings will help you assemble the cannon with greater ease.

Using a permanent black marker, draw a circle around the spot where the rib enters the T fitting and then draw a perpendicular line.

Add numbers to the ribs and T fittings.

Drill holes in T fittings

The holes are drilled to accommodate the metal safety pins. The pins keep the ribs in place during operation.

Pick a drill bit that is slightly larger than the diameter of the safety pins.

Make the large octagon more portable

When the large octagon is assembled and glued it is too large to fit in a medium sized car. To remedy this, I cut the octagon into two pieces. I added straight connector fittings to make it possible to reassemble the large octagon. Like the ribs and the T connectors, you’ll need to sand out one end of the straight connector to make it easier to reassemble. You’ll add a connector pin to help keep it all together. Note that the red tape shows where the large octagon breaks apart.

Cut plywood

The small octagon will be attached to the piece of plywood by screws.

Place the small octagon on top of the plywood and, using a marker, trace the perimeter of the octagon on the plywood. Remove the octagon.

Using a handheld circular saw (like SkilSaw), cut the shape of the octagon out of the plywood.

Draw a circle of 20.5″ in diameter on the plywood. The center of the circle is the same as the center of the octagon.

Using a handheld jigsaw, cut out the circle from the plywood.

Using a belt sander, bevel the front edge of the plywood. This will help reduce the likelihood that the blue poly tarp will catch on a sharp plywood edge and tear.

Attach the small octagon to the plywood

Use drywall screws of 1-⅝” or 2″ in length.

Drill pilot holes in the PVC pipe to prevent cracks in the PVC.

Drill holes at an angle if needed to make sure the screws don’t exit the other side of the plywood.

Add four eyebolts to plywood

Eyebolts will hold the bungee cords in place.

Eyebolts will be attached in such a way that the “eye” of the bolt is on the same side as the small PVC octagon.

Space the eyebolts out evenly.

Leg sleeves

The leg sleeves attach to the front of the plywood. They allow for easy and fast attachment of the PVC legs.

Create two lengths of PVC pipe that are two feet long from 2″ diameter PVC pipe.

Glue one straight connector (fitting) to the end of each sleeve. This straight connector will allow you to attach the end of the pipe to the plywood with a bolt and yet still be able to insert the PVC leg into the sleeve.

Attach these leg sleeves to the front of the plywood using a ⅜”×4″ bolt for the top of the sleeve, driven through the entire pipe and plywood. Use a ⅜”×2″ bolt for the lower section of the sleeve, driven only through the inner wall of the PVC straight connector fitting and the plywood. This design allows for the PVC legs to pass through the bottom until they encounter top bolts.

Secure the bolts with ⅜” washers and lock nuts.

Build the legs

Cut a 10-foot long 1-½” section of PVC pipe in half (2 five-foot sections).

Glue end caps to each section. The photo shows the leg sleeves attached.

Create the blue poly tarp “skin”

Creating the skin is somewhat tedious. Assemble the frame (skeleton) of the cannon and place it on the ground with the front (small octagon) facing up. Note: In this step you’ll be using lots of sewing pins and it’s handy to have a magnetic pin holder mounted to your wrist.

Begin by wrapping the tarp around the large octagon and pin in place

Using the large octagon as a form, create a cylinder shape and pin.

Begin creating eight creases in the tarp, slowly and methodically taking up the excess tarp material. Keep it snug but not super tight.

At the front (top) of the tarp you’ll need to fold over the tarp and sew a seam that allows you to insert nylon cord. This will be a drawstring that allows you to tighten the front of the tarp so air won’t escape around the edges.

Note: There are three basic quality poly tarps. Although the least expensive model will work, I recommend buying a “medium” quality tarp. Don’t buy a high quality tarp because it will be difficult to manipulate and sew through. I purchased mine at Northern Tool as they tend to carry a good selection of sizes and quality.

Sew the seams

Once you have everything pinned up you’ll sew the seams using heavy duty nylon thread.

The seams are long and you’ll use lots of thread.

Use new heavy duty needles. The needles may get dull sewing through the poly tarp.

The large opening (back end) of the cannon needs a way to cinch the tarp. One way to do this is to sew in strips of flat nylon webbing at even intervals. Then use a soldering iron to burn holes through the center of the nylon. Thread your nylon rope through the holes. Refer to photos.

Create the “Membrane”

NOTE: The description that follows does not exactly match the results you’ll see in the photos. Based on my experience building the first membrane, I’ve improved the methodology and I’m sharing the best process with you in these directions.

The membrane is created out of two 60″×94″ long pieces of coated (waterproof) nylon fabric. I recommend using coated fabric over non-coated fabric because I believe the coated fabric will do a better job of pushing air. You want fabric that is durable but not too stiff.

Attach (connect) the two 60″×90″ pieces with a double seam as this must not fail.

Make a giant circle from the fabric

Creating the giant circle will require you to first sew the two pieces of fabric together. You’ll then create a giant 94″ diameter circle on the fabric using a marker. See diagram above. Cut out the circle and use a lighter or torch to burn the exposed edges to prevent fraying.

Sew a 1-½” hem around the perimeter of the circle. I suggest using a zig-zag stich. Be sure to sew this in such a way that you’ll be able to thread the drawstring (nylon cord) through the hem.

Thread the nylon cord through the seam and tie the ends. Consider adding a big piece of webbing to the ends of the cord so the cord ends can be easily found.

Using 12 inches of nylon webbing, sew on a pull handle. Do this in the center of the membrane. On the opposite side sew on an attachment point for the bungee cords (also using nylon webbing).

When the membrane is complete it will remind you of a giant shower cap.

Assemble the cannon frame

Lay the plywood front on the ground with the PVC fittings facing up.

Attach all eight ribs and insert pins.

Attach the large octagon to the ribs.

Carefully flip the cannon frame over so it is now sitting with the plywood in the air.

Attach the skin

Place the blue poly tarp over the frame.

Insert the legs in the leg sleeves and tighten cinch cords on front (around plywood).

Lean the cannon over so it’s resting on its legs.

Rest the back of the cannon on a plastic box and then cinch the cord on the blue tarp.

Attach membrane

Attach the four bungee cords to the eye bolts.

Attach the ends of the bungee cords to the membrane, then place the membrane on the end of the frame and cinch the membrane.

Your giant vortex air cannon is now ready for action!

Operation

To launch giant vortices of air, simply pull back on the membrane handle and release it.

It helps to have a couple friends stabilize the cannon as you pull.

Use a halloween fog (smoke) machine to fill the inside of the cannon with fog and you’ll be able to see giant smoke rings flying through the air.

Consider experimenting with the size of the opening (hole) in the plywood.