Matt Richardson is a San Francisco-based creative technologist and Contributing Editor at MAKE. He’s the co-author of Getting Started with Raspberry Pi and the author of Getting Started with BeagleBone.
Many makers love microcontroller platforms like the Arduino, but as the complexity increases in an electronics project, sometimes a microcontroller just won’t cut it and you need something with a little more “oomph.”
For example, if you want to use a camera and computer vision to detect dirty dishes in your sink, it might be a good idea to explore your options with embedded Linux platforms. These boards are generally more powerful and capable, and are sometimes the perfect solution for projects that are too complex for our beloved microcontrollers.
Not only that, but as the price of embedded Linux platforms drops, the community of support around them grows, which makes them much more accessible to novice and intermediate makers than ever before.
The BeagleBone is an embedded Linux development board that’s aimed at hackers and tinkerers. It’s a smaller, more barebones version of the BeagleBoard. Both are open source hardware and use Texas Instrument’s OMAP processors, which are designed for low-power mobile devices.
These days, a typical microcontroller-based board costs $20 to $30, while the BeagleBone retails for $89. Other than a more powerful processor, what are you getting for your extra money?
Built-in networking: Not only does the BeagleBone have an on-board Ethernet connection, but all the basic networking tools that come packaged with Linux are available. You can use services like FTP, Telnet, and SSH, or even host your own web server on the board.
Remote access: Because of its built-in network services, the BeagleBone makes it much easier to access electronics projects remotely over the internet. For example, if you have a data-logging project, you can download the saved data using an FTP client or you can even have your project email you data automatically. Remote access also allows you to log into the device to update the code.
Timekeeping: Without extra hardware, the board can keep track of the date and time of day, and it’s updated by pinging internet time servers, ensuring that it’s always accurate.
File system: Just like our computers, embedded Linux platforms have a built-in file system, so storing, organizing, and retrieving data is a fairly trivial matter.
Multiple programming languages: You can write your custom code in almost any language you’re most comfortable with: C, C++, Python, Perl, Ruby, Java, or even a shell script.
Linux software: Much of the Linux software that’s already out there can be run on the BeagleBone. When I needed to access a USB webcam for one of my projects, I simply downloaded and compiled an open source command-line program that let me save webcam images as JPEG files.
Linux support: There’s no shortage of Linux support information on the web, and community help sites like stackoverflow.com come in handy when a challenge comes along.
Multitasking: Unlike a basic microcontroller, embedded Linux platforms can share the processor between concurrently running programs and tasks. For example, if your project needs to upload a large file to a server, it doesn’t need to stop its other functions to wait for the upload.
USB: The BeagleBone can act as both a USB host and a USB device — not only can you control it from your computer, you can also connect USB devices to it. This makes it easy to integrate common USB peripherals like flash drives, wi-fi adapters, and webcams into your projects.
Size: The BeagleBone packs all these features into a small form factor. In fact, it fits perfectly into an Altoids tin!
Even though these platforms are becoming easier to work with, it helps to be well versed in digital input and output (I/O) before tackling embedded Linux for your physical computing projects. Arduino is a great platform for getting started with GPIO (General Purpose Input/Output); to learn more, visit makezine.com/arduino.
Project Steps
Get set up via Ethernet
Your BeagleBone comes with a MicroSD card preloaded with a customized version of the Ångström distribution of Linux. Since development on this distribution happens rapidly, you’ll want to update to the latest version, available at beagleboard.org.
To access the BeagleBone to upload code, you can connect to it over the Ethernet port with SSH, or you can connect it directly to your computer’s USB port. Since we’ll be downloading a few files onto the board directly from the internet, let’s connect to the BeagleBone via Ethernet.
With the MicroSD card inserted, connect the BeagleBone to your router via Ethernet and plug in a 5V power supply to the BeagleBone.
On a Mac or Linux box, open a terminal window and type ssh root@beaglebone.local.
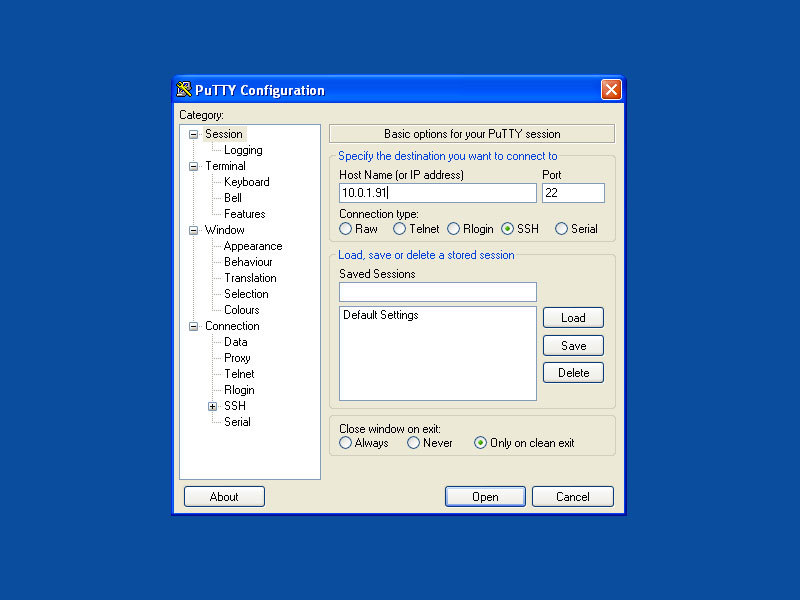
On a Windows PC, download PuTTY and open it. Enter beaglebone.local as the host address, making sure the SSH button is selected, and press Open. When it shows you the prompt login as:, type root and press Enter.
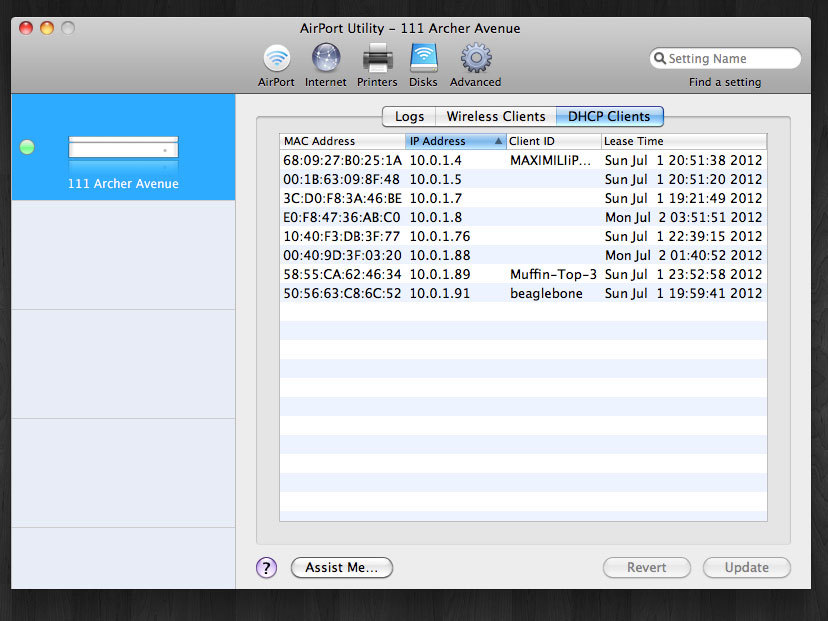
If the address beaglebone.local doesn’t work, try using the IP address of the board instead. Find your BeagleBone’s IP address by logging into your router and looking for “beaglebone” on the DHCP clients list.
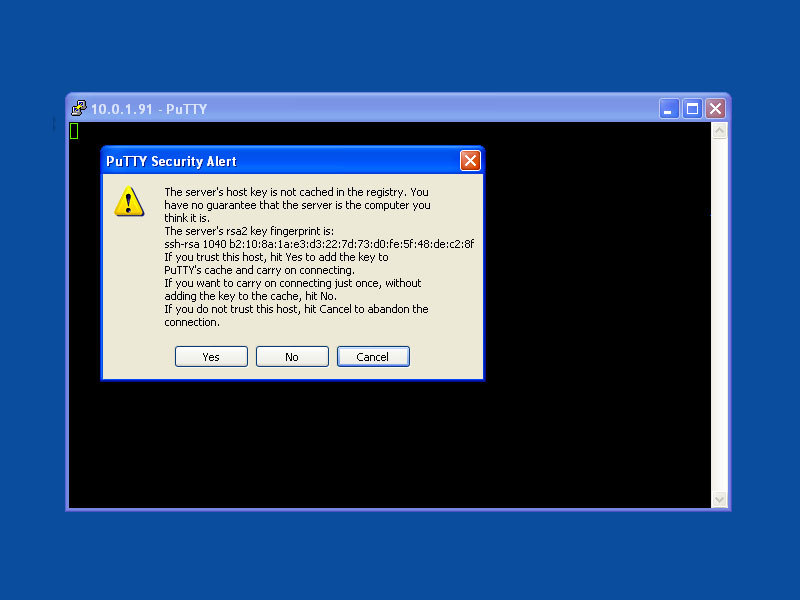
The first time you connect, your SSH client may warn you that the host is unknown. It’s OK to dismiss this message.
There’s no password by default, so just hit Enter. You know you’re connected when you see the root@beaglebone:~# prompt.
Controlling Pins from the command line
Before we get into writing code, let’s look at how to do basic digital pin control from the Linux command line. Once we understand how the Linux kernel uses a virtual file system to read and write pins, it makes programming the BeagleBone much easier.
It’s also possible to read and write specific memory registers to access the pins, but that method is more advanced.
1. Output via GPIO Pins: Light an LED — A great way to get to know a new platform is simply getting an LED to light up, so let’s wire up an LED.
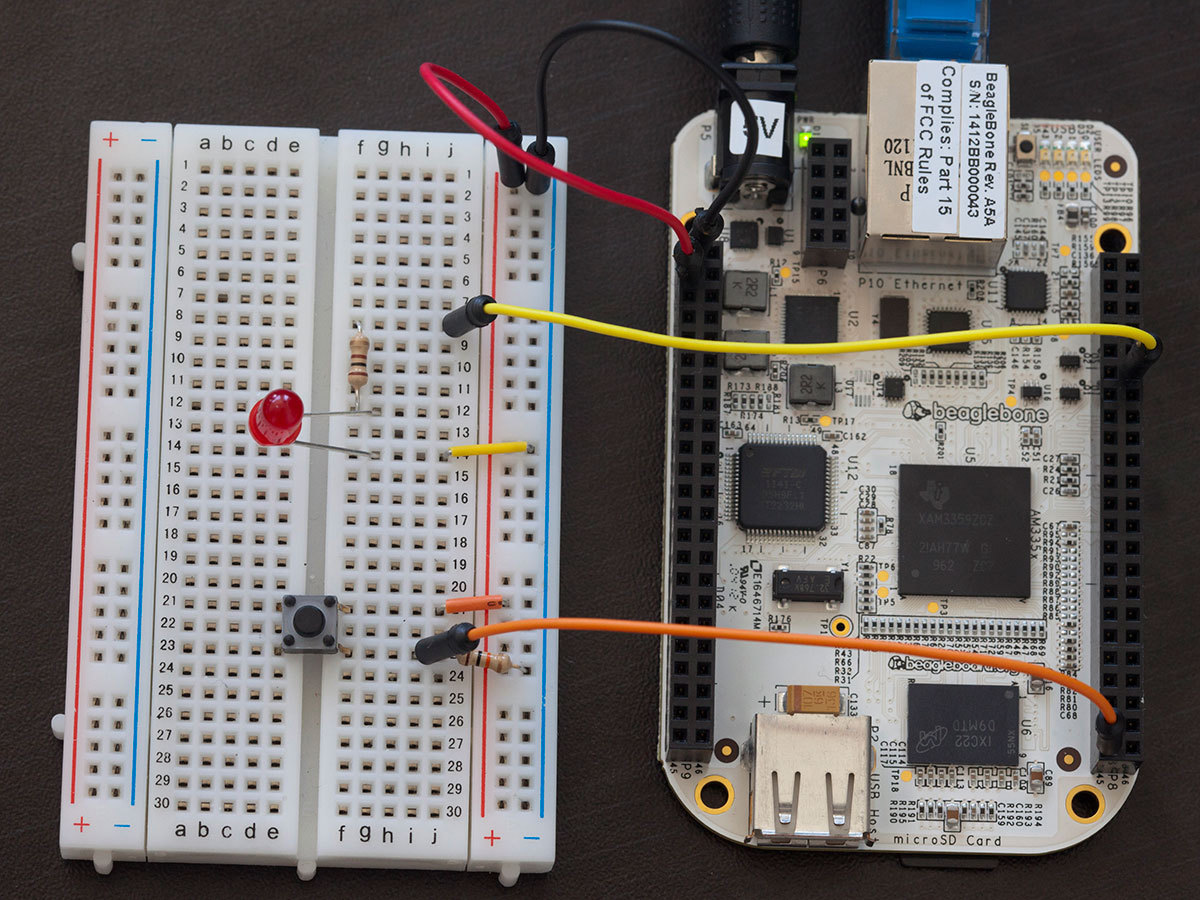
The BeagleBone has 2 main sets of headers, each with 46 pins. One header is labeled “P8” and the other is labeled “P9.” Only the end pins are labeled, so you’ll have to count pins from the ends to determine the pin you want to access. Put a jumper wire in one of the ground pins, which are pins 1 and 2 of header P8 and P9.
We’ll connect our LED to pin 12 on header P8. Put another jumper in that pin, counting off even numbers from pin 2.
On a breadboard, connect the cathode (–) of an LED to ground and the anode (+) to pin 12 on header P8 through a current-limiting resistor (any value between 50Ω and 100Ω should do).
Figure out the Linux GPIO signal number for pin 12 on P8 (see Deriving the Linux GPIO Signal Number in the conclusion).
Now that we know which pin number to use within Linux and we’ve set it to GPIO mode (pin 12 defaults to GPIO mode), let’s use the command line to control the pin.
On the command line, change to the gpio directory: cd /sys/class/gpio
When you list the contents of the directory with the command ls you’ll notice there’s no folder for GPIO signal 44. That’s because first we need to export the pin to “user space” so that we can control it. To do that, write the number 44 to the export file: echo 44 > export
Now when you type ls you’ll see the directory gpio44. Change to that directory: cd gpio44
Since we’re trying to control an LED, we’ll need to set the pin as an output by writing the word out to pin 44’s direction file: echo out > direction
Now we’re ready to set the pin high to illuminate the LED. Write 1 to the value file: echo 1 > value
2. Input via GPIO Pins: Read a Button—Using the GPIO pins as an input is just as easy. Here’s how to tell the BeagleBone to read a pushbutton switch.
Wire up a momentary pushbutton to pin 45 on header P8 with a 10K pull-down resistor. Connect the other side of the button to 3.3V source on header P9 pins 3 or 4.
First, we must export the pin to the user space and change to its directory. Since pin 45 on header P8 is GPIO2_6, we’ll export pin gpio70: echo 70 > /sys/class/gpio/export cd /sys/class/gpio/gpio70
Set the pin direction as an input: echo in > direction
Now instead of writing the value file, we’ll read it: cat value
This should return 0 for a low pin. Now press and hold the button while you execute the cat value command again. If you have the button wired up correctly, you should now see a 1, indicating the pin is high.
When you’re done with the pins, be sure to unexport them from the userspace: echo 44 > /sys/class/gpio/unexport and echo 70 > /sys/class/gpio/unexport
Conclusion
Using Python to Control the Pins
As you can see, using pins as digital inputs and outputs is as simple as reading and writing files in the Linux Virtual File System. This means that, without any libraries, you can use any language you’re comfortable with, as long as there’s a compiler or interpreter for that language available on the BeagleBone.
The included Ångström distribution of Linux even includes a built-in web-based development environment for Node.js called Cloud9. There’s a framework called Bonescript currently under development which can be used for accessing GPIO pins within Node.js.
However, when I started my first few programs with the BeagleBone, I decided to use Python because I was more comfortable working in Python than in Node. In my first Python script, I was working with the files manually: opening them, reading or writing them, then closing them each time I wanted to read or write a pin.
This became tedious, so I wrote a Python module called mrBBIO, which packages up all those functions into an Arduino-like syntax. It also lets you refer to the pins on the BeagleBone as their physical pin locations, so you don’t need to refer to the System Reference Manual to determine the Linux signal name for the physical pin or figure out how to change its mux setting. (I was inspired by Alexander Hiam’s pyBBIO module, which instead writes to specific memory registers to control the pins.)
As long as your BeagleBone is connected to the internet, you can download mrBBIO directly from GitHub. To do so, first change into your home directory:
cd ~
and then download the latest version of mrBBIO:
git clone git://github.com/
mrichardson23/mrBBIO.git
This will create a directory called mrBBIO. Change to that directory:
cd mrBBIO
If you review the example code (type cat example.py to see it), you’ll see that it has setup and loop functions. Just like Arduino, the setup function runs once when the code is first executed and then the loop function runs repeatedly until the program is terminated. The setup function in this example sets pin P8.12 as an output and P8.45 as an input:
def setup():
pinMode(“P8.12”, OUTPUT)
pinMode(“P8.45”, INPUT)
The loop function will be checking whether the button is pressed. When it senses that it was pressed, it will turn the LED on for 1 second and then turn it off. It will also output text to the console to indicate when the button was pressed, using an Arduino-like millis() function.
To execute the code from the command line, type:
python example.py
and watch the LED light up when you press the button! To exit the program, type Ctrl-C. The mrBBIO module will take care of unexporting the pins for you.
If you’re eager to start experimenting on your own, you can start by using the example file as a template. Make a copy of the file:
cp example.py test.py
and edit it in Nano (or your preferred text
editor):
nano test.py
If you’d like, you can even use your computer’s text editor and upload the code to your BeagleBone via SFTP.
To dig deeper into embedded Linux, check out elinux.org, which covers many different embedded Linux platforms. For specific help with the BeagleBone, try reaching out to the BeagleBone mailing list at groups.google.com/group/beaglebone or connect to the #beagle channel on the Freenode IRC network.
Matt Richardson is a San Francisco-based creative technologist and Contributing Editor at MAKE. He’s the co-author of Getting Started with Raspberry Pi and the author of Getting Started with BeagleBone.