
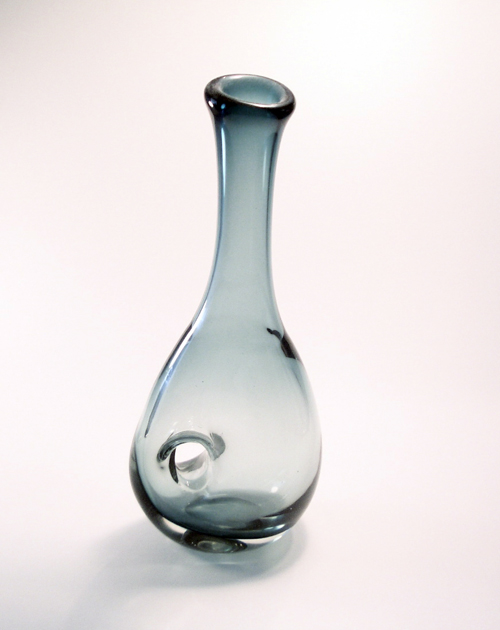
This photo wasn’t taken in a studio. It was taken in my kitchen with a light box I made with household items. I’ve been testing out a cheap solution to take better pictures of craft projects, but this can be used for anything. If you don’t have any of the materials, just head to Bed and Bath and you can get this stuff for around 20 bucks or less (save those coupons in the mail). Most of us typically have at least one of these items somewhere in our house.
I used this tutorial on Switchboard called “Taking Professional Looking Photos without a Professional”.
What you need:
1 big plastic storage container
2 clip lamps
1 white poster board or fabric for lining inside of container
fabric interfacing (enough to cover outside of container, approx 1 1/4 yard)
Lay the plastic bin on a table or flat surface. Insert the poster board (or fabric) in the bin to be your backdrop. Lay the interfacing around the bin and clip the 2 lamps on either side of the bin. You really can get by with using just 2 clip lamps. I like them shining in from both sides. (The lamps I use have 60 watt bulbs.) Also, try moving them around in terms of direction as well as placement. For some items shining the light down from the top looks best. If you think you need more light, another lamp can be used.
When you are ready to take pictures, make sure you have a tripod for your camera. It will give you the stability you need for a clear shot. Make sure your flash is off. Next, turn up the white balance to a level that looks good on your digital camera and shoot away. Take a lot of photos and test to see which setup works best for your photos. You can also take your finished photos and modify the levels in Photoshop or do any kind of cropping/masking. For this shot, I only adjusted the levels a tiny bit.
What’s great about the plastic storage bin is that I can store fabric in it when I’m not taking pictures. It is a great space saving solution.
Related:
Make Blog: Product Photography Tutorials – Link.
27 thoughts on “DIY light box”
Comments are closed.
Hi:
What kind of camera did you use? What settings do you have to put it on to acheive the right look?
Thanks
Hi:
What kind of camera did you use? What settings do you have to put it on to acheive the right look?
Thanks
I don’t have anything fancy. Just a small digital pentax camera. The trick is to bump up the white balance to the highest setting. play around with it.
Is it possible to take good pictures of jewelry with sparkle with a CoolpixL12 Nikon? Dont know what settings to use. thanks
I don’t have that camera but you can set up this lightbox and play with the white balance or other settings on the camera to see what you come up with.
DIY light box is really amazing for me. its works quite well and its look is also good. i really want to take it.Cursos de ingles en el extranjero
What a super awesome solution!! I’ve been wracking my brain on how to make my own light box!!! I’m so excited, can’t wait to try it out!!
YAY! I’ve been wanting to do this but all the tutorials I’ve ever seen require building something – YUCK! I love, love, love this – on my way to Bed Bath & Beyond now! Thank you!!!!!!!!!!
OMG! I already have everything except the posterboard, gonna go get that today! YEEE HAAA!
Love this idea! Thank you!!
Brilliant thanks for sharing
Thank you for offering this solution!
Great! Trying this out. Had all the items – didn’t have to buy anything =] A great alternative to fabric interfacing is that foamy shipping wrap. It probably has the same consistency and transparency as the fabric interfacing. Good luck!
What is fabric interfacing and I don’t get where I put it?
Heidi
Американцы прогнозируют что скоро будет конец света. Об этом говорят
сегодня не мало людей. Вот к примеру здесь http://planeta-nibiru-blizko.narod2.ru .
Как остаться в живых?
Thanks for the light box. Made one -cardboard box, sides cut away and covered with tissue. Used watercol. paper as backdrop, and daylight from window plus ordinary table lamps. Liked the shades produced on my cylindrical objects but shadows had so many colours and too difficult, could not get rid of with photoshop “magic wand”. Box etc., too flimsy and altogether a bit useless so will look forward to trying the plastic box, etc. I wonder where I can find 60 watt. lamps and do they need to be “daylight”? Thanks also for the white balance tip and I look forward to another go with plastic box, etc.
Thanks for posting this! I got lucky on my first hit, finding your photo and explanation immediately. So simple and well-done. I, too, need to use a light box to photograph crafts projects. Your bottle is exquisite, BTW!
[…] A ton of people have made their own light boxes well before me, so this isn’t anything new. However, the majority seem to be made with cardboard boxes. I found a couple of alternatives to the cardboard box and decided to make mine similar to nataliezdrieu’s DIY Light Box. […]
[…] http://www.ehow.com/how_4929644_build-tabletop-photography-studio.html http://blog.makezine.com/2006/07/27/diy-light-box/ http://ngnrdgrl.wordpress.com/2013/03/25/upgrading-my-photography-with-a-diy-light-box/ Working […]
Good idea! The plastic container is more durable than the cardboard box light boxes I’ve seen. You could also line the sides with trace paper if more diffusion is needed.
[…] tu mismo una caja de luz (en inglés) Make te muestra cómo hacer rápidamente una caja de luz con menos de $20. También puedes encontrar un […]
Great idea – I’ve seen lots of of DIY lightbox articles that recommend a cardboard box, but I couldn’t picture how/where I’d put that to keep it from collecting dust… This is brilliant – Thank you for sharing!