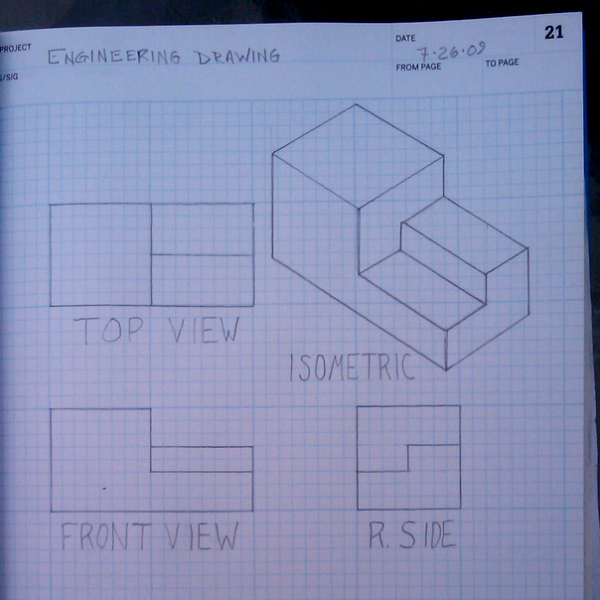
In engineering, fabricating, and all-around making, it is very useful to know basic drawing styles. This will help you get your ideas out of your head and onto that napkin, or into your notebook so that you can bring them into the world. Architects, planners, designers, engineers, and others use drawing to help communicate their ideas clearly and accurately to the people who will carry out their designs. Drawing is also a great way to communicate with yourself, since you can draw a picture of it to help clear up the parts of the idea before moving to the next steps of your design.
Here are a few drawing techniques that will help you speak in a common visual language:
Orthographic
If you’re thinking in terms of a floor plan, or a straight-on view to an object’s face, that’s an orthographic view. In this technique, you are showing the details of the face, where the edges are, if there are holes or visible cuts in the surface, you would show them as solid lines. If those holes or cuts are in another face and not visible from your viewpoint, they would be shown with dashed lines.
An object could have six Orthographic views, top, bottom, right, left, front and back. One way to help visualize the six sides is to take a cardboard box and cut windows in each of the sides. Label the sides and place an object inside the box. When you look straight at the object on one side, that is the view you would draw. You wouldn’t try to include any information from another side.
Multiview Orthographic
Sometimes, you will have a complex object that has information on more than one side. You will want to show the relationship between the sides in a mutltiview orthographic drawing. Here, what you want to do is line up usually two or three corresponding views. Normally, you would show the top view above the front view. The features of the object visible in the top view would line up with the features in the front in a two view drawing. If the side also has details, you would draw the side so that it lines up with the front view.
Isometric
So, you want to show several faces of the object, but don’t want to make a whole bunch of individual drawings. You want to know about Isometric projection! This technique has you placing the object at an imagined 30-degree angle and drawing the three faces that are visible. In isometric, all the sides have parallel edges, just as they would in the real object. The object can be drawn accurately enough to pull measurements. Since three sides are visible at once, you can get a real sense of the object by looking at the drawing.
Scale
If you hope to build directly from these drawings, you’d want to do them accurately and with a scale in mind. There are many different scales, or ratios of drawing to object available to you. Some are pretty simple, like 1:1, full size, 1:2 or 1/ 2 size or 1/4 size. There are lots more, and rather than figure out how far apart to draw the marks to accurately show 3 inches in 1/4 scale, you can use an architects’ or engineers’ scale, which translates feet and inches down to the smaller scale. When you are drawing to scale, a person could put the corresponding scale right down on your drawing and pull out the measurements, which should match your notations.
Sketching
If you just want to get your idea out of your head, sketching is the way to start. Here, what you do is take your paper in hand and draw out your idea using one of the techniques above. With sketching, it is more about the speed of showing your imagined or observed shape than precision and accuracy. Usually, with sketching you would only use a pen or pencil on the paper. The straightness of the line comes from your hand, not from using guides. Get the idea out. You can refine it through revisions, bring it into a drawing program, draft it accurately with drafting tools, but all that comes later, after you have put it on the page. Sketching is quick and helps you see the relationships of the shapes and parts.
Looking for more? Try out the simulation at the bottom of the Teacher Support page of the Engineering the Future curriculum from Boston’s Museum of Science. In Sketchup and other Computer Aided Design programs, you can go to the view menu to see each of these views. But really, the best way to build this into your head is to pick up a pencil or pen and start drawing. Draw the objects on the table in front of you, one at a time. Show them in orthographic, multiview and isometric. There are drawing papers available with square and isometric grids printed on them to help guide your drawings.
In the Maker Shed:
Pick up The Maker’s Notebook ($19.99) for all your big ideas, diagrams, patterns, etc. Exclusive to the Maker Shed: Sticker sheets and a band closure to customize your book.
ADVERTISEMENT


