


It’s getting close to that day of the year when hordes of sugar-hungry kids roam the neighborhood in search of candy. While trick-or-treating might not be an option for everyone, Halloween always offers plenty of opportunities for adults to indulge in some spooky fun.
Sure, store-bought decorations and costumes are great, but those made at home using a 3D printer bring added creativity and flair to the holiday. With that in mind, we will take a look at some of the more interesting decorations and costumes that have been made using this relatively new technology.
Bionic Eye

First on the list comes from Adafruit with their 3D printed bionic eye, which will surely grab attention at any costume party. The ‘eye’ itself is a 46-millimeter 3D printed ocular implant designed to fit into 55-millimeter goggles.
The eye rotates crazily in the goggles’ housing using a pair of micro-sized servomotors connected to an Adafruit Trinket board, which is powered by three AAA batteries. The entire project should cost less than $40 depending on the 3D printed materials used.
Nightmare Glove
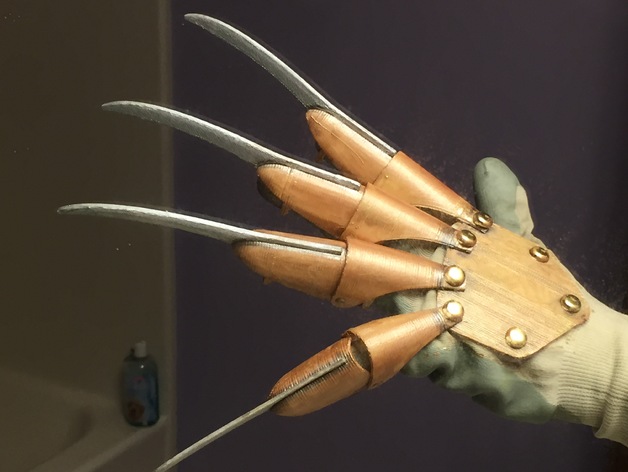
Horror fans will undoubtedly recognize that this iconic costume piece belongs to a nightmarish man who haunts dreams. Maker Peter Gross modeled his nightmare glove after the prop used in the Nightmare on Elm Street series.
His design was made using PLA filament for the hand-plate, fingers and knives, which are hinged with brass paper fasteners for the hand and PLA joints for the fingers. To get the correct size for the glove, Gross measured his fingers and found that printing out the parts 1.5-times larger, the glove fit perfectly.
Varia Suit

Staying on the costume trend, redditor Talaaya decided to take her Halloween costume to the extreme by designing her own Varia Suit from Metroid Prime 3. She made her design using PepaKura Designer in order to get the correct sizes for the pieces.
Once her designs were complete, she then turned them over to her friend Matthew Serle, who printed them out for her using a pair of Zcorp 450 3D printers and only charged her for the cost of the material! For those interested in printing their own, Talaaya posted her design files online for free, which can be found here.
This Creepy Jack O’ Lantern

While some choose to get their decorations from the store (and there’s nothing wrong with that), others like illustrator Sebastian Kerner choose to make their own. Judging from his 3D printed Jack O’ Lantern, his illustration skills are no joke.
He designed his creepy pumpkin using Maxon’s cinema4D design software. He provides a detailed walkthrough on how to use the software to make your own 3D designs on Instructables, which you can find here.
Glow-in-the-Dark Ghost Magnets

Appliances are often neglected when it comes to Halloween decorations. Sure, stoves are out of the question — no one wants to burn their home down — but decorating the fridge should be okay. The people over at 3D Printing for Beginners have an excellent tutorial on how to print your own glow-in-the-dark ghost magnets, which are perfect for fridge décor.
The design build includes the ghost files, which were sourced from Thingiverse and then processed through a slicer. They are then printed out using glow in the dark filament (ABS or PLA will do) and secured to a magnet with glue. To see the complete walkthrough head here.
Life Size Jack O’ Lantern Skull

One of the more unusual decorations (by the Addams Family standard) comes from Shapeways user Embodi3D with his Jack O’ Lantern skull, which is 3D printed from an actual CT scan and created full size. The top of the skull has a removable section to gain access to the hollow interior, which can be filled with all sorts of candy or LED lights to give it a spookier effect.
According to Embodi3D, the best material to use is sandstone, which apparently produces a more authentic look. The skull does run on the expensive side however, with the basic sandstone material starting out at $529 and topping out at $5,999 for the gold edition. Those interested can head here.
Shot Glass Crawlers
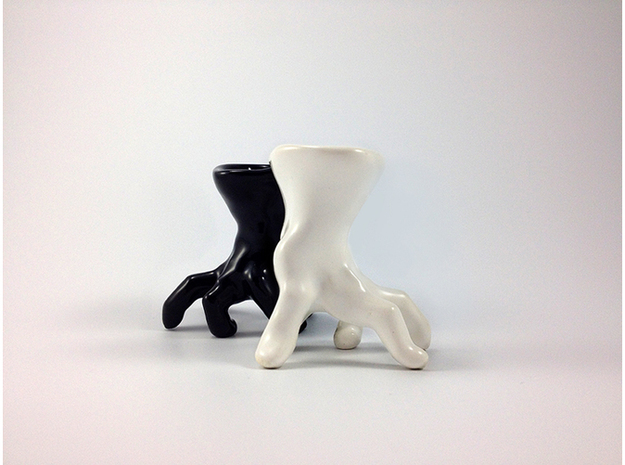
Speaking of The Addams Family, Shapeways user Christopher Cordingley designed a shot glass that bears a striking resemblance to the family’s dismembered helper, Thing. Christopher designed his shot glass because of his love for the expressiveness of human hands, which is obvious in his design.
The ceramic hand is hollow inside and comes in three different sizes — 0.6oz for light drinkers, 1-oz for moderates, and 2-oz for the life of the party. Those interested in getting their hands on one (pun intended) can head here.
White Chocolate Skulls

Decorations and costumes aside, candy does play a big role in the holiday tradition. 3D printed candy ups the ante, especially Anna Kaziunas France’s 3D printed white chocolate skulls. Actually, the skulls are not 3D printed themselves, but rather the molds used to make the candy.
To ensure that the chocolate was safe to eat (and not just free of razorblades and hypodermic needles), the artist used silicon as the medium for the molds. She designed the molds using 123D Catch. The boxes that house the candy were created using a mash up of a parametric box found on Thingiverse using OpenSCAD. To see a complete walkthrough on how to make your own, go here.
Hell-oween Flexy-Hand

While not as creepy as Embodi3D’s CT skull, GyroBot’s Hell-oween Flexy-Hand will most definitely fright any children trying to take a piece of candy from its dish. The coffin-shaped dish is perfect for candy and houses the 3D printed hand, which flexes into a fist when the string tendons are pulled from the back.
The hand’s hinges are tensioned, which allows the hand to return to an open position. Those interested in making their own can use GyroBot’s tutorial and files found here.
Animated Humanoid Robot Head
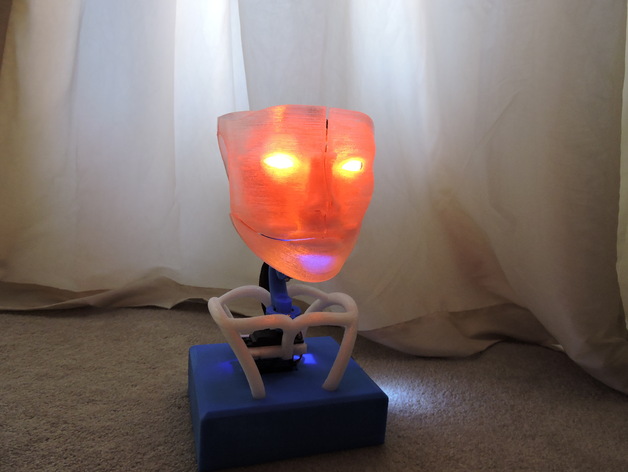
The last entry on this list is probably the most frightening, but the toughest to make. I’m talking about Mike Blakemore’s animated humanoid robot head, which if it had a voice would probably scare some adults too. The robot features a movable mouth, eyes, and a head that also lights up using LEDs underneath its robotic skin.
Five servomotors, which are processed by an Arduino Mini Pro that’s powered by a 7.4v Li Po battery, function to articulate the head. To see it in action and for instructions on how to build your own, visit here.
ADVERTISEMENT


