Last year I bought a generic 350-watt unicycle and loved it, but I soon realized how limited its performance was: about 9mph (15km/h) top speed, maybe 5–6 miles (8–10km) of range, and poor climbing ability. So I thought I would upgrade it with a more powerful motor and make it a real means of transportation, with good speed and enough range to actually go somewhere without having to worry all the time about running out of juice.
Online I bought a 500-watt motor and controller from Shenzhen MicroWorks with impressive specs at a very reasonable cost. But then I realized I needed a completely new enclosure with room for more batteries. Finding nothing suitable, I decided to design my own and 3D print it myself.

Read articles from the magazine right here on Make:. Don’t have a subscription yet? Get one today.
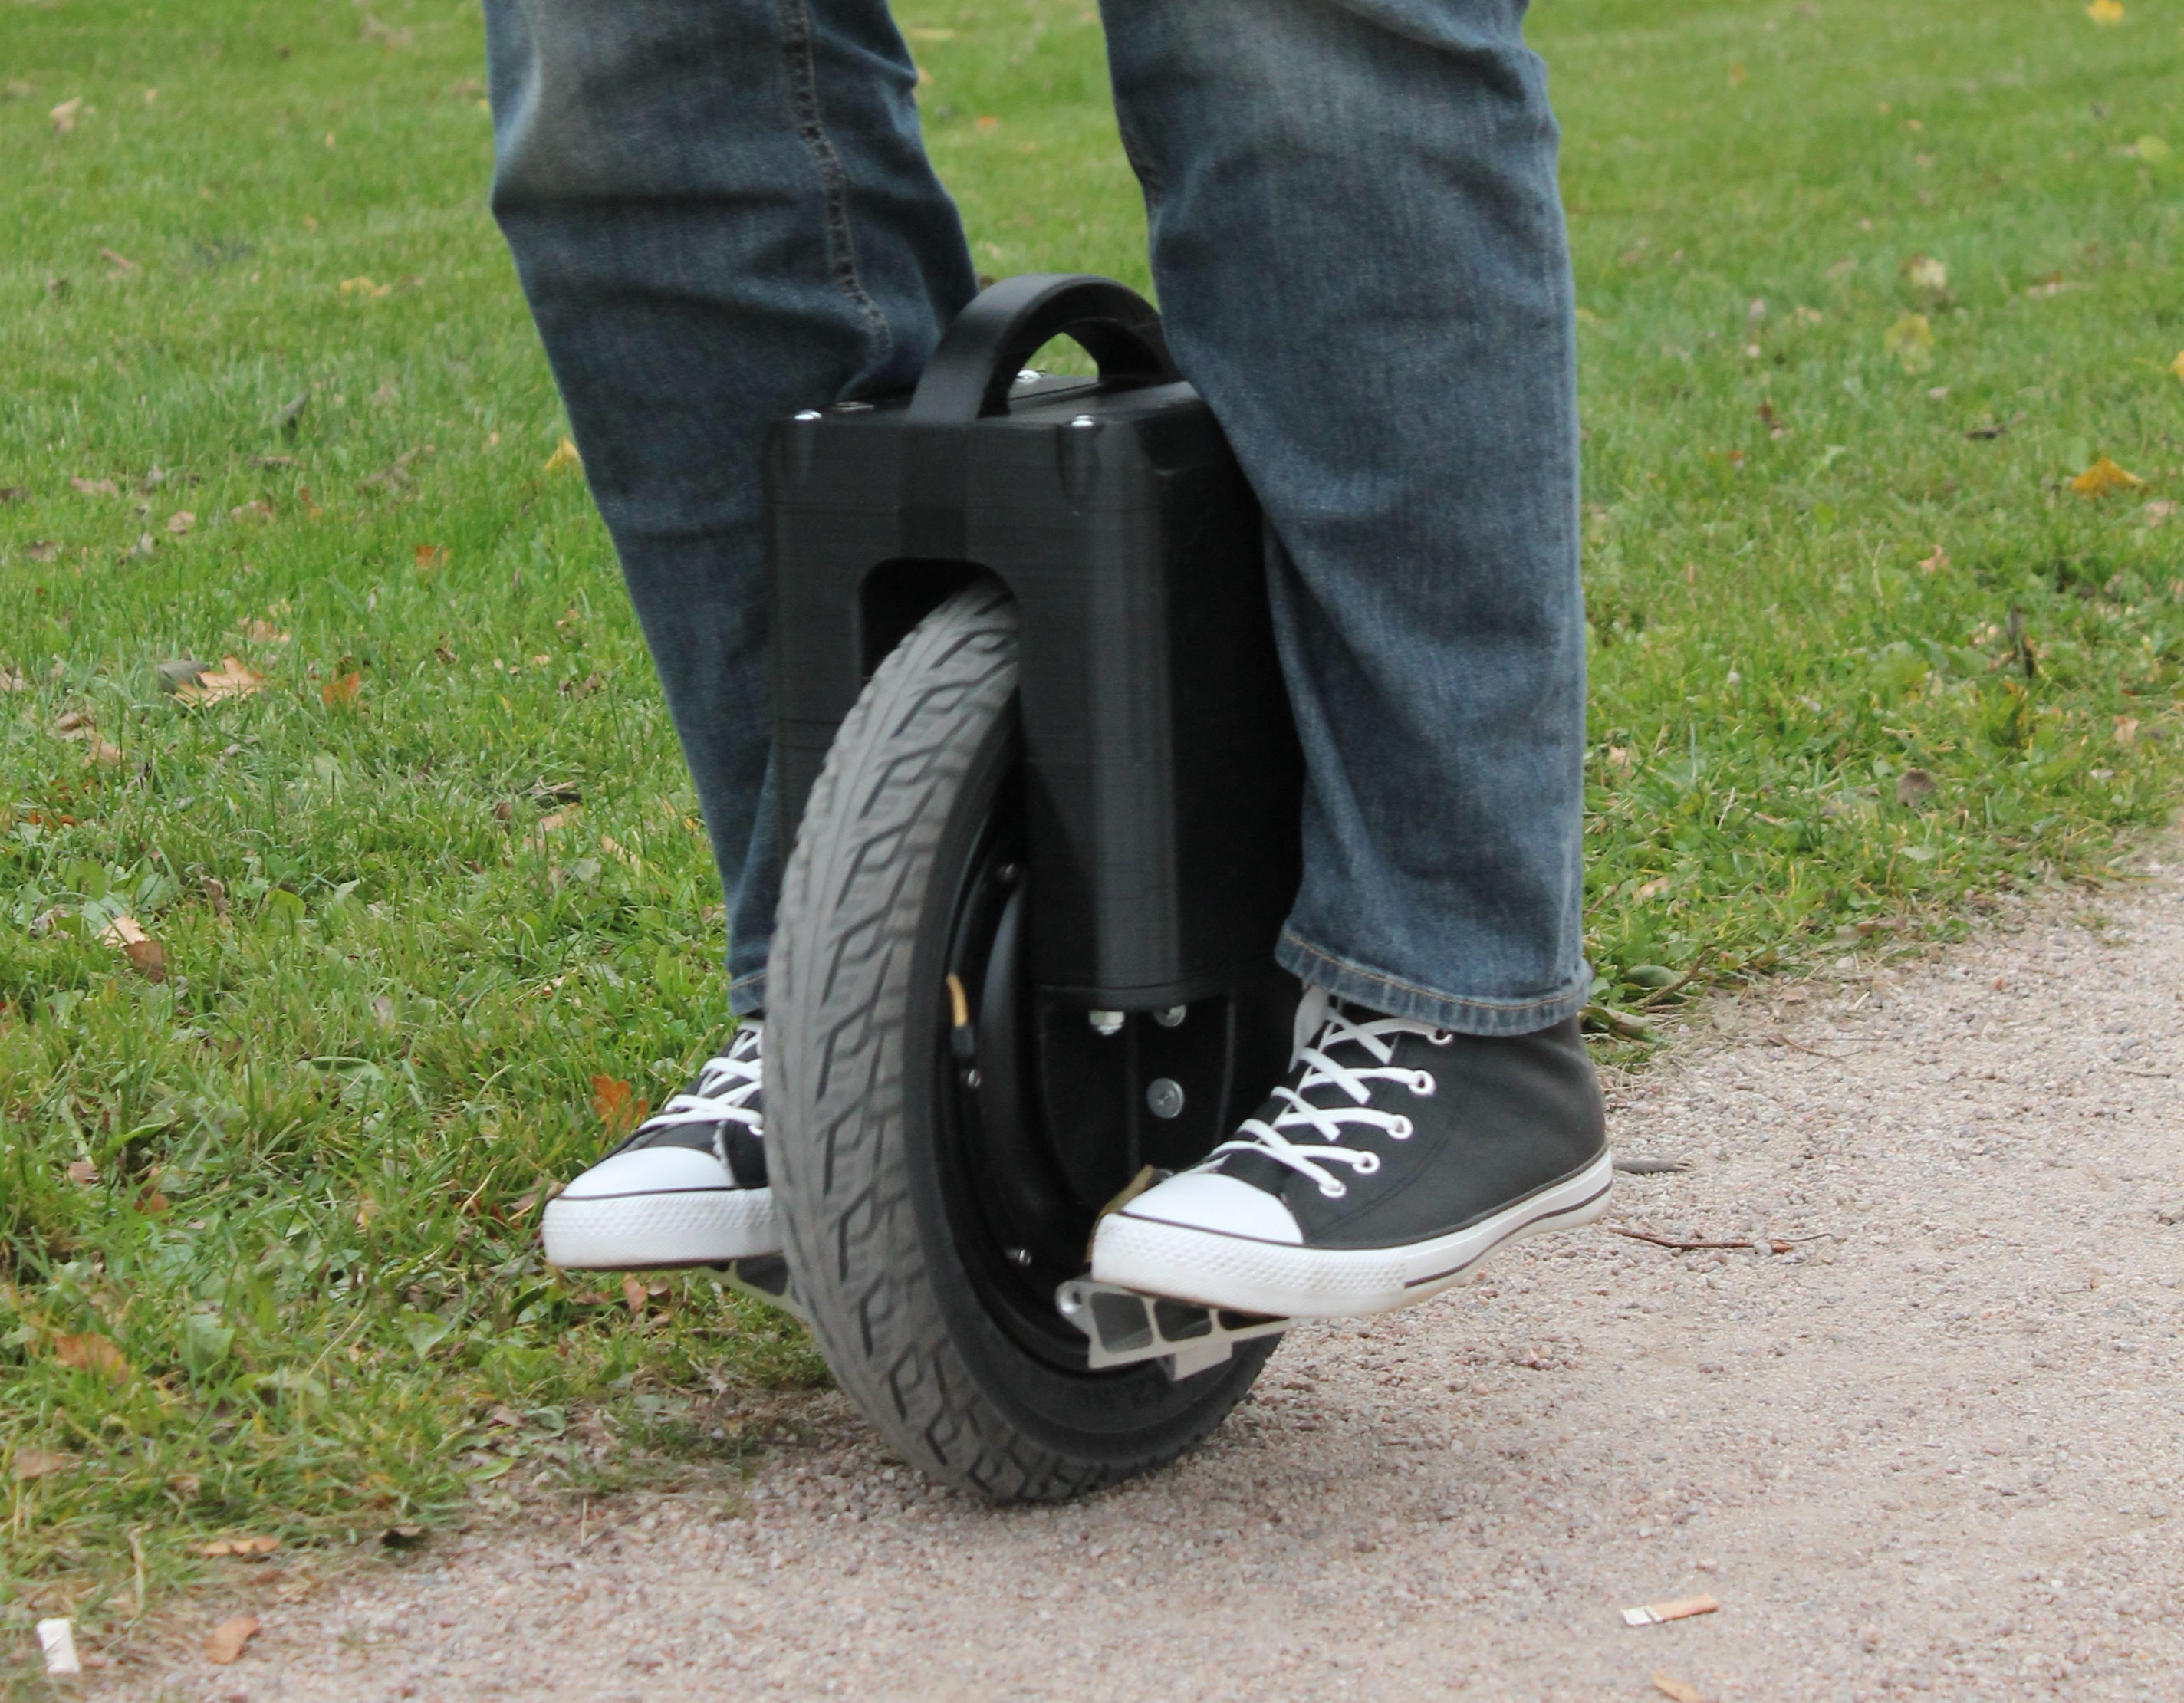
It worked great! This project is my updated version: the E14S Electric Unicycle. It’s more compact, with better ergonomics, but with the same impressive range and performance as its predecessor. Where my old version used four 16-cell battery packs (16S1P) connected in parallel, this new version uses 2 packs of 32 cells (16S2P), so the battery housings can be smaller with the same total capacity. Also, this version uses a horizontal speed controller board, so the housings on both sides are available for batteries, for excellent weight distribution.
The essential structure is the same: The housing is printed in sections that are then stacked and secured with M8 threaded rods that go through the whole structure from top to bottom. These housings are bolted to each other crosswise through the top handle section, also using M8 rods. The new horizontal mainboard goes in the space underneath the top handle.
I’ve tried to keep the design as simple, compact, and smooth as possible. I recommend using PLA filament to avoid warping issues. Be aware that these parts are large and will take a long time to print.
With the motor I used, the unicycle’s top speed is around 20mph (30km/h), and at full battery capacity your range should be around 25 miles (40km) in actual road conditions. You’d have to spend $1,100 or more for a top-of-the-line unicycle to get similar performance. It is really a joy to ride.
CAUTION: This is a high-powered unicycle not recommended for first-time riders. We recommend you develop your riding skills on a less-powerful machine before upgrading to a 500W motor like this one — it will save you a lot of banging up your 3D printed parts, and your shins!
1. Prepare the parts

Figure A
Use PLA filament to print 1 handle (part 5), 1 of each top cover (parts 4a and 4b), and 2 of all other parts. Pedal brackets (part 1) will be exposed to the greatest mechanical stress, so use at least 45% infill. For the remaining parts 25% or more will do (Figure A).
NOTE: The 32-cell batteries are a tight fit in their housings (parts 2 and 3), maximum width 43.5mm. Check the exact dimensions of yours, and make sure they fit, or modify the 3D files if necessary. You could use two 16-cell batteries, which are smaller, and some extra padding, but you’ll have less range.
Test-fit the printed parts and the M8 threaded rods. The 8mm bolt holes on the top covers don’t go all the way through to the nut; there’s 0.5mm of material left in between which needs to be drilled out (Figure B). This is simply because the parts print better this way.

Figure B
2. Mount pedals to motor
Assemble and mount the metal pedals to the motor (it’s pretty obvious how they go together). Make sure the wheel nuts are well tightened, and use thread locker here so they stay tight. An old-fashioned spark plug key can be used for this, so you can pull the motor cable through while tightening.
TIP: This unicycle is designed for the 14″ 500W motor from Shenzhen MicroWorks, but it can be used with others as well.
3. Mount the pedal brackets

Figure C
Use M5 screws and washers, with thread locker, to attach each pedal bracket to the pedal assembly (Figure C). Insert the longer M8 rods into the pedal brackets.
4. Bolt the upper housings
Bolt together both upper sections of the battery housings (part 3) with the handle (part 5) in between, to form a single unit. Use M8×60mm rods, washers, and locking nuts (Figures D, E, and F).

Figure D

Figure E

Figure F
5. Attach the lower housings
Stack the lower sections of the battery housings in place and push the M8×225mm rods through the openings.
6. Load the batteries

Figure G
Stuff the batteries into their housings (Figure G). Make sure the motor leads are pulled through.
7. Add the upper housings
Pull the motor leads up into the handle section where the control board will be located.
8. Mount the controller board

Figure H
Install the board with its big capacitors (Figure H) pointing to the right when the side of the motor with the cables is facing toward you. This is important — otherwise the controller will react exactly opposite the way it’s supposed to.
Attach the board’s aluminum backing plate to the bottom of the handle section, using hot glue. Watch that the Bluetooth module doesn’t get bent, and make sure you leave enough space on one side for the power switch, charging socket, and LED power indicators.
9. Install electronic accessories

Figure I
Take the top cover with openings (part 4b) and mount the power switch, LED battery indicators, charging socket, and buzzer. The LED PCB and buzzer are secured with hot glue (Figure I). If you’re using two buzzers, connect them in parallel to the same JST connector.
NOTE: The buzzer(s) are important for safety, because they’ll let you know when you’re approaching maximum speed. Otherwise you might accidentally try to go faster than the unicycle is able to, and crash at top speed.
10. Connect it all

Figure J
Connect the batteries and electronic components, following manufacturer’s instructions (Figure J).
You can learn more about the MicroWorks 30B4 unicycle motor and controller at on GitHub.
CAUTION: It is extremely important that both batteries are charged to exactly the same voltage before connecting them in parallel. Measure the voltage before connecting them, or you might risk overheating and even fire!
11. Close it up

Figure K
Insert the cap nuts into both top covers, and tighten the M8 rods and bottom nuts from below. Your electric unicycle is complete (Figure K).
YOU PRINT IT, YOU RIDE IT!
Before you step aboard, you must calibrate the horizontal position of your unicycle according to your board manufacturer’s instructions. The MicroWorks board has a Bluetooth app for that — but it’s in Chinese and not easy to use. Luckily older versions of the GotWay app are compatible with the MicroWorks motor, and there’s also a new open source app, EGG Electric Unicycle. Both of these are in English and fairly easy to set up and use. First you pair your electric unicycle controller (EUC) board with an Android phone or tablet, via Bluetooth. Then you calibrate your EUC’s upright position and you’re ready to ride. It only takes a couple of minutes (Figure L).

Figure L
There are 3 riding modes to choose from. Soft mode is the softest and “Madden” mode the firmest. I recommend you start with Madden mode, or possibly Comfort mode, but Soft mode is so soft that I had trouble keeping my balance when I tested it. The app also has plenty of other useful info like current speed, battery voltage and charge, board temperature, and how many amps the motor is drawing (Figure M).

Figure M
Charge your unicycle’s batteries fully (if you haven’t already).
Tie a strap about 2′-3′ long to the handle so you can hold onto it while you ride. This strap is not intended for keeping your balance while you’re riding — it’s a safety strap so you can catch the unicycle and keep it upright if you have to dismount suddenly, so that it will stop, instead of running off and crashing. The unicycle can move on its own in an unpredictable and dangerous fashion when it tips over. Keep using this strap until you learn to step on and off gracefully.
Step on and start riding. Use safety gear (helmet at a minimum, skate pads and shin guards if you’re being extra careful) — it’s fast!
CAUTION: Riding a unicycle is not the easiest skill to acquire, even on an electric unicycle. If you’ve never ridden before, we suggest you watch lots of videos on YouTube first (such as this one) and check out online guides like the Electric Rider. It takes some practice, but once you’ve got the hang of it, you’ve got an amazing personal commuter vehicle that will stow under your desk — and you built it yourself!
WEATHER RESISTANCE
People have asked me whether the unicycle can be used in rainy conditions. The answer is that it can be made quite water resistant by adding silicone in between the printed parts and covering the LED openings with tape or by filling them with transparent silicone. Also the power switch could be replaced with a splash-proof version and the charging port covered with a rubber cap. With those changes, your electric unicycle should be able to handle quite a bit of rain.
COSTS, PART SOURCING, AND BATTERIES
When my editors asked me to break down the cost of this project (in U.S. dollars), here’s how I figured it:
— Minimum: Parts from Microworks with freight: $250 + filament $40 + one 16S battery pack $70 (minimum to get it running) + hardware parts $15 = $375
— Minimum with full range: Microworks $250 + plastic $40 + hardware parts $15 + 64pcs 18650 cells from Gearbest: $176 + 2pcs 16S BMS boards from aliexpress: $39 = $520
This second option means you have to make your own battery packs, like I did, using for example 64 individual lithium cells such as the ones from Gearbest linked here, and two battery management system (BMS) circuit boards such as the ones from Aliexpress.com linked here. These lithium cells are brand cells, but a lower priced version. They are reliable, have good capacity (2600mAh) but put out less current (5.2A) than higher priced cells, which put out 20A or so. However, since there are four of them working in parallel, you´ll still have perfectly sufficient current output. But if you only use 16 cells in your setup, then you should buy more expensive cells with higher output current (20A or more).
— Easiest with full range: If you order complete 16S2P battery packs, like most people probably will, then the battery cost will be about $370–$400 for a total cost of around $700.
— Premium with full range: If you use more expensive batteries with even higher capacity cells, maybe some more expensive filament, and buy the connectors locally then you might spend as much as $800 or more.
So based on my experience, the price range is about $375–$800. You could go even much lower than $375 if you use salvaged cells from laptop batteries to build your own battery packs — but that’s probably a story for another article. And of course if you use a print service it’ll be more, but I haven’t asked for any quotes. Still, this breakdown should help you make a pretty accurate estimate of your costs, should you choose to build this project.
Good luck, and please share your build in the Comments below!
that’s the nicest electric unicycle I’ve ever seen. I can see a future model that’s self balancing ala segway.
They’ve actually been around for a while. I thought this one was also self balancing, but perhaps not.
Of course it is self-balanced, otherwise it would be impossible to ride and control. Since the article was written, I have also made a set of fenders, which can be added to this construction:
http://www.thingiverse.com/thing:1879793
Regular unicycles aren’t self-balanced, and they’re not impossible to ride or control.
Of course, but I was talking about electric unicycles, not traditional ones. The forward balance of regular unicycles is controlled by muscle power, it requires
continuous, immediate and precise response in order to stay balanced.
With an electric unicycle, it would be virtually impossible to manually control the motor so precicely that the unicycle would be able to hold its forward balance for an extended amout of time.
Therefore an electric unicycle has to be self-balanced, there´s no other way to
achieve a balance safe enough for regular use.
Considering that I started with my business online, I bring home $25 for each and every 15-20 mins. It sounds unbelievable however you won’t forgive yourself in case you do not glance through it. Read more about it here>> https://disqus.com/by/adriennevarney/
Fourteen months ago,after i discontinue my old job , i’ve had fortune to find out about this awesome company over internet that literally saved me… They offer online home-based work. My last payment after working with them for 4 months was $10k… Great thing about is that the only requirement for being able to start is simple typing skills and internet connection… https://www.facebook.com/Internet-Jobs-for-US-UK-Australia-Canada-and-New-Zealand-1585996635048445/app/190322544333196/
I’ve made $84 ,000 up till now now working on-line and I’m a full time university student . I’m by making use of a home business marketing opportunity I heard about and I’ve earned such type of decent money . It’s really simple to use not to mention I’m just very happy that I found out about it . The possibility within this is endless . Here’s what I do>>> http://secure53.weebly.com
Perhaps, but humans have balanced on all kinds of things. I wouldn’t underestimate the power of practice.
Well you could do this same build and replace the self-balanced controller with a manually controlled brushless ESC and see how far you´ll get… I prefer to keep my bones intact.
I’ve earned $84 ,000 until now this year working via internet moreover I am a full time student . I’m implementing a web business project I read about and in addition I’ve generated this kind of great money . It is actually undoubtedly user friendly so I am just too thankful that I found out about it . The capability using this is endless . Here’s exactly what I do>>> http://secure11.weebly.com
xcfdsfssd
After leaving my old profession 12 months ago, i’ve had some good luck to understand this website which was a life-saver for me… They give jobs in which people are able to work online from their residence. My most recent income after doing work for them for just 4 months was for $4500… Wonderful thing about is that the only thing essential is very simple typing skills and access to internet…Read more information about it here >> http://www.wzurl.me/Ouxcpw
It’s been 1 yr since I resigned from my previous job and it changed my life… I started freelancing from home, over a website I stumbled upon over internet, several hrs /a day, and I profit now much more than i did on my last work… My check for last month was for 9k dollars… Superb thing about this is that i have more free time with my kids… http://korta.nu/MDe
Here´s a video of it in action. The title says E15S because it has a slightly larger tire mounted than on the original E14S, but it´s exactly the same EUC with exactly the same 14×2.5″ tire recommended in this article.
https://www.youtube.com/watch?v=TBEu8ykEiAg
In the 1970’s a classmate of mine at MIT (John Castellano, who used to build bikes for Ibis when it was a bike brand and not a bike shop, now @ http://www.castellanodesigns.com/fango.html) built a motorized ‘unicycle’ which was basically a bicycle fork from a stingray, a banana seat, and a bicycle engine, all hooked up so you could ride on top of it, although you needed roller skates be stable. Still you could tow people around on skateboards at high speed, even up hills, and that was the idea! :-)
Wow! I would love to see photos of that.
Hi, Matias, thank you for the sharing, and it is rude to ask your 3d print file (STL or so) ?
The link is in the article, see parts/tools.
Can I get a link to the $70 battery pack and the battery charger please?
Here´s a set of two battery packs: http://bit.ly/2gL3nLR
Banggood also has a unicylcle battery, but it´s currently sold out: http://bit.ly/2gE0Tvw
Here´s another one: http://bit.ly/2fQd5rt
The charger can be ordered at Microworks together with the motor and controller.
What do you mean exactly by “they can be ordered together”? Thanks for the info.
To build the unicycle, you need to buy a motor, controller, pedals, electrical accessories etc. The parts used for this project were from Microworks. When ordering those parts, you could ask if it is possible to add some batteries to the same order.
Oh ok. Thanks.
How can I calibrate this with an iPhone instead of an android?
You can´t. You can borrow someone´s android phone or tablet for calibrating. It only takes a couple of minutes and you won´t need it after that.
I have the parts about half printed, I have the motor and all of the items recommended from Shenzen Microworks. Now I need to make the battery decision… I do NOT care if the unicycle has full range, but I was wondering if with 2 of the 16S1P battery packs (132W/2200Mah) if it would still have about the same top speed as having 2 of the 16S2P battery packs. I do not need to go anywhere near 25 miles between charges, but I do want it to go fast! I realize the voltage is the same in either set up, but I wasn’t sure if doubling the amperage would increase the speed significantly or just affect the range. Thanks for sharing the design!
Hi Todd,
Yes, you can use two 16S1P packs and it will work perfectly. Speed and performance will be exactly the same as with the larger packs, only your range will be shorter, probably around 10-13 miles with two 16S1 packs. I recommend you add some padding to make sure your battery packs don´t bounce around while riding, since they are a bit smaller. Wish you lots of fun on your unicycle, maybe share a pic once you´ve completed it.
Interesting and well thought out. Have you taken it off road at all? I would be using mine mostly in woods and hills. The other option would be building a monowheel skateboard but I like this one a lot.
Thanks. I´ve been riding it a lot on gravel roads and on grass. Occasionally also in the woods and on narrow paths. It´s possible. Do a search on youtube for 3D printed electric unicycle.
This has to be easily the best Make: project I have ever done. I am 42 years old and not quite as nimble as I once was, but within about 20 minutes I got the hang of it. Man, that thing is fast!!! My 14 year old son and I have had a blast on this project. Thanks a lot for all of your time and effort!
Hi Todd,
thanks for your feedback, it´s great to hear everything worked out so well with your project. Riding electric unicycles is so much fun once you get the hang of it, which in fact is much easier than most people seem to think. I wish you great times riding, stay safe! Be sure to check out Thingiverse every now and then for addons and future upgrades.
Can you post links to buy the other stuff, like the batteries and the buzzer, button, etc…
Sources are listed under PARTS/TOOLS on the right.
I can’t seem to find the pedals and the hardware parts anywhere. Do you know where to find them?
They are from Microworks. Not all of their parts are listed. Email Mr. Charles Lee. Address is in the description.
Microworks seems to have disappeared.
Thanks for the info. I´ll try to contact them and see if their parts are still available. If not, I´ll find an alternative source.
Did you got an answer? Or an alternative source?
Their Alibaba webshop is currently offline, but I was told it will be re-opened in june. Otherwise, any 14″ Electric Unicycle motor and controller could be used. However, most controllers can only be installed vertically, which means that one of the side housings would have to be used to accomodate the controller. So in such a case, only one side would remain available for batteries. With one 32 cell battery pack the range would be about 20 km instead of 40 km with two 32 cell packs.
Is there a way to limit the speed to 25km/h instead of the full 32km/h? I don’t think the LTA here (like your DMV) would be very happy with a 32km/h electric unicycle.
The actual top speed is about 27-28 km/h, so just slightly above 25. You can set your top speed alarm to be 25 km/h or less with the android app.
Hello Matias,
could you provide more Detail Pictures where I (we) could see how the electronic stuff fit all together? (e.g. Google Drive Document)
I´m a electronic novice and I´m not sure if i get everything assembled the right way.
Where did you get the alu stands for the feeds?
By the way – Great Project!! :-)
Microworks has a diagram on how to connect everything to the board which they ship along with their controller and motors. The only other thing you need to do is to connect the batteries – both charging cables in parallel and both output cables in parallel. But measure the voltage on your batteries before connecting them in parallel. The voltage needs to be the same on both before you connect them. If you have doubts, you could ask a friend with some knowledge in electronics to help you. It´s not very complicated.
It looks amazing waiting for someone to share how to print a 3D car :D I have actually seen some on
http://3dprintersspot.com/top-3d-printed-car/
It´s a fascinating idea, but first we´ll probably have to wait a while for printers to become faster to make it practical. This unicycle took me almost a week to print, but it´s much more fun to ride than a car :)
And I am pretty sure if I am gonna try it I will mess it up…lol
It looks like Shenzhen Micro works has disappeared. I found Hallomotor which offers DIY ebike kits. What should we look for when looking for alternatives, specifically with regards to the controller board?
I can confirm Shenzhen Microworks Alibaba pages are gone with 404 errors. Does anyone have alternate BoM options? Or contact information for Shenzhen Microworks in case they are still around but no longer selling through Alibaba? I love the idea of this project and want to price out parts and get started!
Thanks for the info. I have sent an email to Mr. Charles Lee at Microworks to find out more about the situation. Hopefully the parts are still available. If not, I will try to come up with an alternative source. You need a 14″ Electric Unicycle motor, a matching controller and a set of pedals. There are several sources for both on aliexpress, so the unicycle can also be built with parts other manufacturers if necessary. But let´s first wait for an answer from Mr.Lee. His contact info is in the article, see parts/tools section
can we connect a 16 inch hub motor rather than 14 inch?
This is such an inspiration. I’ve just bought a 3D printer and I’m only just imagining the possibilities!
I’m planning to do something similar but do you or anyone else have advice on increasing the OD of the tyre or what part of the electrical system i could add a front/rear light into?
ConfigureACCEPT
Privacy Overview
Necessary cookies are absolutely essential for the website to function properly. This category only includes cookies that ensures basic functionalities and security features of the website. These cookies do not store any personal information.
Any cookies that may not be particularly necessary for the website to function and is used specifically to collect user personal data via analytics, ads, other embedded contents are termed as non-necessary cookies. It is mandatory to procure user consent prior to running these cookies on your website.