Cover of Make Volume 97. Headline is "Tech Craft". An embroidered LED phone purse and inflatable Katamari costume are on the cover.
This article appeared in Make: Vol. 97. Subscribe to Make: for the latest articles.

Clothing trends come and go, but the denim jacket has been a fashion fixture for over a century — a sartorial staple of work, protests, and concerts, as well as a blank canvas for personal expression. Sturdy, forgiving, and endlessly customizable, denim has long invited modification — with patches, pins, paints, embroidery, and, notoriously, bedazzling.

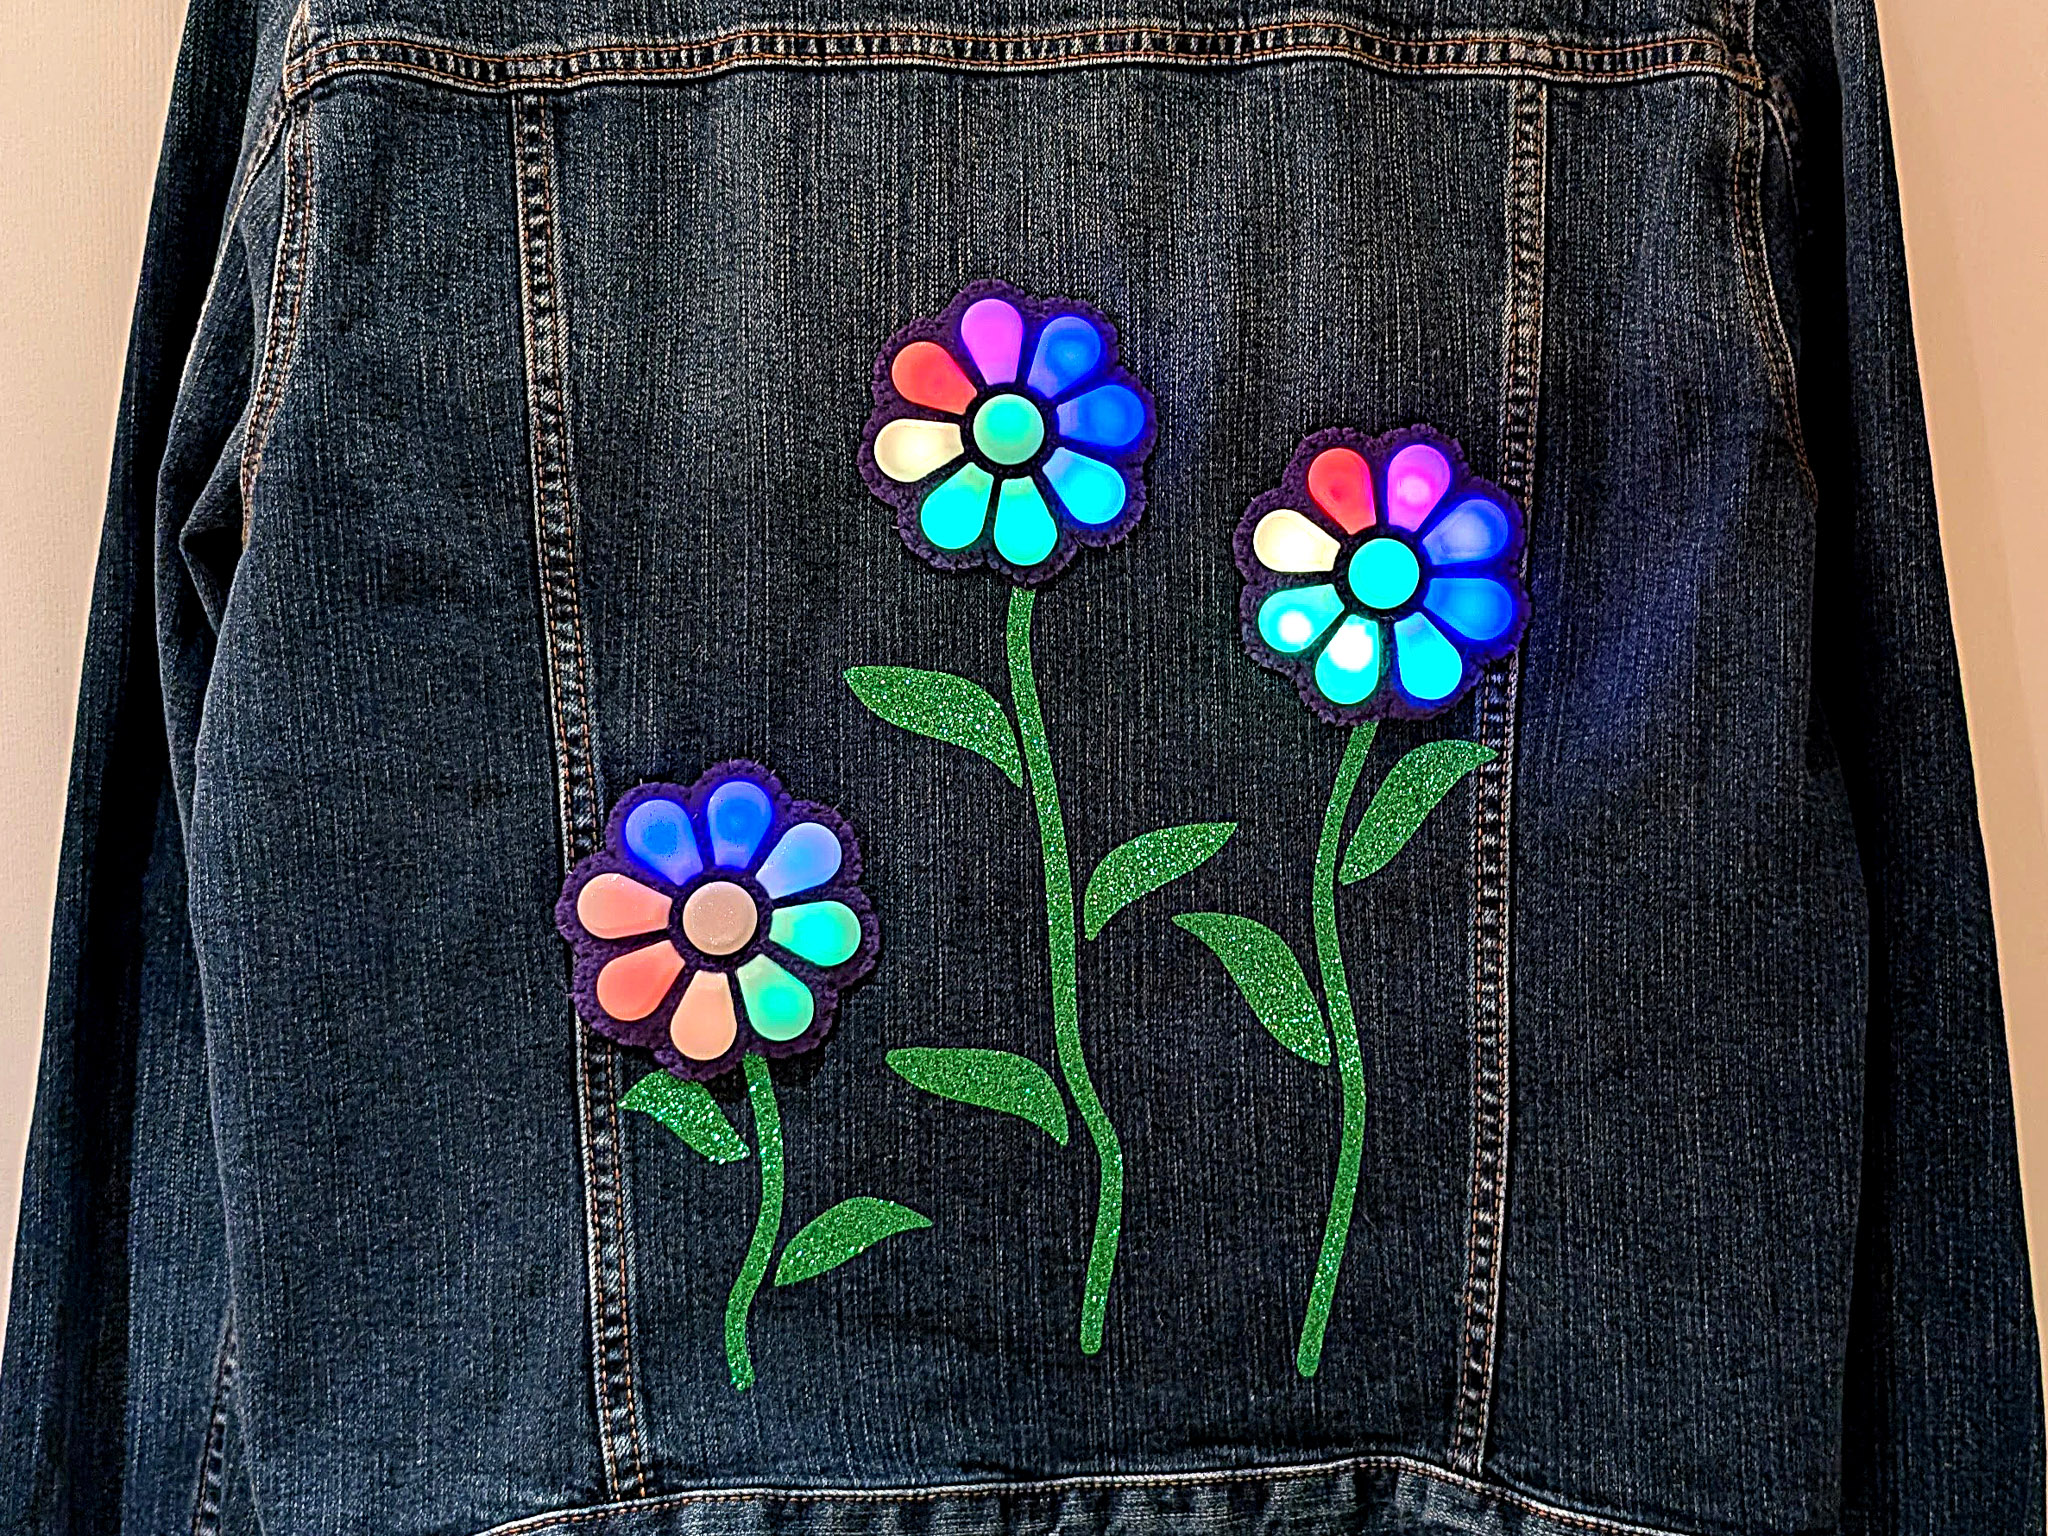
This project puts a 2020s twist on those traditions. The shimmering rhinestones and studs of 1970s-style bedazzling have been swapped for flexible, floral 3D printing, dynamically illuminated with addressable LED strings. To make it, you’ll do some sewing, some soldering, and some 3D printing on fabric.

The result is a wearable piece of light art: expressive, durable, and surprisingly practical. Denim’s stiffness provides a supportive substrate that protects the electronics while its flexibility forms a comfortable canvas for a contemporary kind of appliqué.


Project Steps

1. Find a Denim Jacket

Jean jacket design varies from utilitarian function to high fashion, with styles at every price point. Denim’s durability makes it easy to find pieces in good condition in thrift shops. Buy a new jacket if you want, but you can save money and find a wide variety on the resale market. Just make sure it has room on the back to add one or more 3D-printed flowers.

2. 3D Print the Flowers

First, 3D print the flower parts in translucent white PETG. PLA will work, but isn’t as durable. California Filament’s Cloudy White PETG is designed specifically for printing lithophanes and diffuses light quite well.

Download the design files from the project page. The base, consisting of eight petals surrounding a central disc, is printed onto mesh fabric to allow the arrangement to flex while maintaining the pieces’ configuration. Import the flower base layer STL file (FlowerBasex3.stl) into your slicer, choose a layer height of 0.12mm or finer, and insert a pause at a height of around 1.5mm. Start the print, and, at the pause, cut a piece of tulle fabric and lay it over the first print layers. Place small neodymium magnets around the tulle perimeter to hold the fabric down, pulling gently at the edges to smooth out wrinkles. Keep magnets away from the print itself to avoid collisions with the print nozzle. You may also secure the tulle around its edges with Kapton tape.

Resume the print. The porous mesh allows the PETG to bond through the fabric, securing it to each individual flower petal and center. When finished, carefully remove the base print from the plate, being careful not to rip the tulle.

Print the petal and central disc covers (FlowerPetalsx3.stl) facedown on the build plate for a smooth top surface. Use a layer height of 0.12mm or less, or if your slicer allows, choose the adaptive layer height option to speed up the print. While the parts print, move ahead with the next tutorial steps.

Photography by Debra Ansell

3. Cut the Flower Border Fabric

A non-fraying fabric like fleece or faux leather provides a pretty outline for the flowers, hides the wiring, and strengthens the flower assembly before it’s sewn to the jacket. Faux leather fabric is tougher (make sure it’s PVC-free for laser cutting), but the thicker fleece adds soft, touchable appeal and a more gradual visual transition between the printed flowers and the denim. The choice of material is strictly a matter of personal preference.

Cut three border pieces using the correct vector file for your chosen fabric, either FlowerBorderFleece.svg or FlowerBorderVinyl.svg. A laser cutter is the most accurate and consistent cutting tool, but if you have a very steady hand, you can use the printed SVGs as a pattern and cut them with scissors. Note that the faux leather template includes perforations to guide the stitching, while the fleece template does not.

4. Cut HTV Stems and Leaves

With a vinyl cutter, cut the vector file Stems And Leaves.svg from the heat-transfer vinyl. Weed the excess vinyl from the clear backing and cut through the backing around each HTV piece to separate them. There are extra leaves and stems in different shapes and sizes, so choose the ones that are the best aesthetic and physical fit for the space. If you don’t have a vinyl cutter, it is possible, though challenging, to draw leaves and stems on the HTV then cut them out with scissors.

5. Flower Arranging

Lay the jacket down on a flat surface then position the stems, leaves, and flower base pieces into the desired arrangement on the exterior back panel. Some jackets have features such as seams or decorations that might constrain the layout. If the existing stem and leaf sizes don’t work, trim the stems or cut new ones to create a scene you like.

When the positions are set, put aside the 3D-printed flower bases, and iron the leaves and stems on the jacket according to the HTV package directions. If the plastic backing on HTV pieces overlaps, iron the stems first, then remove the stem backing and iron the leaves.

6. Cut Holes for Wiring

Mark and cut small holes, approximately 1cm in diameter, through the back of the jacket where each flower is centered.

These allow the wiring to pass between the jacket’s interior and exterior. To prevent fraying, paint the hole edges with either clear nail polish or craft glue and let it dry.

7. Assemble the Flowers

Separate the three 3D-printed flower base assemblies from each other by cutting the tulle between them, then place each one on a flat surface, mesh side down, and set the fabric border over it. Press the fabric border piece down so the 3D-printed center and petals extend upward through the openings.

One at a time, place each printed petal and center dome over their corresponding piece in the base, pressing down firmly until they snap into place. These should come together fairly easily, but if the fit is tight, place a hardcover book over the cover piece and press firmly until it snaps to the base. When connecting the domed top to the center disc, be sure to align the dome’s four slots with the four corresponding tabs in the disc.

8. Solder the LED Strings

Measure the two distances between adjacent flowers’ centers. Next, cut two lengths of three-wire silicone cable that are a few centimeters longer than each measurement. Also cut a 12" length to carry power and signal from the controller to the LEDs.

Cut three segments containing nine LEDs apiece from the pebble light strand, leaving enough wire at both ends for soldering. Mark the data input end of each pebble light segment using tape or a marker. Locate the three-pin female JST SM connector.

Solder the connector, three-wire cables, and pebble light strings together in the following order, making sure the direction of data flow is the same along the entire assembly: JST connector → 12" cable → 9-pixel LED string → cable → 9-pixel LED string → cable → 9-pixel LED string. Note that pebble lights have a front and back side. After soldering all the sections, lay the string out flat, with no twists, and make sure that all three pebble light strands have the same front-facing orientation and that all 5V and GND wires line up along the entire assembly.

Test your new LED arrangement by connecting the JST connector to a powered LED controller to make sure it turns on and displays correctly. Before attaching it to the jacket, check that the connecting wires between flowers are long enough to reach between the holes in the denim.

9. Attach LEDs to Flowers

Now you’ll join the LEDs to the flower assemblies on the jacket exterior with the connecting wires, which pass through the holes to remain hidden in the interior. Glue dots or strips are a quick, low-mess method to attach the LED string to the mesh backing of each flower.

For clarity, we’ll refer to the individual LEDs in the string with indexes 1–27: LED 1 is closest to the JST connector, and LED 27 is the last LED on the string. So the three LED string segments contain LEDs 1–9, 10–18, and 19–27 respectively. Each segment illuminates one flower.

Place the entire LED string inside the jacket and push only LEDs 19–27 out to the exterior through the third flower’s hole. Place the flower near the hole, facedown with its mesh side up. Stick a glue dot to the mesh in the center disc. Stick the front (rounded side) of LED 19 to the glue dot, oriented so the wires to LED 20 pass through the notch in the center disc. Then place another glue dot on the back of LED 19 and fold the string backward over on itself to take up the extra slack. Next, place a glue dot on the mesh of the petal nearest the center notch. Press the front side of LED 20 into the glue dot, then place another glue dot on the back of LED 20 and fold the string back on itself, with the glue dot holding the fold in place. Continue to work the LED string around the circle, gluing it back on itself at each petal and then bending the string to the side so that successive LEDs sit in adjacent petals.

After LEDs 19–27 are attached to the third flower, set that flower down and pull the rest of the LED string out through the second flower’s hole in the back of the jacket. Repeat the gluing process, starting with LED 10 in the center disc and gluing LEDs 11–18 to adjacent petals while attaching successive LEDs in the same direction as the first assembly.

When the second flower is completed, pass the rest of the LED string back into the jacket interior through the second hole, then pull it back out through the hole for the first flower. Glue LEDs 1–9 to the remaining flower, as before, with LED 1 in the center and LEDs 2–9 placed in adjacent petals in the same direction as the previous two flowers. When every LED has been seated in a flower petal or disc, slip the JST connector back through the first flower’s hole. Now the flowers sit on the jacket back exterior panel with all connecting wires hidden inside.

10. Sew Flowers to Jacket

Hand sew all three flowers to the back of the jacket with a needle and coordinating thread. The LED animations will look best if the flowers are oriented so that the first sequentially illuminated petal in each flower points in approximately the same direction. Choose a flower to start with and center it, face up, near the hole for its wires. If your border fabric is faux leather with perforations, stitch up and down directly through the perforations, passing through both the faux leather and denim with each stitch. If your border is fleece, you can sew around the perimeter with a simple running stitch, in which the needle passes up and down at regular intervals, with stitches sitting about 8mm inside the fleece edge. For a more polished finish, appliqué sewing techniques such as a whipstitch or blanket stitch around the flower perimeter will work as well. If you’re not familiar with appliqué stitching, tutorials are easy to find online.

Be very careful to avoid sewing through the wires, or stitching any of the wires to the interior of the jacket. Taut stitches can rip through the silicone insulation, exposing the wires.

11. Secure Wiring

When all three flowers are sewn, tack the loose connecting wires to the jacket interior with iron-on fusible interfacing. (Only do this if your wires are silicone coated. Silicone resists heat quite well, but a steam iron will melt PVC coating.)

Don’t worry about aesthetics here, as the wires and interfacing are concealed inside the jacket. Lay the jacket with the interior face of the back panel facing upward on an ironing board, and heat the iron to the setting recommended by the interfacing package. Cut interfacing strips an inch or two wide, and lay them over loose wires to cover them. Iron with gentle pressure until the interfacing adheres to the inside of the jacket. Before ironing the wire that attaches to the LED controller, route it toward an interior jacket pocket if there is one.

12. Attach and Program the Controller

Many LED jackets have interior pockets which can hold the controller and power bank. If your jacket doesn’t have a good place to stash them, you can just sew a makeshift interior pocket.

The QuinLED and Athom WLED controllers mentioned in the Materials list feature USB-C power input ports as well as male JST connectors which can attach directly to your flower LED string. If you’re flashing your own controller, make sure it connects to both the jacket’s LED wires and portable power.

Connect a powered WLED controller to the wiring, and watch your flowers glow! If you’re new to WLED, good tutorials to get started can be found online at kno.wled.ge/basics/tutorials. WLED software comes with a large selection of pre-installed patterns, many of which are customizable with different color palettes, pattern speeds, and intensities. And you can arrange your favorite patterns into playlists, creating the perfect illumination style for any occasion.

Take Your Glow on the Go

The BedazzLED Jean Jacket is surprisingly practical for a wearable art piece. Powered down, it blends in perfectly at a rock concert or grocery store. Just a single press of the controller button turns it into a dynamic display guaranteed to turn heads and start conversations.

This wearable is versatile and durable enough for frequent use. The pebble light strings are waterproof, so the jacket can be hand washed in cold water after the disconnecting the controller and power bank.

Next Steps

This 3D-printed bedazzling technique works on other items of clothing and accessories as well. It’s straightforward to modify this project to place a single flower on a baseball cap. For a bigger challenge, cover a tote bag with a lush illuminated garden.

I’ve enjoyed accumulating my own “Light Wash Denim” collection, and even exhibiting it at various maker events. If you’re comfortable with CAD design, you can create your own original 3D prints to decorate an assortment of “designer” denim jackets. Regardless of fashion trends, you’ll be sure to shine in your “bedazzLED” creations.


This article appeared in Make: Volume 97.