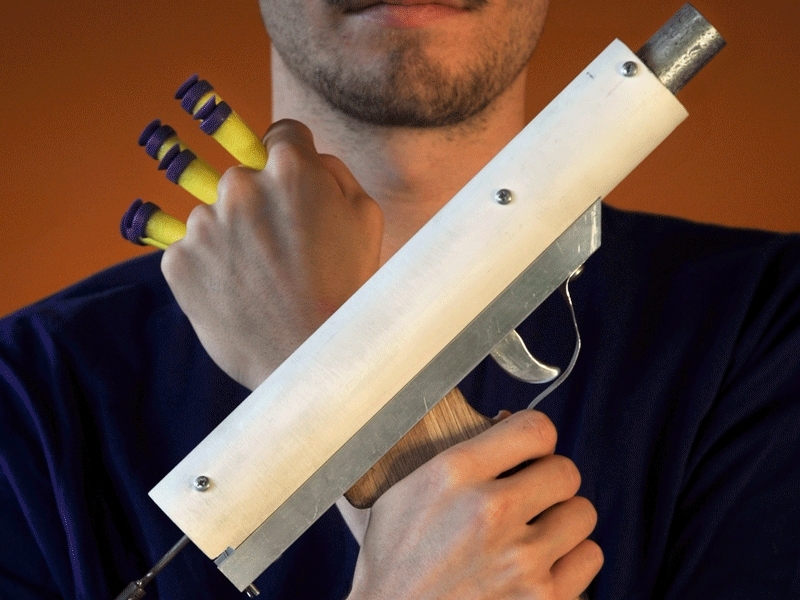
Like most geek-filled offices, at my workplace we have several Nerf guns and similar toy weapons floating about. Not impressed with the performance of my colleague Lester’s Nerf Maverick, a mainstay of Nerf’s suction-cup-dart-firing “N-Strike” series, I decided to build a better Nerf gun myself.

Here’s the result: a simple weapon, single shot only, but with much greater range and accuracy than the standard toys. Let your indoor combat foes tremble; with a little practice, one shot is all you need.

I made the pistol from PVC pipe, aluminum extrusion, and aluminum tubing, with wood for the grip and various pieces of metal and plastic, mostly from my junk box — and you can easily adapt the design to use what you have in yours. A sliding trigger and telescoping plunger keep the pistol short and compact. You’ll need a small metal lathe to machine some of the parts, but as there’s nothing too critical in the design, this is a nice project to hone your skills.

YouTube player

What will the next generation of Make: look like? We’re inviting you to shape the future by investing in Make:. By becoming an investor, you help decide what’s next. The future of Make: is in your hands. Learn More.

Project Steps

Barrel, Body, and End Cap

I made this design up as I went along, without working out the dimensions ahead of time. You can do the same, or download templates from my build at http://makeprojects.com/v/29.

For the body, cut a length of 1¼” PVC pipe with a hacksaw.

From the cutting board, cut 2 plastic centering rings to hold the barrel. I finished them on a lathe and secured each one into the body using 3 screws.

Cutting boards are a good source of plastic for projects — it’s cheaper and easier to go to a supermarket than buy from an industrial plastics supplier.

Cut the barrel out of 1″ metal tube. It can be any length over 70mm (the length of a Nerf dart), and can protrude any amount from the body, depending on the aesthetics you want.

Machine 2 grooves into the barrel so that C-clips can hold it between the rings. Leave room for a rubber O-ring against the rear ring. The clips prevent the barrel from sliding, and the rubber ring keeps it from rattling or rotating.

The Nerf dart’s suction-cup tip is a bit wider than its shaft, so the plastic sleeve stops 20mm short of the barrel’s end. This lets the dart sit inside the barrel completely when the gun is cocked, with no friction against the barrel.

A standard ½”-diameter Nerf dart should fit snugly inside the barrel without bind- ing. To fine-tune your barrel’s inside diameter, cut an inner sleeve from ½” ID plastic pipe, and lathe it down to push-fit inside the barrel.

Mark and drill 3 equi-distant screw holes in the body for each ring, without the rings inside. Then slide in the barrel assembly, mark the rings through the holes, and drill them with small holes for the self-tapping screws.

Later you’ll install a longer bottom screw in the rear centering ring.

Machine the end cap from cutting-board plastic to fit snugly inside the body. Drill a centered 8mm hole in the cap for the plunger to pass through, and chamfer the front with a countersink bit to let it exit easily. Mount an 8mm fender washer onto its back using 2 small screws.

The washer provides a hard-wearing metal surface for the catch wire to slide against.

For the catch wire, cut 4″ of the 1.2mm wire. Drill and thread it through the end cap and washer. Bend the front of the wire, or attach a small stop, so it won’t pull out. Bend the back of the wire to lie flush across the end cap.

Drill and mount the end cap in the body the same way you did with the centering rings.

Piston and plunger

Machine the piston out of more cutting-board plastic to slide within the body. Cut an O-ring groove around its perimeter to provide a seal.

The telescoping plunger is made from a 96mm-long 5/16″ tube. A short, wide screw holds it to the piston. I solder-ed mine, but you can also tap threads in the tube and screw it in. A small O-ring under the screw helps seal the piston.

For the telescoping section, cut a 1/8″ rod, 115mm-long, and solder a 5/16″-diameter cylindrical stop on back.

For the rear stop, cut an 18mm length of 5/16″ rod and face off the ends. Drill a 1/8″ hole halfway through the cylinder from one end; this is where you’ll solder in the 1/8″ rod. Drill a hole across the stop 3mm from the other end for attaching the pull ring.

Machine the catch piece from 5/16″ rod, about 25mm long and with a 1″ hole for sliding over the 1/8″ rod. Grind down about 10mm of the front end so it fits tightly into the 5/16″ tube, and chamfer the back so it will pull through the end cap.

Machine a square groove 7mm up from the back, just wide and deep enough to hold the catch wire.

Slide the catch piece over the 1/8″ rod, and then solder a stop, 3/16″-diameter or so, onto the rod’s front end.

Slide the rod into the tube and solder on its catch piece.

The catch wire in this groove is what holds the plunger back once the pistol is cocked. The smaller stop slides inside the 5/16″ tube; make it a loose fit so the internal stop can move freely.

Main spring and test-firing

Remove the pull ring, slide the spring and end cap over the plunger, and replace the ring. Slide the assembly into the body. Cut a notch in the back of the body to let the catch wire swing side to side.

With the end cap screwed into place with its 2 top screws (you’ll add the bottom screw later), test-pull the plunger back until the rod telescopes back and you can swing the wire into the catch piece.

Once the gun is cocked, you can telescope the rod back in, flush with the end.

To test fire, just push the wire sideways out of its notch.

Trigger system

Cut and file a trigger from 10mm-thick aluminum, and tap 2 mounting holes on top.

Cut and file a trigger plate from 3mm aluminum to slide within the housing. Drill 2 mounting holes in front for the trigger and 2 in back for the ramp. In the middle, 46mm from the trigger end, cut a 19mm×8mm slot for the bolt that holds the handgrip.

Cut the ramp out of 1mm metal 85mm long, with a 35° wedge in back to push the catch wire. Screw the ramp to the trigger plate.

The trigger plate and ramp could be a single piece, but as this was my prototype, I made them separate so I could fine-tune the ramp angle.

One trigger mounting screw also holds a tab that the trigger return spring hooks onto.

Make the trigger housing from U-channel 22mm×210mm long, undercut 45° in front. Two holes let it screw-mount to the centering rings through the body, and another hole takes the bolt that holds the grip. A 10mm×22mm slot lets the trigger pass through.

By varying the angle of the ramp, you can adjust how sensitive the trigger is; the steeper the ramp, the more sensitive the trigger.

On back of the housing, tap a small hole on the left for the screw anchoring the catch-wire spring, and cut a slot on the right to let the catch wire pass through.

Grip and trigger guard

Cut the grip out of 18mm-thick wood. Drill a 16mm hole crossways through the grip, to hold a cylindrical metal insert. Then drill a 6mm hole from the top of the grip to the middle of the insert, for the long bolt that secures the grip to the trigger housing.

Cut the 16mm cylindrical metal insert. Tap a 6mm hole in its side, for the bolt, and tap a centered 3mm hole into each face, for screwing on 2 grip side plates.

Cut side plates matching the grip out of 4mm acrylic, then file and sand them into a comfortable shape. File a step into the tops of the plates so that they fit snugly over the sides of the trigger housing.

The step in the top of the acrylic plates keeps the grip from rotating under the housing, and also prevents the side plates from rotating on the grip.

Cut and bend a trigger guard from thin aluminum plate, about 1mm thick. Angle its front end up to cover the front of the trigger housing and abut the round pistol body. The back of the trigger guard pushes into a shallow hole drilled into the front of the grip.

To make the trigger guard front fit against the body tube, I wrapped sandpaper around the tube and rubbed the aluminum guard against it until it had the matching concave shape.

Final assembly

Attach the trigger to its plate using two 3mm screws, sandwiching the brass tab for the return spring under the front one. Screw the ramp to the rear of the plate, and drop the assembly into the housing.

Run the trigger housing’s front mounting screw up through its hole, and then hook the trigger return spring between it and the trigger plate tab. The spring will hold the mounting screw in place until you screw it into the gun body.

Run the 6mm bolt through the spacer and its slot in the trigger plate. Push the steel insert through the grip with its threads aligned with the mounting hole for the long bolt, then screw the bolt into the insert through the grip. Screw the acrylic plates onto each side.

The top of the bolt is threaded through a small spacer cut from 5/16″ tube so that it doesn’t interfere with the sliding trigger plate. And I ground the head of the bolt down so that it would clear the body piece when the pistol was assembled.

Finally, screw the grip and trigger assembly to the main body of the pistol using the 2 long, self-tapping screws, making sure the catch wire passes through the rectangular slot in the trigger housing.

Loop the ½” spring between the end of the catch wire and the small screw next door, to pull the catch wire in toward the plunger rod.

With the trigger housing attached to the body and the catch spring in place, you can see how pulling the trigger will release the catch wire.

Congratulations! Your pistol is fully assembled.

Conclusion

Using the pistol is simple. You pull back on the ring on the end of the plunger until the catch wire hooks onto the plunger catch. Then simply push the telescoping part of the plunger back into the pistol. (With a non-telescoping plunger, the pistol would have to be longer and wouldn’t be as neat when cocked.) You’re ready to fire!

I’ve found that when fired over a range of 8–10 meters (26–33 feet), the darts are fairly accurate and travel fairly flat. At farther distances, you need to start lifting the barrel to get more of a lob trajectory on the darts.

What else could be done? You can paint the pistol any way you want, although I would stay away from black, so it isn’t mistaken for a real weapon. Most parts of the pistol can be modified to suit your own particular tastes. The grip can be changed, the barrel length modified. Adding a stronger main spring is probably the best way to increase the range. You could also add some kind of sights — perhaps even a laser sight from a cheap laser pointer, for that high-tech touch.

The next version I’m planning is a Nerf-firing replica of a “real” prop weapon. Perhaps a stormtrooper’s blaster from Star Wars or a pistol from Blake’s 7?

'''This project first appeared in MAKE Volume 29, pages 112-122.