jepCoffeeRig

I love cold brew coffee. Its rich and delicious flavor, and low acidity, means it tastes great over ice. Traditional hot-brewed coffee methods simply can’t compare; when chilled and served on ice they tend to taste diluted and acidic. I have a small commercial drip tower that works very well, however, given the fact that cold brew takes up to 18 hours to brew, it’s disappointing to finish it off in just a few drinks. You can buy large cold-brew towers, but they’re very expensive, aimed at coffee shops. I decided to build a much larger brewing tower from scratch, and to make it considerably higher precision while I was at it — drip rate is everything when it comes to cold brew — using a microcontroller-driven solenoid valve for exact drip rate.

DSC00016

A cold-brew coffee tower consists of three main parts: a water receptacle at the top with a drip control valve, a chamber for grounds in the middle where the brewing takes place, and a carafe to receive the brewed coffee at the bottom.

coldBrew21

Sourcing parts was a bit of an adventure. I had planned to use chemistry lab glass for all three systems, but eventually realized that this would be either too expensive, in the case of using a separatory funnel for the tapped water receptacle, or impractical — a Buchner funnel large enough to hold 150 grams of ground coffee would be much too squat and wide to saturate evenly. After much hunting I found the ideal components: a water serving pitcher for the top receptacle, a siphon brewing upper beaker as the grounds chamber, and a flat-bottomed boiling flask as the receiving vessel. For a bit of spiraling glass laboratory aesthetic I added a Graham condenser to the mix, purely for looks.

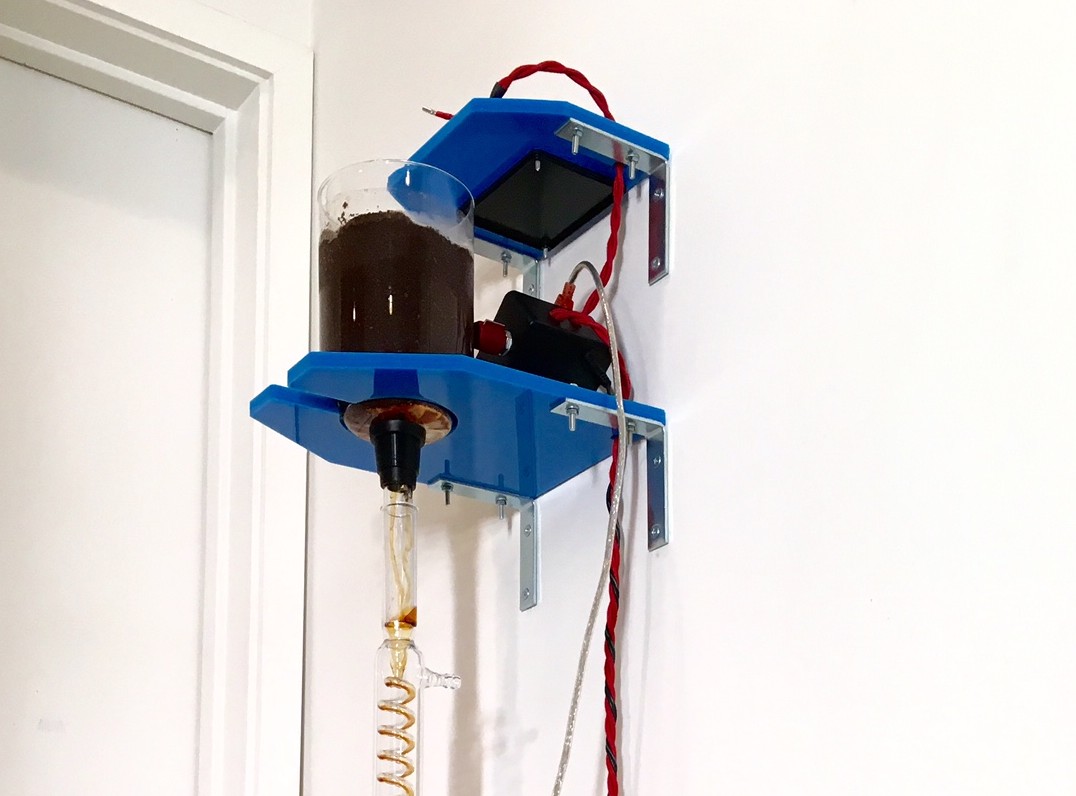
Since this behemoth would stand 4′ tall and need quite a bit of support to hold the components, I decided to mount the tower on the wall using laser cut acrylic holders connected to angle brackets. If you don’t have access to a laser cutter, you can print the linked files and use them as a guide for cutting with a bandsaw or scroll saw.

For ultimate control over the water drip rate, I chose a food-safe solenoid valve and I built an Arduino-based controller for it. The controller consists of a transistor circuit mounted on a prototyping shield, two 1000-ohm potentiometers, and a bit of Arduino code running on an Arduino Uno. This allows you to use the two knobs to adjust the frequency of the valve opening and closing, and the length of time it remains open per drip. Since the volume of water the solenoid valve allows through is much more than we want per drip for a long, overnight brew, I needed to reduce the size of the drip tube inner diameter. I attempted this with various tubes, straws, and fairly janky contraptions, until I eventually succeeded when I “borrowed” the miniature drip valve from my small commercial brewer. A Hario valve (available from coffee parts suppliers online) press-fits very nicely inside ¼” tubing — you can use any food-safe stopcock valve that fits.

Some of the fittings will be specific to the dispenser and solenoid valve you choose, so it’s best to bring these parts to a plumbing store for help with parts.

coldBrew03


Project Steps

ASSEMBLY

Remove the existing spigot from the beverage dispenser. Wrap the replacement elbow’s threads with teflon tape, then insert into the dispenser, using any washers and gaskets necessary to create a water-tight seal. Thread on the nut and tighten. Wrap the exposed elbow threads with teflon tape, then screw on the solenoid valve. Screw the John Guest push-to-connect fitting into the solenoid valve. Insert a small length of  ¼” tubing, then fit the stopcock valve in place.

coldBrew01

coldBrew24

CONTROLLER

Follow the circuit diagram to solder the transistor, diode, resistor, potentiometers, and power supply to the proto shield. I used screw terminals to connect the power supply and the solenoid valve wires to the board, and spade terminals to connect the board to the solenoid valve. Plug the power supply into the wall AC power, and connect the spade terminals to the solenoid valve.

coffee circuit

Plug the proto shield into the Arduino Uno by aligning their headers. Download the project code file coldCoffeeDripBrew.ino from this link, then upload it to the Arduino over USB. Disconnect from USB, then plug the second power supply into the Arduino’s power jack. The solenoid valve will begin to open and close, and you can test timing adjustments with the two potentiometers.

With everything working, ream out two holes in the enclosure for the potentiometers and mount them. You can add knobs to the potentiometers at this point. Also add holes, if needed, for the two power sources and solenoid wiring. Place the Arduino Uno and proto shield into the enclosure.

coldBrew05

coldBrew06

coldBrew19

MOUNTING

Cut out the acrylic mounts using the cutting files I’ve provided. You can download them from this link.

Make_coldBrewRack [Converted]

Attach them to the brackets with the M4 screws and nuts.

coldBrew04

Since the distances between components will vary, mount the lowest shelf first, then place your boiling flask, stopper, Graham condenser, and grounds beaker on the shelf (this will take two people) in order to determine ideal placement for the middle shelf. Mark the holes, then mount the middle shelf. Use the same technique to measure, mark, and mount the top shelf.

Run the wiring up through the holes in the shelf, then screw and plug the wires into the controller. Close the controller enclosure’s lid, then affix the controller to underside of the top shelf using double stick foam tape.

coldBrew07

Insert the filter screen into the bottom of the grounds beaker, then place all of the glass components on their respective shelves. Plug in the solenoid valve.

coldBrew09

BREW OPERATION

It is time to start the brew! First, grind 200 grams of coffee to a coarse grind, and pour the grounds into the middle beaker.

coldBrew10

coldBrew11

Wet the grounds through with water, so you’ll get even distribution of the dripped water during brewing. Then, cover the grounds with the cloth filter.

coldBrew12

coldBrew13

Fill the water dispenser with 1250ml of fresh, cold water.

coldBrew15

Add 700 grams of ice cubes. These will keep the water cold, and melt during the brew to total the desired 1500ml of water (the extra 450 grams will melt, but stay below the spigot elbow line on my particular dispenser, your measurements may vary).

coldBrew16

Plug in the power supplies and then use the knobs on the controller to adjust the drip rate and amount.

coldBrew17

The water will mingle with the grounds and begin to extract those wonderful volatile solids that turn it into the magical elixir of cold-brewed coffee. Watch as it streams through the coil of the condenser into the flask waiting expectantly below!

coldBrew18

Depending on the coarseness of the grind and the rate of the drip, you’ll have to wait up to 18 hours for the brew to finish. But it is well worth the wait. When it’s done, pour some on ice and enjoy your delicious, high tech, cold brew coffee.

coldBrew20

coldBrew21