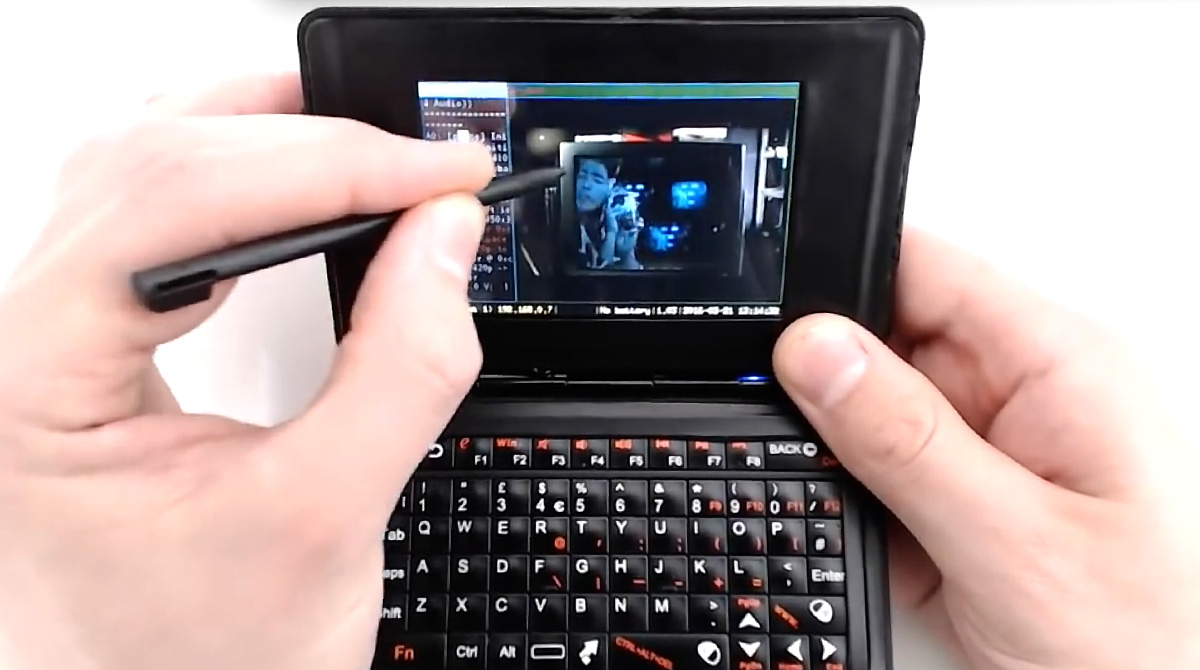
I made this little Nintendo DS sized computer using a Raspberry Pi and a bunch of off-the-shelf parts. It is a fully functional linux computer that can do most things a full system can (games, web stuff, videos, music etc).
You can also output the video to an external monitor, transforming it into a desktop-ish computer.
I make other stuff like this on my youtube channel.
Estimated Cost ~$120
FEATURES:
- Raspberry Pi 2 (900MHz CPU, 1GB RAM)
- 3x USB ports
- 1x Ethernet
- Fully QWERTY keyboard
- backlit 3.5inch Touchscreen
- 1000mAh battery Clamshell case (made from 2x hard drive enclosures)
- Full Linux OS (Raspbian, using i3 window manager)
- Audio/Video out
How to build it
Here’s everything broken down into steps for easier following.
The first thing to do is remove some components from the Raspberry Pi board to make it as thin as possible. This includes: The 2x USB sockets, ethernet plug, GPIO pins, 2x camera connectors, composite audio/video jack, and HDMI port. You can use a soldering iron in conjunction with a solder sucker or solder wick
Not everything is easy to desolder from the board, and I made good use of the mini hacksaw blade and cutters too. Just be careful not to damage components or scratch the board, and you’ll be fine.
You should be left with a really thin Raspberry Pi 2 board
Desolder the pins from the PiTFT board. This frees up lots of space, and make it super thin. Again use the soldering iron to heat up the solder and the pins come off easily.
Cut and prep some wires and create extensions for the USB, ethernet and audio/video ports.
It’s much easier if you tin the end of the wires, as well as the contacts on the components, and it makes bond together. If you’re having trouble, use a helping hands stand to free up your hands.
I modified the keyboard, allowing it to be powered by the Pi instead of it’s own battery. All you need to do is snip the red and black wires on the battery, being careful not to damage or puncture anything else. Be very careful with these lipo batteries, since they are volatile. Do not puncture or squash them.
I just added a 5v to 3.3v step down regulator to the battery contacts. Just add the red (voltage) and black (ground) wires to where they were for the battery. Again, tinning the end of the wires makes the soldering much quicker.
I also added a button switch to turn the backlight on and off. It doesn’t matter what colors you use for this, just solder both ends of the button to each contact.
All this does is momentarily connects the contacts together once the button is pressed.
Now we need to prepare the case. I used two 2.5″ hard drive enclosures. They’re super cheap and available on ebay and amazon
Again, this is pretty straight forward, but takes quite a bit of time. I measured and cut the top and bottom halves of the case, mostly with the hacksaw blade, then finished it with plastic sheeting and vinyl tape. If you have a Dremel, you can save a lot of time.
I added the piano hinge at the back and drilled a few holes for the wires. I affixed the hinge using a couple really small nuts and bolts.
I also glued on some rubber nubs to stop the screen overextending.
To reduce the height of the powerboost, cut the top of the JST battery connector off using the hacksaw or cutters.
Place everything in the case, and feed the wires between the bottom and top halves
Now you can solder everything together. I made sure the 2 battery wires went through different holes to minimize the risk of shorting if they break in the future.
It might seem like a lot of wires, but all you’re doing is basically soldering the extensions onto where the components used to be on the board.
Close the case up, cross your fingers, and power the computer on.
You can output the video from it to a TV or monitor. Not the best resolution, but works nice for videos.
You now have a handheld Linux terminal fits in your back pocket. The i3 window manager, coupled with the touchscreen really helps free up space for multitasking.
This looks like a really awesome project. Thanks for posting it. Can you describe how you wire the PiTFT to the Pi? I assume, since you removed all the pins, that you have to wire from each GPIO to each pad on the PiTFT. Also, is there any chance you can give a little more detail on the power connections?
“my room mate Lori Is getting paid on the internet 98$/hr”…..!ce520ctwo days ago grey MacLaren P1 I bought after earning 18,512 DoIIars..it was my previous month’s payout..just a little over.17k DoIIars Last month..3-5 hours job a day…with weekly payouts..it’s realy the simplest. job I have ever Do.. I Joined This 7 months. ago. and now making over. hourly 87 DoIIars…Learn. More right Here !ce520n:➽:➽:➽➽➽➽ http://GlobalSuperJobsReportsEmploymentsPixelGetPayHourly$98…. .❖❖:❦❦:❖❖:❦❦:❖❖:❦❦:❖❖:❦❦:❖❖:❦❦:❖❖:❦❦:❖❖:❦❦:❖❖:❦❦:❖❖:❦❦:❖❖:❦❦:❖❖:❦❦::::::!ce520n….,..
The PiTFT just uses SPI interface pins, so you don’t need to route every GPIO, I think. Saves quite a number of pins…
True, but which ones?
At the very 1st, I’d favor to state thanks to you for this enlightening article. Second, I’d prefer to wonder wherever I can learn http://www.proessaywriting.com a lot more info concerning your post. I arrived right here via Bing and can’t discover any associated web websites connected to this matter. How do I sign for your web blog? I had prefer to stick to your updates http://www.proessaywriting.com as they arrive along! I’d a query to interrogate but I forgot what it absolutely was… anyways, thank you very much.
Nice build, Chris! I saw this on hackaday (I think) when they gave you some props the other day.
That keyboard is the tricky thing. I couldn’t find it sourced in the states. Is it branded under a different name or anything?
Some issue here!
Maybe something like this??
http://www.newegg.com/Product/Product.aspx?Item=9SIA3JD1E69509&cm_re=mini_keyboard-_-9SIA3JD1E69509-_-Product
Could be a substitute?
Or any of the tiny BT keyboards that are thumb style.
How long does the battery last?
Hows thescreen resoltuion with text? I wonder if there is a GNU/Linux distro with bitmap fonts…
Not hard at all configure linux to use bitmap fonts for everything; the exception maybe being the TTY (Haven’t looked into that.)
I use a heat gun at work, I was wondering if it would be possible to heatshrink plastic on the outside, that is, if you could do it without damaging the computer. It would be a slightly more durable coat than using tape. I suppose some kind of lacquer finish might work too. I would want to be able to take it apart if it needed fixing or for more mods later.
Couldn’t you fit the 2Ah LiPo battery? Looks similar size
Bravo! I’d love to see something like this, made professionally with an extremely polished case design. I love how it has a form factor like the old Sharp Zaurus handheld. I have an old Sony Clie clamshell type PDA in storage that would be a wicked design to pair with a Pi-Zero board, or maybe even a stripped down RPi3, running Ubuntu-Mate. ;)
would LOVE to see THAT!!!
Is there enough space left for a 3G or LTE modem?
Is there a complete BOM anywhere(meaning manufacturers, part numbers, etc.? I mean, you didn’t just pull the parts out of a dumpster…
For anyone who would like to do something similar to this using an EOMA68 Computer Card I’ve added a break-out board option to the (currently live) crowd funding campaign, https://www.crowdsupply.com/eoma68/micro-desktop/updates/breakout-board . Imagine that you’d prefer to be able to re-use the computer for other things, wouldn’t it be nice if it already came in a robust credit-card-sized case that was 5mm high?
COuld I do this with a pi 0?
Do you think it would work with this keyboard: Minisuit Removable Qwerty Keyboard Stand Case for Samsung Galaxy Tab 3 (7.0″)
Gee, this is almost as useful as my phone, but a lot more work.
you miss the point. You could go buy a 10 inch windows tablet for just about the same amount that exceed this in every way. Believe it or not, some people like to make things, and share what they made on places like MAKEzine. Christ, it literally says “Make:” in big red letters in the top left corner. If this is work to you, then why are you even here?
But then you are locked in to the apple/google idea of what they want you to do with the hardware. Some of us prefer to do what WE want, when we want, and not have to ask for permission from someone to use our hardware WE bought
No, I am into utility that is simple and easy to use. Not into egotistical junk like you.
Would you build and send me one? I have zero ability in some of the areas required to construct such a thing.
I will pay Earth Dollars.
No, I am into utility that is simple and easy to use. Not into egotistical junk like you.
ConfigureACCEPT
Privacy Overview
Necessary cookies are absolutely essential for the website to function properly. This category only includes cookies that ensures basic functionalities and security features of the website. These cookies do not store any personal information.
Any cookies that may not be particularly necessary for the website to function and is used specifically to collect user personal data via analytics, ads, other embedded contents are termed as non-necessary cookies. It is mandatory to procure user consent prior to running these cookies on your website.