donkey_kong

Nostalgic for Atari, Nintendo, Sega Genesis, and arcade games? With RetroPie, a software that organizes all your games into one easy-to-navigate place, a Raspberry Pi, and a USB gaming controller you can be playing the classics in less than an hour.

The RetroPie software builds off of the Emulation Station front-end gaming software, which runs each separate gaming emulator, and adapts it to work on a Raspberry Pi. The software was put together by the guys at petRockBlog, and came out of the RetroPie Project, whose goal was to turn Raspberry Pi into a dedicated retro-gaming console. The software is free, but I suggest you donate if you enjoy the hard work they put into it.

Once installed, you are going to realize that RetroPie only comes with a few games, and none of them are the ones you really wanted. Your next question is probably: Where do you get those ROMs? I can’t tell you for legal reasons, but I’m sure you know how to use Google.

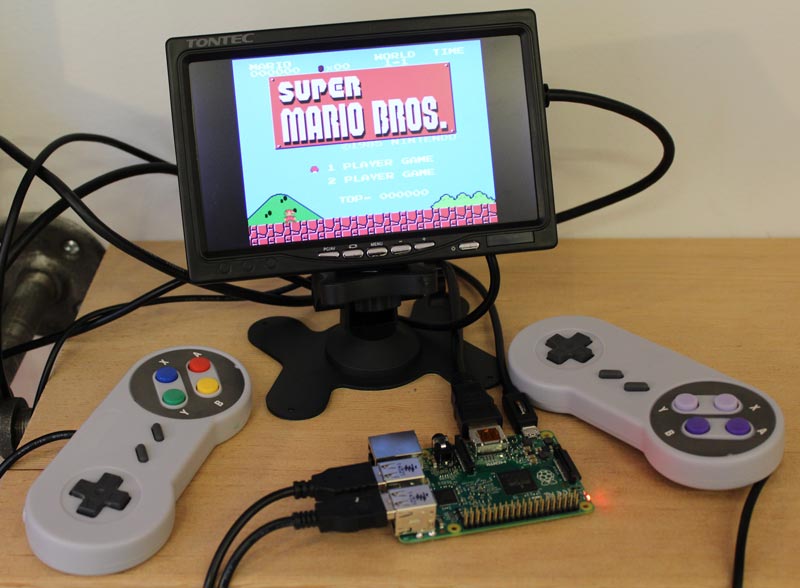
This is the finished system for the Raspberry Pi retro gaming console. It highlights how it can go from power-on to playing a game in under 30 seconds.

YouTube player

Now lets get started.

Project Steps

Gather your parts

You will need:

  • Raspberry Pi
  • Micro SD card with 4GB or more
  • Power supply
  • USB controller (or two)

Download the RetroPie image

On your Windows or Mac computer, download the version of RetroPie for the version of Raspberry Pi you have from petRockBlog.

The download comes in a compressed file so you will need to unpack it with a program like WinZip, WinRar, or 7-Zip. Once unpacked, that will give you the image file you are looking for.

Format your SD card

On Windows: Right click the SD card from the computer screen and select format.

Note that it must be formatted in FAT32.

Install the RetroPie image onto the SD card

For Windows you can download this free program called Win32DiskImager. Once inside a disc image writing program, you can attach the image and set the SD card as the write device like shown in the image. Then click the write button and wait for it to do its thing.

For Mac you can use Apple Pi Baker. These instructions can help you with that.

NOTE: Writing the image to the disc will make it look like all the space has been reduced down to 4GB and you will not be able to go beyond that nor be able to use the rest of the unused space on the disc. But that will be fixed in Step 6 when we expand the file system to utilize the entire disc space.

Configure the RetroPie to your controller

Plug the SD card into the Raspberry Pi, plug it into a TV, and boot it up. The RetroPie project will automatically boot into the game emulator system. The first thing you will be asked to do is set the controls of whatever controller you are using. I found that this Super Nintendo USB controller will work as expected for all Nintendo, Super Nintendo, Sega Genesis, arcades, and even Atari.

NOTE: The only gaming systems available at this point are Amiga, Apple II, Macintosh, MS DOS, PORTS, ScummVM, and INFOCOM. You can look up what each of these emulate here.

Basically, they are very old computer-based gaming emulators, and some of these come with games ready to play, but a mouse and keyboard will be needed to play them. The mouse and keyboard kind of defeats the purpose of having a mobile device like the Raspberry Pi to run your new gaming system. So if you are like me and you don’t care to use a mouse and keyboard, then delete these systems and install the more 2-player friendly gaming consoles.

Expanding the files size

You will need to expand the file system to utilize the entire size of the SD card. First go to the RetroPie menu while inside Emulation Station and choose the “Raspberry Pi Configuration tool Raspi-config” option.

The first option is the one to expand the file system.

Getting more gaming emulators

To get the Nintendo or Super Nintendo emulators installed all you need to do is copy and paste the ROMs into the correct folders on the SD card. Since the SD card does not really work so well plugged into a Windows or Mac OS, you will need to either transfer files over your network, FTP, or SSH.

The easiest method by far is transferring the files over a network, using an Ethernet cord to plug the Raspberry Pi into your internet router, which is also connected to your other (Windows or Mac) computer (by either Wi-Fi or Ethernet cord). The screenshot shows my Windows computer connected to the Raspberry Pi through the router with this method.

Note: The Raspberry Pi does not need to be plugged into a TV for this. As long as the Raspberry Pi is turned on and plugged into the router, the files can be transferred over.

Copy the ROMs to the correct folders

Once your computer is connected to the Raspberry Pi by either your home router network, FTP, or SSH, you can move your ROMs over. First navigate to the retropie/roms/ folder.

Inside the /roms/ folder is a long list of emulator folders to hold the ROMs for each one. Some are pretty easy to figure out, and others you will need to look them up on the RetroPie Wiki.

Here are some of the basics. For each system place the ROMs in the corresponding folder:
Nintendo = /nes,
Super Nintendo = /snes,
Nintendo 64 = /n64,
Sega = /mastersystem,
Sega Genesis = /genesis

If you do not want any of the default emulators like the AMIGA or Apple then you can delete or rename those folders while in here. Renaming with a “-” in front of the ROM folder name will keep the emulator from showing in RetroPie but keep it safe if you want to turn it back on down the road. For example “-amiga”.

Finished and ready to play

Once the ROMs are in the correct folders and you reboot the Raspberry Pi, the emulator will show up on the home screen and your games will be there ready to play.

Extra tips

The Default Hotkeys are good to remember. Exiting out of any game can be done by hitting start and select at the same time!

Some emulators require extra files called bios for the emulator to work. The Playstation, Atari 5200, and some arcade games are examples of these. If you have the bios and add it to the /RetroPie/BIOS folder then those can work.

If you want to play arcade games then ONLY Romset 0.37b5 games will work. These are the older version ROMs and they are harder to find in this version. Good luck.

New splash screens and themes can be downloaded through the RetroPie menu and turned on for a better looking UI. I personally really like the “Clean” theme that has great background graphics for each emulator and better game list images and info.

3D print a NES style case

I downloaded this thing on Thingiverse and printed it in 3 pieces. Its great for protecting the Raspberry Pi if I take it somewhere, and it looks rad.

Throw a little primer and paint on there and it can look just like the original Nintendo.