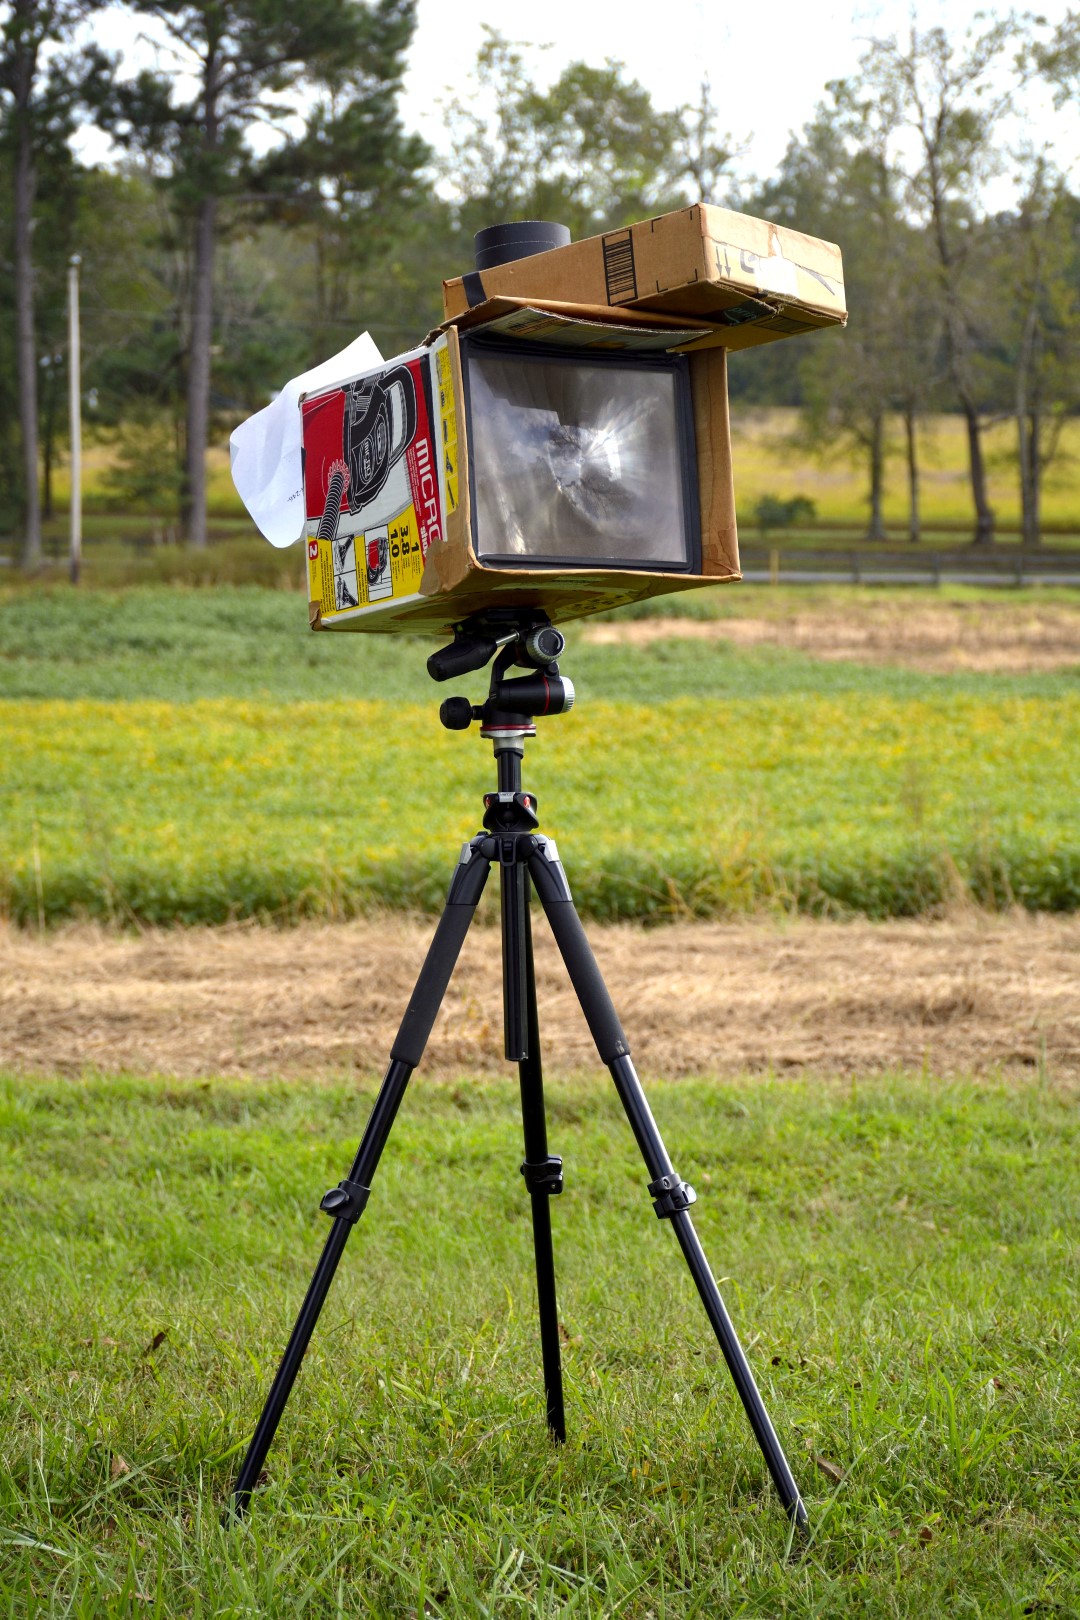
Here’s how to make a simple sliding box camera that takes long-exposure photos on cyanotype paper that’s normally used for blueprints or “sun prints.” The paper can be easily developed at home in a bathroom sink. It’s a fun way to really, physically see what’s happening in a camera. It’s an inexpensive project, and it produces wonderfully spooky UV images.

Before you build your camera, play with the cyanotype paper. Do some experiments with the sun print kit and see how the paper works in direct sunlight. Explore UV exposure by writing with sunscreen on the included acrylic sheet and placing that over the paper. Become familiar with developing the paper, and try using drugstore hydrogen peroxide to speed the oxidation process after development.

Materials

  • Lens either a large magnifying glass lens or a Fresnel lens
  • Cardboard boxes
  • Cyanotype paper I use the Super Sunprint Kit from Lawrence Hall of Science, Amazon #B001KOGY3M or American Science & Surplus #93519P1.
  • Tape I recommend gaffer’s tape.

Optional:

  • White glue such as Elmer’s
  • Paper
  • Hydrogen peroxide, 3%

Tools

  • Box cutter
  • Ruler

Optional

  • Paintbrush and bowl, or spray bottle
  • Scanner if you want to create sienna- or sepia-tone positive images

Project Steps

1. Choose a lens

You want a large, inexpensive, thin lens for this project: maybe a Fresnel lens from Amazon or eBay, or a large drugstore magnifying glass. The Fresnel lens is large and gathers lots of light, making exposures not so long (30 to 90 minutes), as shown here:

House, imaged with Fresnel lens.
Deer skull, imaged with Fresnel lens.

A magnifying glass will help form a clearer picture but might require longer exposure times (1 to 3 hours).

House, imaged with magnifying glass.
Deer skull, imaged with magnifying glass.

2. Measure its focal length

In a darkened room with a window, use your lens to focus an image on the wall — an image of something far outside the window. Use a ruler or yardstick to find out how far away the lens is from the wall; that is approximately the focal distance. For a demonstration, watch this video

YouTube player


3. Build box slide and attach lens

My lens had a focal length of 300mm (11.8″). I built a sliding attachment that was about 10″×10″×11″ and attached the lens to its front. This sliding portion slides in and out of the box so you can focus the image. I also allowed the top of this sliding portion to fold open so I could peek into the box and see the image while focusing.

4. Re-measure focal length

When you have the lens attached to the box slide, measure the focal length again with everything squared up.

Can you see the far images clearly? Do you have a little clearance? Cut back the box slide as needed. The box can and should be a little shorter than the lenses’ focal length.

5. Build the outer box

Build a box around the box slide. I found that a 10″×10″×11″ box was about right to expose half sheets of the cyanotype paper. I made my slide to fit into it, but you could do the reverse and just build a box around the slide. I tore back the very top of the box to help peek inside the camera while I’m focusing.

6. Make a lens cap

I took a size 1AD Amazon box that fit over the end of my camera and used it as a lens cap. It protects the lens and prevents accidental exposure. Putting it on when I’m done taking the picture stops exposure.

7. Build a wedge (optional)

Build a little cardboard wedge to go under the camera. The camera is most stable on the ground; the wedge can prop it up to take pictures of buildings and other tall objects.

8. Take a picture

Go outdoors and look for a subject. The cyanotype paper responds to UV-A light so it might not produce an image exactly like what you see visually. Look for high-contrast, simple compositions.

Camera is secure on the ground. Direct sunlight is not hitting lens. Lens cap is used to shield the opening in the top of the camera.


Set up your camera and focus your image. Start by making some test exposures: Leave the camera alone ½ hour for a Fresnel lens, 1 hour for a magnifying glass. When the paper is exposed, you can actually see a positive image in the back of the camera, as if the UV light bleached the paper.

9. Develop the picture

In a room without direct sunlight, soak and develop the cyanotype paper in a sink. Rinsing the paper 2 or 3 times helps to remove unreacted chemicals and improve the contrast and lifespan of the print.

A final wash or spray with hydrogen peroxide helps to speed oxidation, darken the blues, and show the full picture you managed to capture. If you don’t have hydrogen peroxide you might have to wait up to a day to see if you have captured a strong image.

From Ultraviolet to prussian blue

Enjoy this simple camera! I’ve had good luck getting spooky pictures with it. Because they’re exposed by ultraviolet light, they have a ghostly look. It’s not quite what you’re used to seeing.

How does it work? The sun print paper is treated with chemicals that, when exposed to UV light, react to form the pigment Prussian blue (ferric ferrocyanide), also known as Berlin blue or Paris blue. Prussian blue is insoluble in water, so it stays behind while the unreacted chemicals are rinsed away.

Invert to sepia

If you have a scanner, you can scan your cyanotype picture and invert it digitally using a photo editing program to make sienna- or sepia-toned positive images.


If you don’t have a scanner, you might try a smartphone and a free photo-editing app like Snapseed. Take a picture of your cyanotype, then edit with Snapseed. Do something like Tools→Curves and change the diagonal curve line so it goes to opposite corners. Then try other effects to get a better sepia or black-and-white image.

See like a Bee

If you get really good at this you might use a camera extension and very long exposures to see if you can image the UV patterns on flowers. See this site to consider how much extension and how long an exposure you might need.