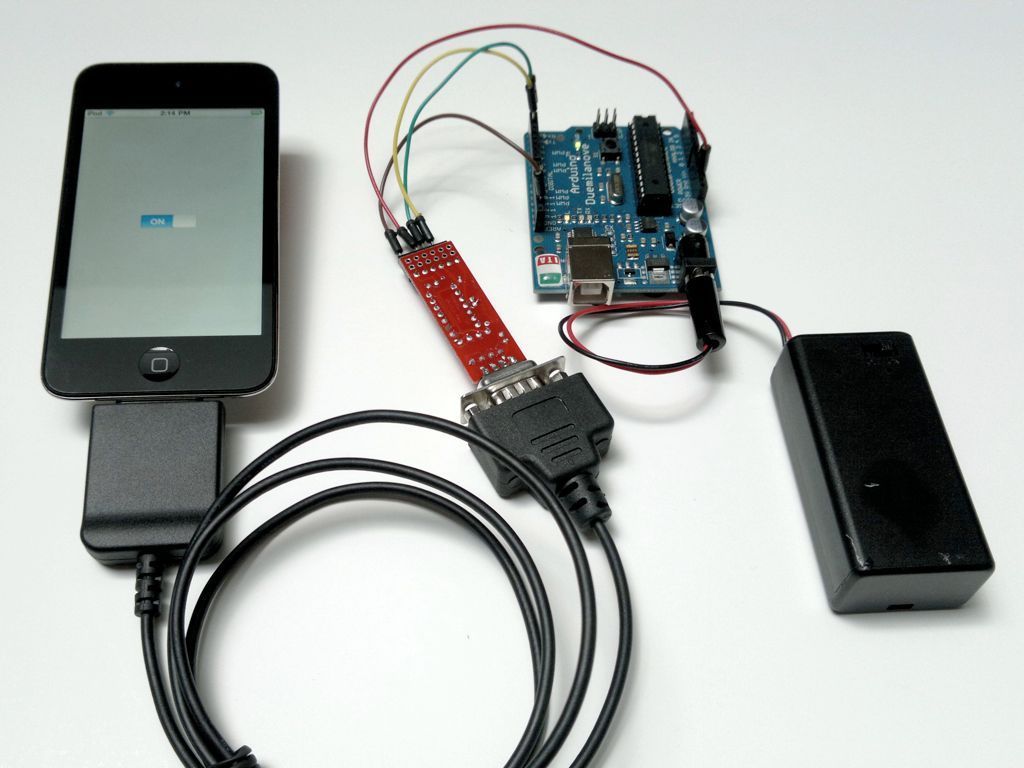
The Redpark Serial Cable, which is part of the Redpark Breakout Pack for Arduino and iOS available from the Maker Shed, lets you connect the iPhone to Arduino without jail breaking. This guide shows you one of the simplest examples: connecting an iOS device to an Arduino and turning an LED on and off from an iOS app.
To develop apps for the iPhone, iPad, or iPod touch, you'll need to register as an iOS developer. Although you can register for free, all that gets you is the development tools. You won't be able to deploy your apps to a real device. It's $99 a year for an individual developer, $299 for Enterprises (this option lets you deploy apps directly to your team), and free for educational institutions (which also lets you deploy apps to a team).
If you've never programmed for the iPhone before, you can't count on this guide to help you. There are many learning resources, from Stanford's free Developing Apps for iOS courses to Matt Neuburg's Programming iOS 5 or Alasdair Allan's Learning iOS Programming, both of which are available in print or ebook form.
Before you go any further, please make sure you can create and run simple apps on your iPhone, iPad, or iPod touch. It will also be helpful if you familiarize yourself thoroughly with the Xcode development environment.
Give you project the name HelloArduino, and choose the appropriate device family (iPhone, iPad, or if you're feeling ambitious, Universal, though this will create a bit more work for you).
Now you need to tell the app's code what to do with the switch.
If you need room on the screen, you can hide the Utilities Pane (View→Utilities→Hide Utilities).
Next, open the Assistant Editor (View→Editor→Assistant), and locate the toolbar above the window that appears.
Click the icon to the right of the left/right arrows and make sure the Assistant Editor is set to automatic. It should be showing the HelloArduinoViewController.h file.
Control-click the switch, and drag from it to the code that appears in the Assistant Editor. Hold it just above the "@end" in the code and release. Add a new outlet and name it toggleSwitch as shown.
Do this once again, but instead, add a new action, and name it toggleLED. Save the file (File→Save).
Next, you need to import Apple's Accessory Framework. To do this, click the Project in the left pane, then choose Build Phases, and open the "Link Binary With" section. Click +, locate the ExternalAccessory.framework, and add it.
Step #9: Add some declarations to the view controller
Select the HelloArduinoViewController.m file to open it for editing.
Visit my modified version of the file at GitHub then edit your copy of the file:
Locate the viewDidLoad method and replace it with my version of it.
Be sure to Remove the comment delimiters (/* and */) before and after it.
Implement the methods required by the RscMgrDelegate protocol (add everything from my file from the #pragma mark - RscMgrDelegate methods to the end of the file.
Locate the toggleLED method and replace it with my version of it.
This step is optional, but it will avoid the problem of you seeing an error message ("This accessory requires an application...") each time you plug in the cable.
In Xcode, expand the Supporting Files group and click on Hello-Arduino.plist to open it.
Right-click the bottom row, and choose Add Row. Click the up/down pointing arrows to the right of the new row's key (it will probably default to "Application Category") and choose "Supported external accessory protocols".
Click the triangle to the left of the key name you just selected to open up the list. In the value field for Item 0, type com.redpark.hobdb9.
Run the Arduino IDE and upload the RedparkToggle sketch to your Arduino.
Temporarily disconnect the jumper wire going to the Arduino's RX pin (the green cable shown in the first step), and upload your sketch.
You must disconnect it before uploading a sketch because the RS232-TTL adapter will otherwise interfere with the upload process. Leave the jumper wire disconnected until you complete the next step.
Open the Arduino's serial monitor (Tools→Serial Monitor), and make sure it's set to 9600 baud.
Wait a few seconds for the sketch to restart, then type 1 and click Send. The LED should come on. Try that again with 0 instead of 1, and the LED should go off.
Connect your iPhone, iPad, or iPod touch to your Mac with a dock cable.
Make sure Xcode is configured to run it on the device you just connected (see the figure).
Click the Run button in Xcode.
If you get any errors, review the preceding steps to make sure you followed them exactly. If you still have problems, you can try downloading the project from GitHub.
I'm a tinkerer and finally reached the point where I fix more things than I break. When I'm not tinkering, I'm probably editing a book for Maker Media.
When you buy through links on our site, we may earn an affiliate commission.
Our websites use cookies to improve your browsing experience. Some of these are essential for the basic functionalities of our websites. In addition, we use third-party cookies to help us analyze and understand usage. These will be stored in your browser only with your consent and you have the option to opt-out. Your choice here will be recorded for all Make.co Websites.