DSC09059

This article first appeared in Make: Volume 41.

Five years ago we built our first book scanner from salvage and scrap. Book digitization was the domain of giants — Microsoft and Google. Commercial book scanners cost as much as a small car. Unless you chose to destroy your books in sheet-feed or flatbed scanners, there was no safe and affordable way to preserve the contents of your bookshelf on your e-reader.

Collectively, we tried to fix that. Over 2,000 people contributed more than 350 designs and thousands of lines of code at diybookscanner.org.

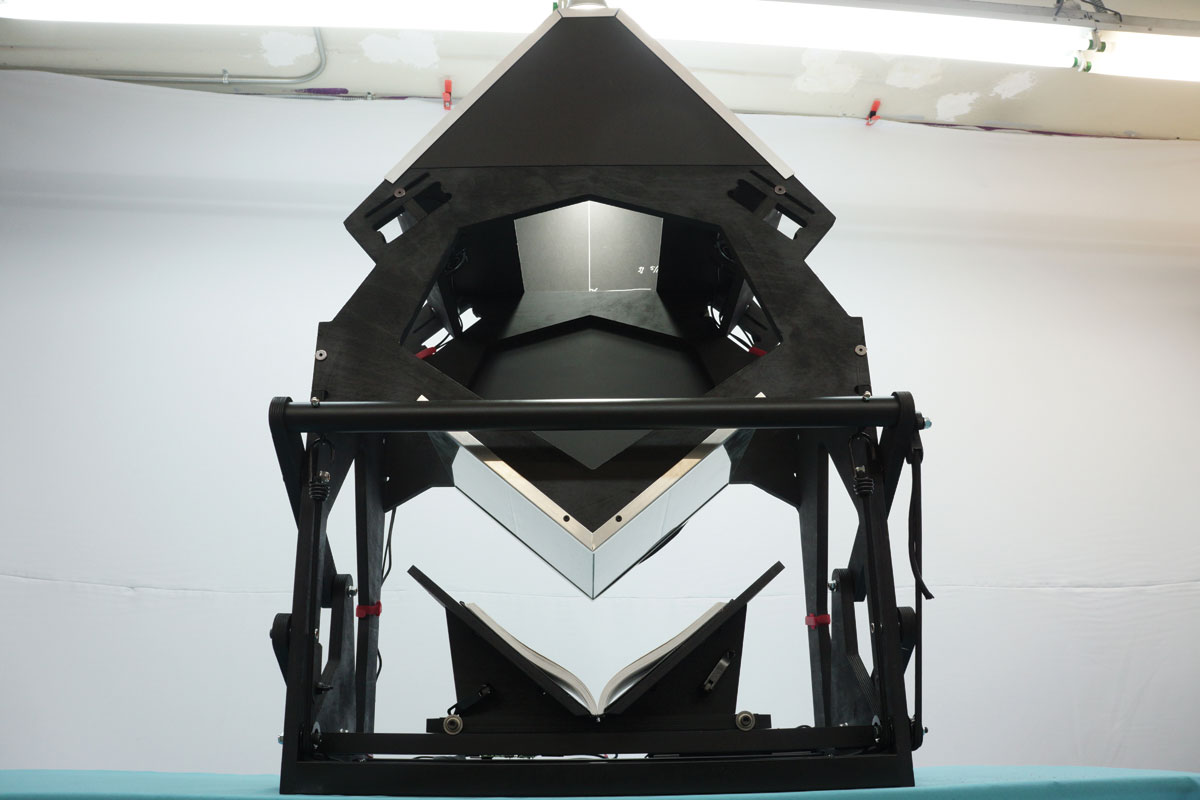
The result is the Archivist — the VW Beetle of book scanners — cheap, durable, and tremendously effective. It’s open source and made with the simplest materials possible, like plywood, bungees, and skateboard bearings. As fast as you can turn the pages, the Archivist photographs them automatically and creates a zip file of the entire book, for conversion to the e-book format of your choice.

Here’s how you can make your own. We want to see one in every community, starting with hackerspaces. This document shows you how to put together the Archivist kit, which has some nice features that are a little tough to DIY; where appropriate, we’ll fill in DIY approaches.

How DIY book scanning works:

  • Lighting — Cheap cameras need a lot of light, and post-processing is easier if the light is bright and uniform.
  • Camera support — Cameras need to be placed opposite the page. Post-processing is vastly easier if the cameras don’t move.
  • Platen — The “page flattener.” It’s a V-shaped construction of glass or acrylic. Flat pages are easier to process — in fact they’re usable with no post-processing. (Good input equals good output!)
  • Cradle — Holds the book, gently, and accommodates the spine of the book.
  • Base — Holds all the other stuff together.
  • Electronics — Many of us build a simple system to trigger our cameras electronically using Stereo Data Maker software. The new Archivist system has an onboard Raspberry Pi running software called Spreads to operate two Canon point-and-shoot cameras (updated with Canon Hacks Development Kit firmware) and then sends the zipped images to your computer. Spreads even has a web interface so you can control your book scanning from any smartphone or tablet.

Project Steps

Cut the wood parts

DIY: Download the design files (DXF artwork, zipped) at diybookscanner.org. The part outlines are in the file ArchivistBookScanner_M3.dxf; cut them on a CNC cutting machine or by hand using a jigsaw or router.

Paint your parts

To reduce glare, paint every wooden component black. We recommend using Rust-Oleum Painter’s Touch 2x Ultra Cover Flat Black spray paint. Flat black latex paint applied with a brush is also OK.

Assemble base

Attach the Base Bars to a Side Plate with furniture bolts, as pictured. Finger tighten only. Attach the second Side Plate, too. When you’re confident that the base rests evenly, wrench-tighten the bolts until they’re secure. DIY: Substitute framing screws to secure your wooden base bars.

Assemble pulleys

Orient the assembly as pictured. The left side requires a single pulley on the inside. Insert a 40mm M8 bolt into a pulley, then spin a nut onto the bolt so it firmly contacts the pulley. Attach the pulley to the left side plate and cap it with an M8 flange nut. Tighten with a wrench. DIY: A 5/16″-18 bolt will also work.

The right side needs a pulley both inside and outside of the side plate. Start with a 60mm M8 fully threaded hex bolt. From left to right, your delicious pulley sandwich will go: Bolt → Pulley → Nut → Wood → Nut → Pulley → Lock nut. Tighten with a wrench when in place. DIY: If you can’t get an M8 60mm bolt, substitute a 5/16″-18 bolt or short piece of threaded rod.

Assemble bungee attachment point

The left side only needs an attachment point on the inside. Spin a nut onto a 40mm M8 bolt. Insert through the outside of the Left Side Plate. On the inside, secure with a flange nut, leaving ¼” between the flange nut and the wood. DIY: A 5/16″-18 bolt will work here.

The right side needs attachment points both inside and outside. Spin a nut onto a 60mm M8 fully-threaded hex bolt until there’s about ¼” between the nut and the bolt head. Insert through the inside of the Right Side Plate. Secure with a nut. Cap the bolt with a flange nut, leaving about ¼” between the flange nut and M8 nut. DIY: You can substitute a 5/16″-18 bolt or short piece of threaded rod.

Bolt on cradle lift stop

With a 40mm M8 bolt through the outside of the Left Side Plate, attach the Cradle Lift Stop. Secure with a wing nut. Tighten the wing nut so the Cradle Lift Stop sticks firmly in place but still rotates out of the way. DIY: A 5/16″-18 bolt will work here.

Apply felt (optional)

Apply felt to the inside relief of the Side Plates. This will provide a cushion between the Lifters and the Side Plates. Optional, but it’s gentler on your books. Highly recommended.

Assemble cradle runners

Bolt the Cradle Runners to the Lifters with furniture bolts. Use a flat surface to ensure they’re even. Place the assembly into the the Scanner Base so the Lifters are sitting in the big relief holes in the Side Plates. It is essential that the screw or bolt heads be flush with the wood. DIY: Use framing screws instead.

Attach lift arms

Pop the 608ZZ flange bearings into both sides of all 4 lift arms. Finger force should be enough. Otherwise, persuade them with a deadblow hammer or physics textbook. DIY: Consider using ordinary skate bearings, which are easier to find.

Put 50mm socket caps through both bearings of a Short Arm. Add a washer to the ends of the protruding bolts. Connect the Short Arm to the Lifter and Side Plate. Secure the bolts with flange nuts — just finger-tight for now. DIY: You can substitute 5/16″-18 bolts, 2″ long.

NOTE: The Right Long Arm has an Attachment Point hole that the Left Long Arm doesn’t. Attach the Right and Left Long Arms to their respective sides.

Insert a 50mm socket cap into the Right Long Arm Attachment Point hole (the head of the socket cap will be on the inside of the scanner). Add a washer. Spin a nut to the base. Cap with a flange nut.

Once all the arms are in place, tighten the flange nuts with a wrench. Be careful. Only tighten until they feel firm. It’s possible to overtighten and put pressure on the bearings, locking them in place.

Beautiful! Test the lift mechanism. It should feel easy and smooth. If it’s crunchy or stiff, you’ve overtightened. Side-to-side slop means you’ve not tightened enough. (Of course, without the bungees attached, it’ll feel heavy.)

Connect lift handlebar

Drop an M8 nut onto the head of 2 eye bolts. Insert those eye bolts into the notched side of the Handlebar, so that the eyes run parallel with the Handlebar. Secure the eye bolts with a nut. Cap with an acorn nut. (Acorns keep the eyebolts from poking your hands. They’re optional!)

Bolt the Handlebar to both Long Lift Arms with furniture bolts. (The acorns face out, toward the user.) DIY: Since your handlebar is wood, use the #6 1-5/8″ wood screws instead.

Assemble cradle base

Prepare a 50mm M8 bolt by adding a 608ZZ flange bearing and then a washer. Insert a cross dowel into a Cradle Base dowel hole. Line up the slot on the dowel head with the corresponding bolt hole. Insert the prepared M8 bolt. It might be a little tricky to start. Tighten a quarter turn past finger tight. Repeat to add the other 3 bearings to the base. DIY: Substitute a skate bearing and use a #6 1-5/8″ wood screw instead of the bolt.

If the Cradle Base rests unevenly like an old restaurant table, just loosen the bolts, sit the base on a level surface, and retighten.

Assemble cradle leaves

Fit the Cradle Angles into the Cradle Leaves as pictured. The tabs on the Angles should face inside, toward each other.

Hammer the Cradle Angles to fully seat them. You can be pretty forceful, don’t worry. Works best with a deadblow hammer or frozen ham.

Assemble book cradle

Insert the bicycle skewers through the holes on the Cradle Angles. Tighten the nuts to clamp. DIY: Use threaded rods instead of skewers.

Seat the finished Leaves and Angles into the Cradle Base slots, making a V shape. For easy use, you want the skewer clamps to face the front of the scanner. Adjust the clamps until the whole cradle feels sturdy. Now you can easily unclamp and slide to fit any book spines.

Bolt front/back plates and camera braces

Take the Front Plate (or Back Plate, they’re identical) and bolt on the Camera Braces with furniture bolts. Now bolt on the Back Plate. Make sure that when the bolts are loose you can adjust the position of the camera braces smoothly before you proceed. If not, sand a bit to loosen the fit. DIY: This is one place where you should try to match the kit. A 50mm, 1/4-20 or M5 furniture bolt and cross dowel will allow you to adjust this part as necessary.

Install glass

Apply electrical tape along the 2 shorter edges of both glass plates. The goal is to have the tape overlap both sides of the glass evenly, providing a surface to rest on the wood. The tape also pads the glass against abrasion from the metal brackets you’ll apply soon.

Lay the glass edges together at the beveled edge. Tape them together 5 or 6 times. This creates a flexible hinge that keeps the plates together perfectly when you lay them on the module.

Install glass (cont’d)

Flip the Imaging Module so the pointy parts go up. Seat your glass plates on the Imaging Module. The mitered edges of the glass plates should mate cleanly into a point.

Tape the entire length of both glass plates to the wood frame.

Bracket installation

Grip the first angle bracket in place securely with your hand — a clamp could crack the glass. Screw the bracket into the wood. Start at one end of the bracket, and screw point-to-point until finished. Don’t switch sides — it’s easy to make it uneven. DIY: Use the 5/8″ steel angle brackets.

While screwing in the bracket, you may feel the bracket and wood pushing apart. Unscrew, reclamp with your hand, and then rescrew again. Then tighten the screw the last bit.

Remove the 5 or 6 strips of tape laying across the glass plates.

Put it all together

The cradle is removable so you can easily place a book in it. Remove it.

Pick up the Imaging Module so the pointy parts face down. Seat it into the slots on top of the Scanner Base. The whole Imaging Module is symmetrical, so it doesn’t matter which side faces front. Be careful. Get a friend to help you. Cracking the glass will make you very sad.

Insert a cross dowel into the Side Plate. As before, line up the indentation with the corresponding bolt hole. Insert a furniture bolt and tighten, securing the Front Plate to the Side Plate. Repeat 3 times. Be sure to drop your wrench 3 times for good luck. DIY: Use #6 1-5/8″ wood screws here instead.

Put the Book Cradle onto the Runners.

Hook bungees

Engage the Lift Lock so the cradle doesn’t jump at you when attaching the bungees.

Hook a bungee cord to the inner Attachment Point on the right side. Loop the cord under the pulley and hook it into the eyelet on the Handlebar. Do the same for the left side.

Now you can lift your cradle, no problem.

Cut foamcore

Cut the foamcore board to the sizes and shapes pictured, following the template drawing LightModulePanels_Need2Ea.dxf from the design files you downloaded.

Fold aluminum angles

On 2 aluminum angles, measure and mark the angle and cut points, as pictured.

Snip with your tinsnips.

Now fold the aluminum to make your supports. You can use your adjustable wrench to help you make clean folds. (If you bought a kit, these parts come pre-made.)

Stick them together

Stick the folded aluminum angles to the foamcore as shown. Hot glue, super glue, or 2-part epoxy will work well. We strongly recommend 3M’s VHB, sold at hardware stores as “Outdoor Mounting Tape.” Its strength is nothing short of life-altering.

Affix lights

Drill holes to zip-tie your light fixtures. The side holes go 2½” from the edge; the middle hole is smack in the middle. Since I was using foamcore, I just set the lights on top and marked the hole locations with a marker.

Zip-tie the 3 light fixtures in place.

Glare control

Install 6″×15″ pieces of foamcore above the camera brackets. These ensure that no glare from the cameras bounces onto your book pages. They make a big difference, as shown.

Download Spreads, configure your Pi

Spreads is a tool that helps you streamline your book scanning workflow. It takes care of every scanning step on the software side: setting up your capturing devices, handling the capturing process, and downloading the images to your machine. (The image that runs on the Raspberry Pi computer is called SpreadPi). In time, Spreads will also support post-processing the images into a proper e-book! Any support questions for Spreads should be asked at diybookscanner.org/forum. We’re always happy to help.

Download the disk image of SpreadPi from buildbot.diybookscanner.org. The image contains a complete Linux operating system and a complete install of Spreads, ready to run.

NOTE: The SpreadPi image is based on Raspbian, but installing it from Git is difficult. We recommend you just download our custom image.

Copy SpreadPi to an SD card

Follow this tutorial to copy SpreadPi to SD card 1, which goes into the Raspberry Pi: andrewmunsell.com/blog/getting-started-raspberry-pi-install-raspbian. For most situations, this is all you need to configure the Pi. For advanced users and occasional problematic setups, it is possible to SSH into the Pi and configure it manually.

Install CHDK on the cameras

Now that the Pi has an operating system, we need to configure our cameras. Download CHDK from chdk.wikia.com/wiki/CHDK and read the user manual there before installing it on your cameras. (If you’re using Canon cameras different than the ones specified here, be sure to check the CHDK website for compatible models.)

Use the STICK utility to install CHDK to SD cards 2 and 3, which will go into the left and right cameras.

Create a file called OWN.TXT on the root of each card. On the left camera, OWN.TXT should contain only the word “odd.” On the right camera, it should contain only the word “even.” Lock the locking tab on the SD cards. Put SD cards 2 and 3 into the cameras.

Turn it on

With everything powered down, mount your cameras in the scanner, connect the cameras to the Pi, and connect the Pi to the network.

Turn on the cameras first, and then turn on the Pi. The Pi takes up to 2 minutes to boot — be patient. It’s busy spinning up the Spreads server and getting an IP address from your network. Spreads will display that IP address on the screens of your cameras for you when it’s ready to begin.

Access Spreads in your browser

Spreads has an easy-to-use web interface. Open a browser on any device that is on the same network as your scanner. If your smartphone or tablet is on your home wi-fi network, you can use it to scan. To connect to the scanner, enter the IP address that was displayed on the camera screen.

New workflow

Click on New Workflow. Enter the name of the book you are scanning and click submit. After clicking Submit, you should hear and see Spreads configuring your cameras. Be sure to set the zoom level of the cameras — on the A1400IS the zoom level should be 13.

Capture images

In Spreads, press the camera button to capture your first 2 pages. Turn the page and capture the next 2. Continue capturing until you’ve finished the book. If you make a mistake, you can use the Retake button on the left. If you don’t like the images, or see something wrong, you can configure the cameras on the fly with the Settings button on the right.

Download images

When you’ve finished capturing, you can return to the home screen by clicking the green checkmark. Click the Download button to retrieve images from the web interface for post-processing.

Post-processing

The file you get straight from the scanner is a zip file with all the images, renamed and in order. However, it’s not yet an e-book. An e-book is — in many ways — better looking and more functional. You need “post-processing” to get there.

We have 2 excellent free software packages — Book Scan Wizard and Scan Tailor — to clean the pages up. After that, they can be converted into the format of your choice, and read on the device of your choice.

We also plan to integrate post-processing right into future versions of SpreadPi. For an in-depth discussion come visit our forums at diybookscanner.org.

Going further

It’s alive! Now tune it up for better performance. The single biggest improvement is to cover all the openings with black cloth, paper, or plastic to prevent glare, but there are other possibilities. If you intend to digitize art books, for example, you should consider changing to high CRI LEDs. If you’re digitizing small books, you could re-align the cameras to digitize just a small area of the platen. And if you want to have both your hands free while scanning, you can turn the whole thing around and attach a treadle to the handle, so you can use your foot to lift the book.

Let us know how you use your DIY Book Scanner in the comments below!