


Humans have been experimenting with sound, making music, and inventing instruments since prehistoric times. In the beginning, we made noises using objects found in nature, including shells and vegetation, but as our skills and tools advanced, so too did the instruments we made.
Every instrument we think about as mainstream today was once a new invention, influenced by a myriad of other instruments from cultures across the world. Let’s take the violin as an example, which didn’t exist until the 1500s when lute and lyre makers started to tinker with the design of previous stringed instruments. The design of the first violins evolved over the following centuries as the demands of the orchestra changed and new tools and techniques became available.
It’s not just instruments either. You might think of classical music mainstays like Stravinsky, Strauss, or Debussy as boring establishment composers, but in their day they were seen as avant garde and radical. The premiere of Stravinksy’s The Rite of Spring nearly caused a riot when the audience became outraged by the dissonant chords, pulsing rhythm, and modern ballet dancers.
Even the musical notes we use in Western music today were not carved in stone in ancient times: in fact it was only in 1955 that middle A was officially set at 440Hz. Before 440Hz was accepted as the standard for middle A, there were regional and national variations for instrument tuning. Not everyone was enthusiastic about the globalisation of musical notes, and people are still unhappy about the decision to this day! If you spend a little time digging around on the internet you’ll find 440Hz conspiracy theories galore, as well as campaigns for middle A to be changed to 432Hz, 438Hz, or even 538Hz.
All music is made up and all instruments are invented, so as makers we should feel empowered to follow in the footsteps of the musical experimenters who came before us and make noises in any way that we want. Who knows where your tinkering will take you?

Music Tech Hackers Changing History
Let’s take a closer look at one piece of music technology — the tape recorder — and how the people who hacked it changed modern music production. The magnetic tape recorder was invented in Germany and used in World War Two by the Nazis for propaganda purposes. After the war ended, Allied troops found the technology and took it home to their own countries. Eventually, magnetic tape recorders came into use in broadcasting and recording studios across the world. As the technology evolved and became widespread, it also became cheaper and more accessible to people as well as institutions.
As more people got access to these machines, some began playing with them in unexpected ways. In Paris, a handful of these magnetic tape recorder experimenters started sharing their work, leading to the creation of an iconic movement called musique concrète.
To edit a recording on magnetic tape, you needed to physically cut the tape with a blade and use sticky tape to attach it to the next part of magnetic tape. The musique concrète folks would go out into the world and record interesting sounds onto their tape. They would then take sections of this tape, cut it up, flip them (to play the sounds backwards), speed them up or slow them down (for higher or lower tones), distort them, stick them back together, and re-record them to create new exciting new sounds.
Let’s take the example of the plucking of a violin string: the sound starts immediately then dies off gradually. In music production that would be called a sharp attack and a long release or decay. Using the new technologies and techniques from the musique concrète folks, you could flip that violin sound around to produce a new sound with a long attack and a short decay. This all seems quite normal to us now, but back then it was revolutionary.
You can actually head over to YouTube now and listen to some experimental musique concrète from the 1940s, but don’t expect harmonious compositions or banging beats! Their music may not have made it to the mainstream but their techniques certainly did. Their place in music tech hacking history was cemented in the 1960s, when the Beatles became the first big band to use these techniques to create the otherworldly, psychedelic sounds of their classic track “Tomorrow Never Knows.”

The BBC Radiophonic Workshop
Another lasting effect the musique concrète folks had on modern music was through the work of a remarkable British woman called Daphne Oram. She was a musician and physicist who became one of the iconic figures of early electronic music. She had a job at the BBC as a music balancer, which involved setting up recording equipment and lining up vinyl records for seamless broadcasting. Oram was also a big fan of avant garde music, including musique concrète. She realised that combining magnetic tape recorders and the new techniques from Paris held enormous promise for new sounds and music. She recorded tones from sine wave generators onto tape loops and experimented with the effects of playing them back at various speeds, creating some of the earliest purely electronic music.
Oram’s colleagues at the BBC were not enthusiastic about her work: it took her eight years of experimentation and a lot of persuasion before she could convince somebody to let her create some music for a BBC show. This wasn’t just due to the forward-thinking nature of her work, but also because of her gender. “They wanted my work,” Oram said, “but they didn’t want me.” After she teamed up with her colleague Desmond Briscoe, the BBC finally relented to her requests for the creation of a department dedicated to electronic sound. This department was called the BBC Radiophonic Workshop, which became one of the leading experimental sound design studios in the world.
There are a number of documentaries about the BBC Radiophonic Workshop and its alumni that you can watch to explore this fascinating period of music tech history further, including Sisters with Transistors and The Delian Mode.

Inventing Instruments With Modern Microcontrollers
The tape recorder is an excellent example of how the wider availability of a new technology and the sharing of experimental techniques led to a string of exciting innovations. We’re currently in an extremely exciting time for new, accessible, affordable technologies. We can play with all sorts of microcontrollers and different sensors, and we can use our sensor data to wirelessly control any number of soft synths or digital audio workstations.
It’s not just the hardware that is increasingly accessible, but also the knowledge required to use it. Back in Oram’s day you would have to travel to a conference or subscribe to a very niche set of journals to find information about emerging music tech. These days we have people like Look Mum No Computer showing us how to build synths on YouTube (such as his insane Furby Organ, pictured above), makerspaces with music hacking groups like London Hackspace’s Hackoustic, and educational workshops at events like CCC’s Congress.
There’s never been a better time to start making music and experimenting with sound!
Modern Music Hackers
A few favorites from the Hackoustic group at London Hackspace, hackoustic.org.

Brendan O’Connor’s Sound Stitcher
Sound Stitcher is an interactive vintage sewing machine. Turning the wheel generates digitally amplified sewing machine noises, while interacting with its levers, sliders, and clips causes the sounds to distort and degrade.

Adrian Holder’s Object Project
Holder, aka Precis, hacked a turntable so that it not only plays sound the traditional way, with a
needle, but also produces music and tones by striking its surface. The turntable also reads the
shape, size, color, and movement of objects placed upon it!

Tom Fox’s Springything
Springything is an experimental instrument made out of springs, magnets, a coil of wire, and an amplifier. The range and variety of noises and sonic textures that come out of this instrument are quite impressive! Build your own.

Jen Haugan’s Doppler Machine
The Doppler Machine uses the Doppler effect as a playful way to create new sounds. Haugan
plays her instrument in combination with feedback and external microphones, leading to
ephemeral, alien soundscapes.
Great Microcontrollers for Musical Instruments
Makers have made strange and beautiful music with just about every microcontroller out there, but here are some of our favorite devices for inventing instruments.
Makey Makey


Everyone loves the easygoing charm of the Makey Makey. It takes seconds to set up with no code or soldering required, after which it transforms ordinary items into touchpads that can be used for whatever fun invention you can dream up, from the infamous banana piano to unusual game controllers. In a Makey Makey circuit, you connect a conductive object (such as a metal item or a thing with a high water content — like fruit or people) to the board with alligator clips then close the circuit by connecting to ground. The Makey Makey then connects to your computer to control whatever you tell it to control.
One of the best ways to use the Makey Makey is as an instrument. I’ve used the board to play piano with bananas, play the bongos with jelly, and trigger samples by taking a sip of my tea. Perfect for beginners or family fun.
Bare Conductive Touch Board
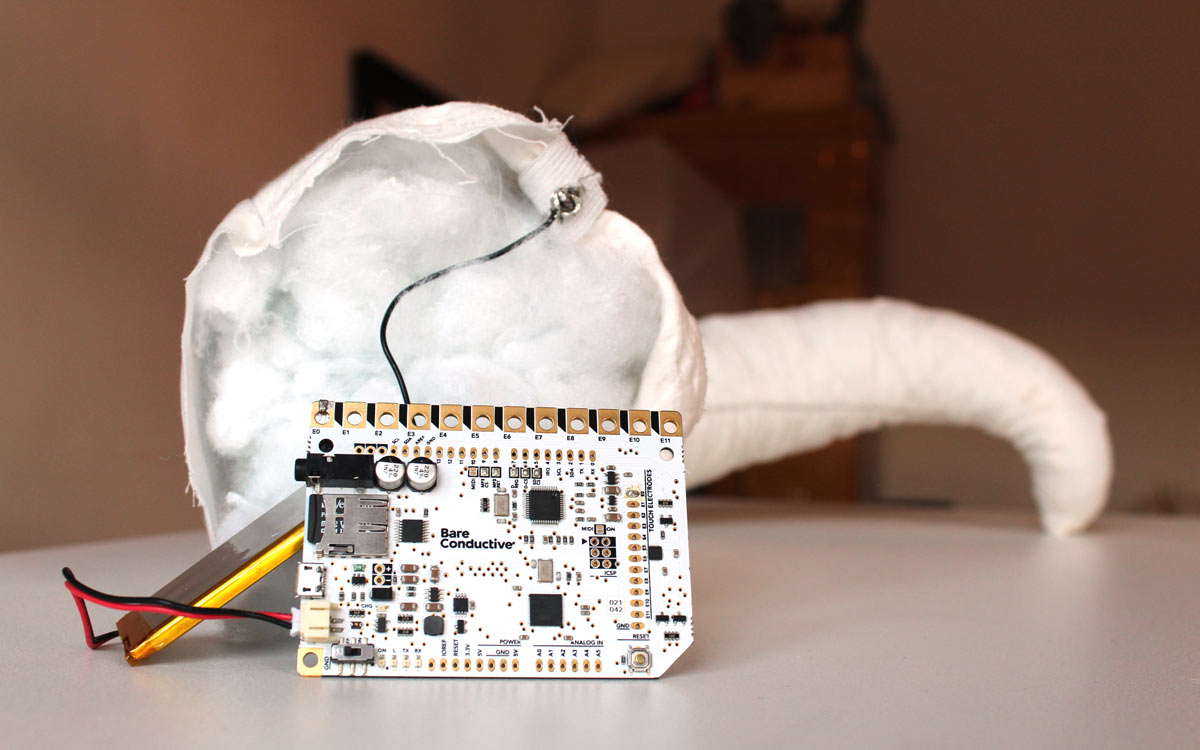

If you have a project in mind that combines touch and sound you should consider giving the Bare Conductive Touch Board a try. Connect the electrodes on the board to a conductive material (such as copper tape, wire, or conductive paint) and your touch will trigger one of 12 audio samples on the onboard SD card, which are very easy to switch out to samples of your choice.
These attractive, Arduino-compatible boards are reliable and simple. You don’t need to look at any code if you just want the basic touch and play functionality, and you don’t need to connect it to a computer for it to play your sounds. If you do feel comfortable writing a bit of code, you can use the Bare Conductive Touch Board to sense proximity too — great for all sorts of musical applications! I recently used this board to make a big plush pet tentacle that purrs when I stroke it.
Teensy


If you’re happy writing Arduino code then some of the best microcontrollers you can choose for music projects are Teensys. They’re tiny, powerful, and eye-wateringly fast, with some excellent advanced audio tools and libraries in the Teensy ecosystem. You’ll find Teensys at the heart of many sequencers and synthesizers.
Maker, researcher, and music enthusiast Oscar Oomens paired a Teensy with a Raspberry Pi to create the beautiful SENSEI synthesizer. The synth features a custom touch interface and wearable gyroscope that allow the user to “shape” sound in multiple dimensions. As well as moving the joystick, you can control the sound characteristics with three force-sensitive resistors on the grip.
Bela


One of the best ways to make a more advanced musical instrument with embedded technology is Bela. Bela isn’t a microcontroller, it’s an add-on for the BeagleBone single-board computer (SBC) [full disclosure: my husband, Drew Fustini, is a volunteer board member of the BeagleBoard.org Foundation]. Bela uses open source software and hardware specifically designed for making beautiful sounding instruments. If you’re serious about making instruments, it’s a great choice.
I paired a Bela with a Trill capacitive touch sensor to make a series of musical metal circuit sculpture creatures, including a sub bass and a harp.
To learn more about it, let’s use Bela to build a rubber duckie synthesizer!
Synthesizing Sound: Make a Digital Rubber Duckie

You will need:
- Bela or Bela Mini board These are add-on boards (“capes”) for BeagleBone computers, but you don’t need a BeagleBone for this project.
- Breadboard
- Jumper wires, male to male (4)
- Force sensitive resistor (FSR)
- Resistor, 10kΩ
- Computer with Pure Data software free from puredata.info
- Speaker and 1/8″ (3.5mm) aux cable
Creating Interactive Duckie Sounds
Created in the Augmented Instruments Lab at London’s Queen Mary University, Bela and the Bela Mini are based on the open source BeagleBone Black and PocketBeagle SBCs. Most SBCs and microcontrollers have add-ons: Raspberry Pi has hats, Arduino has shields, and BeagleBone has capes — such as Bela. It leverages the high-speed capabilities of the BeagleBone to make super responsive, low-latency instruments.
What makes Bela really exciting for me is how it works with not just C++ but also a number of open source sound synthesis programs, including Pure Data and Super Collider. You can use these powerful audio programs to create your noises, then embed them into an instrument that you can play forevermore with no connected computer. Pure Data is a great way to do all sorts of complex and beautiful things with sound.
In this project we’re going to use Bela and Pure Data to run a synthesized rubber duckie based on a physical model. With physical modeling, the physics of a specific type of sonic interaction are re-created in code, which lets us synthesize sounds much more realistically. The code in this example uses a physical model of a rubber duck toy, created by Christian Heinrichs. Creating a physical model involves analyzing an object and attempting to understand and then synthesize all the different ways it makes sound — all its different attack and release and intensity and other sound qualities, under a variety of playing conditions such as squeezing the air out fast or slow, letting air flow back in, squeezing too hard, and so on. It’s the difference between a simple duckie sample, and a realistically interacting digital duckie that can create its full range of sounds depending on how you play it.
This physical model can be controlled with sensors in real time, making it an extremely exciting way to make rich, satisfying sounds, especially when paired with audio software like Pure Data.
1. Wire the FSR

Start by wiring your force sensitive resistor (FSR). FSRs are sensors that detect physical pressure, such as weight or squeezing. We’ll manipulate this FSR to engage the duckie sounds (the real rubber duckie shown above is just illustrative).
Insert the two metal pins at the base of your FSR into two separate rows of your breadboard. Next, take your 10kΩ resistor and insert one of its legs into the same row as one of the legs of your FSR. Insert the other leg of your 10kΩ resistor into the ground rail of your breadboard (Figure A).
2. Connect the Bela

Next, wire your FSR to your Bela, which should not yet be connected to power or your computer. Use jumper wires to connect the ground rail of your breadboard to a ground pin on your Bela, then connect the power rail of your breadboard to the Bela 3.3V pin. Find the leg of the FSR that you connected to the ground rail in Step 1.
Plug in one end of a jumper wire to a free hole in the same row as your grounded FSR, then connect the other end of the wire to pin A0 on your Bela (Figure B).
3. Connect computer and speaker
Plug the aux adapter cable that came with your Bela to the audio OUT pins, then use an ordinary 1/8″ (3.5mm) aux cable to connect a speaker. Turn the audio level down on your speaker to start with, as the tone we’re going to use to test our setup can be loud!
Before you connect your Bela to your computer, take a moment to check that your board is not sitting on anything conductive. The board has metal pins on the bottom, so just make sure you aren’t in danger of shorting your board by putting it on a metal laptop, a strip of copper tape, or other conductive material.

Connect the Bela to your computer using the micro-USB to USB-A cable that comes with the board (Figure C).
4. Test your Bela setup
One of the nice things about Bela is that you access the IDE (the development environment where you program your board) using your web browser. This means that once your Bela is connected to your computer, all you need to do is open a browser and get coding — no software downloads needed! You don’t even need to be online because your computer recognizes your Bela as a local network. After your Bela boots up, go to http://bela.local in a web browser to load the Bela IDE. If http://bela.local doesn’t bring up the IDE, try the IP addresses 192.168.6.2 or 192.168.7.2.
There are four main parts of the IDE. The editor is where you write your code: C++, Csound, Supercollider Programming Language (sclang), JavaScript, or Pure Data. You stop and run your code using the toolbar at the bottom, where you can also find the oscilloscope and the GUI visualiser. The console gives you feedback about your Bela, such as sensor data and error messages. Finally, tabs is where you manage projects and settings, as well as where you find code examples, an interactive pin out diagram and all the libraries.

Test your setup by navigating to the tabs section of the IDE and running the audio world’s version of “Blink”: the sine tone. Click on the lightbulb icon in the tabs section to bring up the Examples folder. Click on Fundamentals then click on the example project called sinetone to open it up in your editor (Figure D). Click on the “build & run” circular arrow icon in your toolbar; your code should start running on the board and if all is well, you’ll hear a sine tone.
5. Program your Bela duckie
Go back to the Examples tab in the Bela IDE, and scroll down until you find the Pure Data section. Expand that section by clicking on the +, then open the rubber duckie sketch. The minimal code you see in the editor area is the main file of the collection of files that make up the Pure Data patch. Unlike the C++ code found in the sinetone example, you can’t edit Pure Data patches directly in the browser. We’ll take a closer look at the Pure Data code in the next step, but for now you can go ahead and run the rubber duckie code by clicking on the build & run icon in the toolbar.
Press, squeeze, flick, and grip your FSR to try out your new rubber duckie. Try pressing slowly, quickly, firmly, and lightly to see the difference it makes!
6. Explore and experiment
If you want to understand more about the way these difficult-to-synthesize interactive sounds are created, you can start by taking a look around the Pure Data file. Pure Data (often called Pd) is a free and open source visual programming environment for sound, visuals, and other media. It’s a wonderful tool for creating complex sound synthesis. You can’t edit Pd files directly in the browser, so if you want to a look at the (really quite interesting!) example code in more detail you’ll need to open it with Pd.
First, click on the folder icon in the tabs section of the Bela IDE to open the Project Explorer then download your project and unzip the folder. Next, download and install Pd on your computer from puredata.info. There are two versions of Pd available: Pd Vanilla or Purr Data. Either will work just fine, but I tend to use Pd Vanilla.


Go to the unzipped folder you downloaded from the Bela IDE and open _main.pd in Pure Data (Figure E). Enter Edit mode, then click on the duckie and sigdelta nodes to take a look around. Sigdelta works out the velocity of the sensor stream, making our duckie respond to our touch in a more natural, responsive manner. Duckie is the physical model (Figure F), which calculates airflow and pressure, as well as detuning the frequency of the duck when you start to release your grip and the “air” starts flowing back in!
All of my projects in this article — the purring tentacle, the jelly bongos, the banana piano, and the circuit sculpture creatures — will be published in my upcoming book on DIY Music Tech, due out in 2021. Follow me on Twitter @helenleigh or Instagram @helenleigh_makes to find out when it’s released


