cooking-stache

The poor incandescent light bulb — the very symbol of having a bright idea — is endangered. It’s being phased out all around the world: Brazil and Venezuela (since 2005), European Union (2009), and soon in the United States (2014). Granted, efficient CFL and LED lights produce more light with far less energy, but they’re just not as much fun.

The light bulb in the EZ-Make Oven creates enough heat to shrink plastic, harden polymer clay, or as in this DIY project, make wiggly creations by “cooking” plastisol. Have your own “aha!” moment and build this light bulb-powered craft oven, while you can!

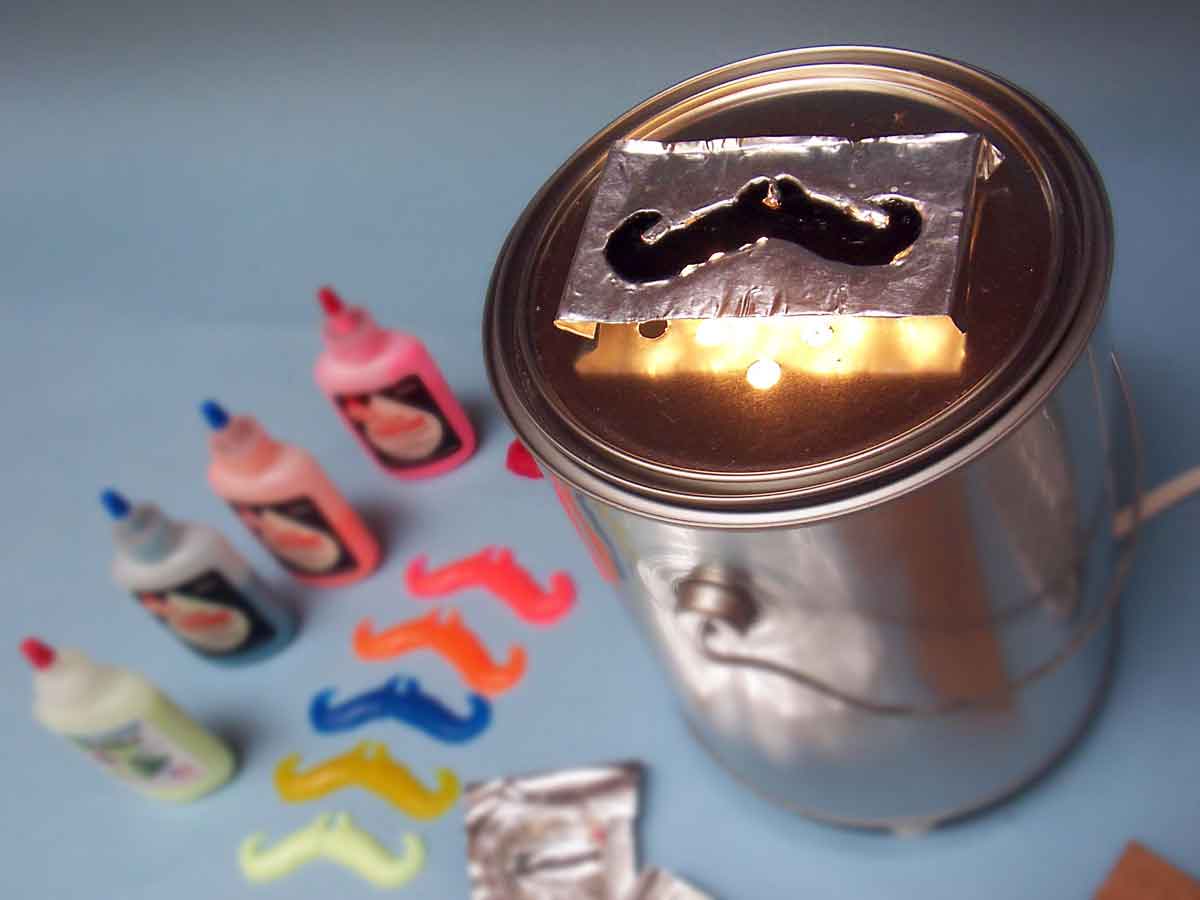
The oven design is super simple: a light bulb in a can. Holes in the bottom serve as cool air intakes and for mounting the insulated feet and bulb socket. A grid of holes in the lid allows the hot air to rise up around the molds. An inverted loaf pan serves as a cover to hold in the heat.

The oven reaches about 300°F with a 75W spotlight. That’s just enough to fuse polymer clay and cure plastisol.

NOTE: Unlike thermoplastics that can be melted and remolded, molding with thermoset materials is like making a hard-boiled egg: once cooked, its form is permanently set. What starts out as a syrupy liquid cures into a soft, pliant plastic. Baby boomers might remember the Thingmaker toy from the 1960s. Use this new DIY version to create your own custom mold shapes out of easy-to-form sheet aluminum.
WARNING: The sides of the oven can get hot, so be careful and always use the cool wire handle to lift or move the oven.


What will the next generation of Make: look like? We’re inviting you to shape the future by investing in Make:. By becoming an investor, you help decide what’s next. The future of Make: is in your hands. Learn More.

Project Steps

Lay out the holes

Lay out the holes in the bottom of the can, following the assembly diagram.

Set the compass to the radius of the can, then use it to mark off distances around the rim to locate 3 equidistant holes for the feet. At each location, mark a spot ½” inside the rim and center-punch each spot.

Place the lamp socket in the center and mark the locations of the mounting holes. Center-punch. (If your socket has a single screw mount in the center, mark and punch a center hole instead.)

Lastly, set the compass for half the can’s radius, scribe a circle, and mark off 4 equidistant ½” holes in the bottom, and center punch.

For the holes in the lid, find the center and then use the compass to scribe a circle with a ⅝” radius. Use the compass to mark off 6 holes and center punch. Repeat with 1″ and 1½” radius circles. Exact spacing isn’t critical, but you’ll want a regular distribution of holes for even heat flow in the center of the lid.

Drill the holes

In the bottom of the can, drill three ⅛” holes for the feet, four ½” holes for venting, and holes to fit the small bolts for mounting your lamp socket.

Drill the grid of holes in the lid. Deburr all holes as needed.

TIP: A step drill bit works well for drilling in thin metals, where a twist bit tends to grab and pull up the metal. It’s easiest to use the step bit with a drill press: control the diameter of the hole by the depth of the feed.

Mount the hardware

Cut 2 synthetic corks in half and drill a 1/8″ pilot hole through 3 of the halves. Attach the 3 half-cork feet, using small screws from inside the can.

Insert the grommet in one of the four ½” holes and thread the lamp cord through it. Tie a knot in the cord 6″ from the end, then split and strip the wires. Connect the wires to the socket. Bolt the lamp socket to the inside bottom of the can using the bolts and nuts.

Mount the hardware (cont'd)

Install the in-line switch on the cord, 12″ from the can, following the directions from your switch.

Finally, strip the other end and attach the wires to the AC plug. For a polarized 2-prong plug, the narrow (hot) blade goes to the center (hot) contact on the socket. For a 3-prong grounded plug, the bare or green wire goes to the green ground contact on the socket, if any.

Screw in the bulb and test.

Make the oven lid

Invert an aluminum-foil loaf pan and attach a synthetic cork to the outside. Drill a ⅛” pilot hole in the cork and fasten it to the pan with a screw.

Make the form

The form is a hard “positive” pattern over which you’ll stretch and shape the aluminum sheet to make a “negative” mold. You’ll make your form by sculpting soft polymer clay, then firing it.

Cut a piece of hardboard on which to make your form. Knead a small quantity of polymer clay until pliant and then sculpt your shape. Keep in mind that you’ll be stretching and deforming the aluminum sheet over your form, so keep your shape rather shallow (the aluminum will only stretch so far) and allow plenty of draft (angled sides without undercuts).

I’m making a mold for casting rubber moustaches. To make your own, roll the poly clay into a teardrop, then place it on the hardboard. Cut it in half lengthwise with a thin piece of metal or a knife, shape the curl, and add 2 bits to make nose pinchers. Lastly, sculpt in some hair detail — done!

You’ll be amazed at the small details that the foil will pick up (like the penny), so take some time to make small features and textures in your poly clay form.

When your poly clay form is finished, bake it in a 275°F oven for about 20 minutes or until hard. Probe gently with a toothpick; when the clay springs back, it’s done.

You can also fire your poly clay using the EZ-Make Oven you just built. It gets hot enough, but it will take more time than using a big kitchen oven. Place the lid on top of the form to keep in the heat.

When done, set your firm form aside to cool.

Tool the mold

The material used for the mold must have 3 properties: a low specific heat (to efficiently conduct the light bulb’s limited heat to the plastisol), ductility (to be easily formed), and compatibility with the plastisol’s chemistry. Steel is too hard, and copper is not chemically compatible, but aluminum has all 3 attributes. Get some 0.005″-thick “tooling” aluminum from an art supply store. It’s specially made to be soft and is easily worked with wooden tools. You can also use pieces cut from a disposable aluminum pan. It’s a little stiffer and harder to form but will work fine.

Cut a sheet of foil somewhat larger than your form. Lay it over the form and press it around the form with your fingers. A few wrinkles and folds are inevitable, but you’ll work them smooth later.

Make some tools from wooden dowels of various diameters. Leave one end flat and make radiused tips on the other end, in various sizes from gently rounded to pencil-point sharp.

Tool the mold (cont'd)

Use the wooden tools very carefully to press the foil closer to the form (Figure T). Don’t try to stretch the foil all at once; be careful not to tear or poke a hole. Instead, work slowly from the sides or top toward the center of a valley or crease. Start with the roundest-tipped tools first. Do a little at a time. Slowly approximate the shape, stretching the foil as you go. Easy does it! This may take some practice until you get the hang of it.

Once you’ve defined the basic shape, go back with a finer-pointed wood dowel and work the small details. Firm but gentle pressure gives the best result.

Use the flat end, or the side of a dowel, to smooth out any wrinkles and make a flat surface surrounding your mold shape. Finally, fold down 2 sides to make “legs” so the inverted mold stands level.

TIP: Often, as you get to the deepest part of the form, where it meets the hardboard, the foil will be very thin and tear easily. Don’t despair; your mold may still be quite usable, because you won’t fill the mold up to the very top. Keep working!

Cast your first part

A good source for bulk plastisol and pigments is Industrial Arts Supply Company. Get formulation #16 for nicely soft and rubbery molded parts. You can also get ready-to-use precolored “goop” in squeeze bottles from Patti-Goop online at eBay or Amazon. I’ve even used old bottles of Mattel’s original Thingmaker Goop — it still works after 50 years!

Place the mold on the oven and preheat. Fill a squeeze bottle with plastisol and pigment and mix thoroughly. Fill the mold by squeezing in plastisol slowly and letting it fill from bottom to top to avoid trapping any bubbles.

You can even “paint” your part by using different colors: Let one color set before adding another, or pour together to get a swirl effect.

Place the lid over the mold to help trap the heat. Thin shapes cure quickly; deep shapes take more time. Probe with a toothpick: when the plastisol is firm it’s done. Carefully remove the mold with tongs or tweezers (it’s hot!) and let cool.

When cool, use a toothpick to carefully pick at an edge, then lift and peel your part out of the mold. If you’re careful you can cast many parts from the same mold.

TIP: If you have trouble getting the oven hot enough, try draping a folded towel over the loaf-pan lid to trap heat, but be safe and keep an eye on it! Need more heat? Try a slightly hotter bulb.

Go nuts

There’s no limit to the customized or personalized shapes you can create. My daughter Laura molded this cute beetle character based on her own ’zine-comic Bug Boys. She added some flexible wires during the casting to give Stag-B bendable, poseable arms and legs!

The last photo shows a rainbow of hipster ’staches, Bug Boys, and a tortured tongue!