Sam Potozkin is a Chapman University student working at the intersection of communication, technology, engineering and imagination. He’s driven to turn bold ideas into reality, using AI and innovation to bring the extraordinary to life.
This article appeared in Make: Vol. 99. Subscribe to Make: for the latest articles.
What happens when AI moves off the screen and into the physical world?
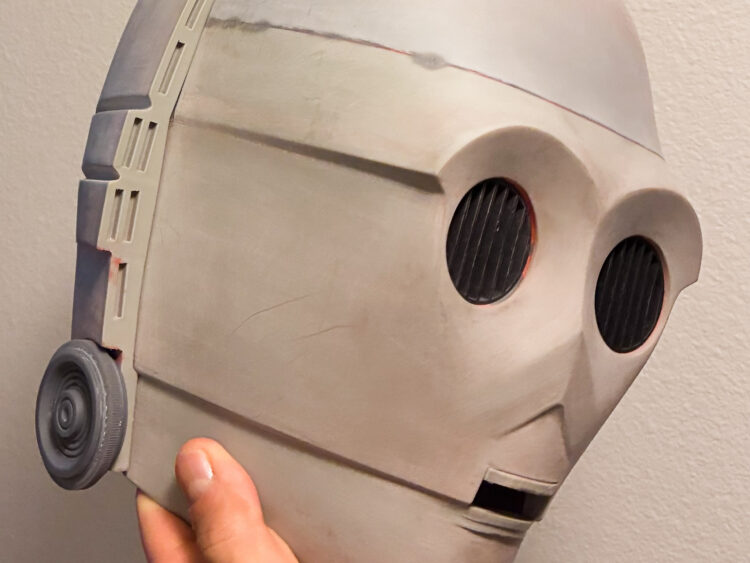
This project explores that idea by turning a 3D-printed C-3PO head into a real-time conversational system. Instead of typing into a chatbot, you can speak to it and it speaks back, creating an experience that feels more like interacting with a presence than a piece of software.
This build focuses on getting a realistic C-3PO housing for your chatbot. The last step explains how to integrate embedded electronics to enable real-time AI interaction. The result is a fully self-contained droid head that looks accurate and responds in real time.
Slice the head STL at about 15% infill in PLA, ABS, or PETG filament. Optionally, print smaller detail parts on a resin printer for higher resolution and reduced sanding. Remove support structures carefully.
Tip: Orient the head so the neck flange is on the build plate, minimizing supports inside the head cavity. This also ensures good geometry for mounting electronics. Rotate “hogging” surfaces toward the build plate if you want to hide layer lines.
I outsourced clear resin lenses for the LEDs, but you can try clear filament or make your own from a plastic reflector or light diffusion panel.
Step 2: Sanding and Gap Filling
Start with aggressive sanding to remove print lines. Grit progression: 80 → 120 → 220 → 320 → 400
Each stage removes scratches from the previous one. Focus on layer lines, seams between parts, and surface inconsistencies.
Use glazing spot putty (like Bondo) for large gaps, and wood filler for fine surface imperfections. Apply, let it cure, then sand flush with surrounding material.
Close your eyes and run your fingers across the surface. If it feels like one continuous surface, then you’re ready. If it feels uneven or “stepped,” repeat filling and sanding. The paint will not hide imperfections, it will amplify them.
Safety tips: Wear a dust mask or respirator. Work in a ventilated space. And avoid inhaling fine plastic.
Step 3: Primer and Wet Sanding
The primer acts as both a filler and a visual checkpoint—imperfections that weren’t obvious before will become visible here. Apply Dupli-Color Hi-Build 2-in-1 primer in light coats, about 8–10 inches. Start with two light coats, then finish with medium coat. Wait about 10 minutes between coats (it varies with humidity and temperature).
When it’s dry, sand with 600 grit sandpaper to remove high spots. Reapply primer if needed.
Finally, wet sand progressively: 400 → 600 → 1200 → 1500 grit. The goal is a completely smooth, glass-like surface.
Step 4: Black Base Coat and Clear Sealer
Spray Dupli-Color Gloss Black (DAL1677, lacquer) over the primed head. Hold the can about 8″ away, and apply 2–3 medium wet coats, letting each dry for about 15 min. Black provides a reflective underlayer for the chrome. Once fully dry (1–2 hr), spray one even coat of Dupli-Color 1K Clear Gloss. This clearcoat seals and protects the black, and improves the subsequent chrome’s adherence. Wait at least 1 hr before handling.
Tip: If you see dust nibs or runs in the black coat, let it dry and sand with 1500 grit, then re-spray. It’s better to fix paint flaws now than after chrome. Always let coats dry fully before sanding or recoating.
Step 5: Alclad II Chrome Lacquer
Alclad chrome behaves very differently from standard paint. It is not meant to “cover” the surface — instead, it forms a thin metallic layer that reflects the gloss black base beneath it. The quality of your final finish depends almost entirely on how lightly and gradually this layer is applied.
Before applying chrome, confirm that the black base is fully cured (not just dry), the surface is uniformly glossy, and that there are no dust particles, fingerprints, or dull spots. Any imperfections at this stage will be amplified by the chrome.
Spray setup:
Airbrush: ~12–18 PSI
HVLP (if used): ~20–25 PSI with a wide fan and low material flow
Distance: 4–8 inches from the surface
Environment: clean, low-dust, well-lit
Set your spray output as low as possible while maintaining a consistent mist.
This step rewards patience — most of the final look comes from restraint, not application. Apply the chrome in extremely light passes. Begin moving before triggering the spray. Use smooth, continuous side-to-side motion. Release the trigger before stopping movement. And overlap passes by ~50%
Do not attempt full coverage in one pass. Instead, build the finish gradually through multiple thin layers.
On the first pass, you should see the surface looking dark and slightly metallic. The black base may still show through, this is normal and expected. As you continue, each pass increases reflectivity, and the finish becomes more uniform and mirror-like. A darker appearance usually means the layer is still thin, not that it’s wrong.
Alclad dries very quickly. Reflectivity increases as solvents flash off. Within seconds, the surface begins to shift from dull to reflective. So don’t judge the finish immediately after spraying. Wait a moment and observe how it develops.
Continue working around the part in light passes. Spray, move to another area to allow the previous section to dry. Return and add another pass only where needed. This staggered approach prevents over-application and maintains reflectivity.
Tips: do not:
Apply heavy or wet coats
Stay in one area too long
Try to “fix” unevenness mid-pass
Heavy application causes a dull gray finish, loss of reflectivity, and permanent degradation of the chrome effect. If you overspray, the only real fix is to strip and restart.
After a light layer has dried, gently buff with a soft cloth (a cotton T-shirt works well) using minimal pressure. This removes the slight haze that forms during spraying and enhances the mirror finish. Properly applied chrome is surprisingly durable and able to withstand light handling and buffing shortly after application.
Indoor lighting can hide uneven areas. For a better review, take the part outside into natural sunlight and rotate it and observe reflections. Sunlight will clearly reveal dark spots (which need more passes) and uneven reflectivity.
Step 6: Candy Gold Tint and Final Clearcoat
Mix Tamiya X-24 Clear Yellow and a small amount of X-26 Orange (~5:1 ratio).
Apply as a light mist over chrome. Multiple passes will give a deeper gold. But it’s better to stop slightly early than go too far. Over-tinting will quickly dull the metallic effect.
To protect your work with a clear coat, apply either 1K clear (it’s easier) or 2K clear (it’s stronger but riskier). 2K clear will likely introduce orange peel, which can only be fixed by wet sanding with 1200 – 1500 grit, and reapplying the final clear coat. This has a high risk of sanding through, so go slowly.
If your budget allows, electroplating produces superior results with less risk.
Step 7: Electronics Assembly
Before soldering, prototype your system on a breadboard. Check the project page for guidance on how to wire it up.
At a high level, the system works as a continuous loop:
A microphone captures speech
Speech-to-text converts the audio to text
A language model generates a response from the text
Text-to-speech converts the response to audio
Finally, the audio output plays through the exciter.
This loop runs continuously for natural conversation and interruption. I open-sourced the project code on GitHub so builders can inspect the setup, adapt it, or use it as a starting point for their own physical AI projects!
For the audio system, mount the speaker exciter inside the head. Sand the mounting area smooth, and apply firm pressure for adhesion. The exciter turns the entire shell into a speaker by vibrating the surface.
Use jumper wires for prototyping, then transition to soldered connections for durability. Maintain clean routing, and label or color-code wires.
Secure components with hot glue or zip ties. Connect the LEDs to their GPIO pins, and verify the audio input/output.
Conclusion
This project brings together fabrication, electronics, and AI into a single system that feels both physical and interactive.
Beyond the build itself, this project hints at a broader shift: AI is no longer limited to screens. Read more on the project page.
Sam Potozkin is a Chapman University student working at the intersection of communication, technology, engineering and imagination. He’s driven to turn bold ideas into reality, using AI and innovation to bring the extraordinary to life.