Flashback: Kite Aerial Photography Puts Your Eye in the Sky
To take pictures from a kite, you need three things: a kite, a camera, and a special rig that attaches the camera to the kiteline and activates the shutter button on the camera. Here’s how to do it.
is an inveterate tinkerer from Berkeley, California where he serves as a Professor of Architecture for the University of California, Berkeley. Benton’s research in Building Science often involves the design and construction of prototype devices.
To celebrate 20 years of Make:, we’re looking back at projects from our first issue. If you’ve ever wanted to take really bird’s eye view pictures with a film camera, here’s Kite Aerial Photography from Make: 01.
Note: this is a classic article. Some of the information is very likely obsolete.
This article appeared in Make: Vol. 01.Subscribe to Make: for more great articles.
Kite aerial photography appeals to that part of me, perhaps of all of us, that would slip our earthly bonds and see the world from new heights. An aerial view offers a fresh perspective of familiar landscapes, and in doing so challenges our spatial sensibilities, our grasp of relationships.
Charles C. Benton
Have you ever wanted to take pictures from the sky?
Kite aerial photography (or KAP for short) bridges the gap between taking pictures from a ladder and taking them from an airplane. Within this elevation spectrum, you can capture landscapes, objects, architecture, and people in entirely new ways.
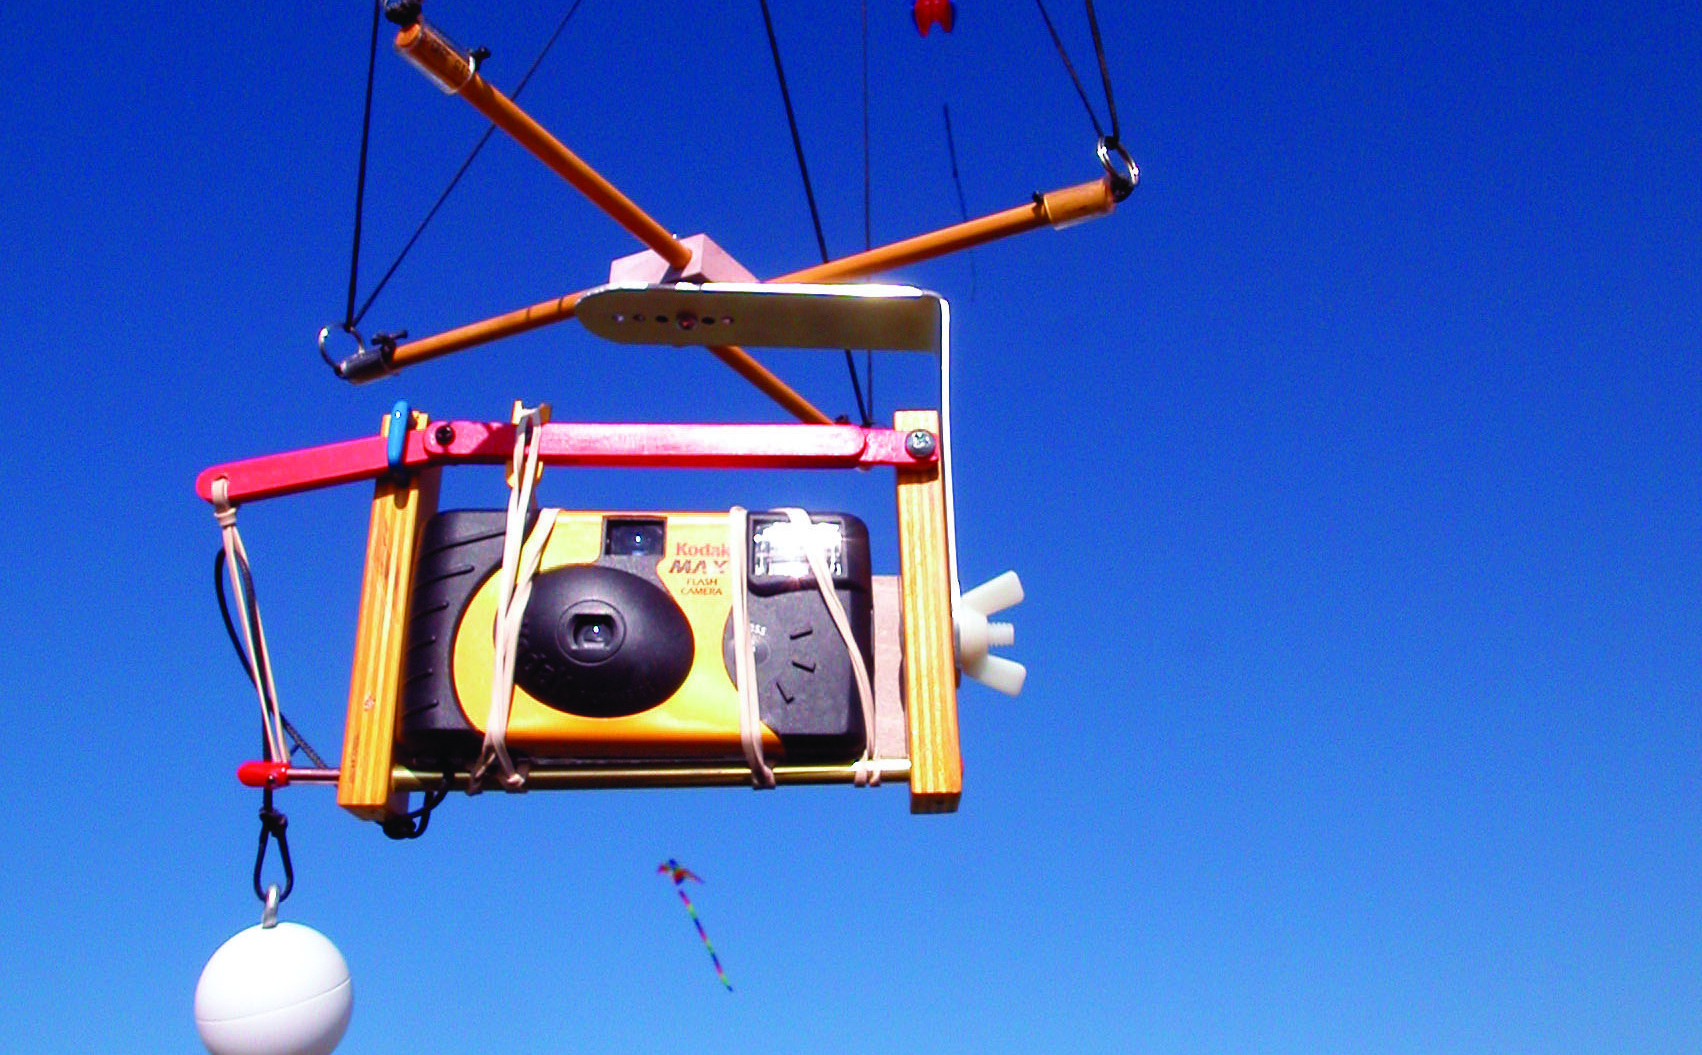
In the pages that follow, I’ll give you step-by-step instructions for building a very low-cost rig consisting of a camera cradle made of craft (popsicle) sticks and model airplane plywood, a shutter-button timer mechanism that uses rubber bands and Silly Putty, and a camera-stabilizing suspension.
Following the step-by-step section, I’ll recommend some kites and other equipment you can use for the project, and then run you through your first flight with the rig.
A day in the life of a kite aerial photographer
It’s a sunny Saturday morning in Berkeley, California. I check the Bay Area winds website and learn that a sea breeze is coming from the northwest. My kite aerial photography (KAP) gear is already packed and in the trunk of my VW Cabriolet. The remote control batteries are charged and ready to go. Around noon I head for the Aeroschellville airstrip north of San Francisco Bay. The owner of a Swift airplane wants me to take some photographs of his craft while it is parked on the ground, and he has secured permission from airport authorities to allow me to fly the kite at the airstrip. During the delightful, top-down drive north, I’m watching trees, water surfaces, and so on to get a sense of the wind.
After arriving at the airstrip, it takes less than a minute to clip the fuzzy tail to the kite’s harness and to clip the kite’s bridle to the kiteline. With a leather glove on the hand I use to hold the kiteline, I launch the kite, a Sutton Flowform 16, and spool out a quick 100 feet of line. Though the kite is behaving somewhat erratically, it has sufficient pull to lift the camera rig. It will be a challenge to avoid motion blur in the images. I would normally send the kite much higher before attaching the camera to see if I can find smoother air at 300 or 400 feet. But this strategy is not prudent at an airstrip, and besides, we would have to seek additional permissions.
Ground-level view of the camera rig flying below a Sutton Flowform 16 kite. The Picavet suspension lines are white in this image. The camera cradle is well balanced below the Picavet cross.
It’s time to rig the camera, so I clip the kiteline off to a carabiner tied to a post. From my KAP gear bag I pull out a Canon Rebel X, its 24mm lens, and my handbuilt, radio-controlled camera cradle. I spend a minute getting a fresh roll of film into the Canon and the lens-hood mounted on the lens. Then I complete a quick ground check of the remote control radio gear — used to control the orientation and shutter of the camera when it’s in the air — by powering up the receiver. Convinced the frequency is clear, I turn on my transmitter and check the camera cradle’s rotation functions.
Today’s windy conditions invite the inevitable question, “How do you establish a stable platform that you actually trust your camera to?” Even though the kite is quite active a hundred feet up, the movement at the Picavet is modest. This is partly due to the stretch of the Dacron line absorbing the load, but mostly it’s just the geometry of having the Picavet within 15 feet of the kiteline’s anchor point. When launching, I always attach the Picavet’s “hangups” in a position that places the Picavet’s cross just within reach — say about 8 feet above the ground. Even if the kite dives 50 feet, the camera will still be above ground level. So I proceed by attaching the camera cradle to the Picavet and making a final check of rig movement functions and the camera’s settings: auto-exposure mode, focus on automatic.
Once the camera is hanging from the rig, I unclip the kiteline from the carabiner and gain a little working height by letting out kiteline. As stable as the launching arrangement is, I generally feel better when the camera is clear of the ground. With the camera rig about 30 feet above the ground, I work with the Swift owner to take a series of bird’s-eye view and oblique shots of the airplane with the camera gaining no more than 40 feet of altitude (as monitored by the IR laser rangefinder I keep in my vest). The owner helps me sight the camera cradle’s position downrange — something my twin sons usually attend to.
The camera cradle is bouncing around quite a bit in the gusty winds and my shutter speed is varying between 1⁄250 and 1⁄500 of a second (determined when the camera was on the ground). The trick in this situation is to patiently wait for the moments when the camera cradle becomes less active and shoot in these interludes. This I do, and when the rig is moving vigorously, I back away from the handsome Swift, lest something fail, and — bombs away. (I will knock on wood and say that in hundreds of flights, I’ve yet to drop anything.)
KAP aficionados often emblazon their gear with cloth club badges like the ones shown here.
After taking my last shot, I tie the kiteline off to the carabiner again and walk the kiteline down to retrieve the camera rig. With the kiteline under my armpit, I easily handle the Picavet without putting tension on its lines. After removing the camera cradle, the kiteline is released and the kite flies from the carabiner while I move the camera rig out of harm’s way (or, as I do on other occasions, change the film and then reattach).
With the camera tucked away, I walk the kiteline down again and remove the Picavet and then the hangups. These go back into their photographer’s vest storage pockets. Next the kite is hauled in (by walking the kiteline down in this case) and kite, tail, and kiteline are stowed away. A final scan around the flying site for scattered gear is followed by stowing the larger items, including the photographer’s vest, in the KAP gear bag. The session ends by taking a couple of ground-level context shots, thanking the Swift pilot, and exchanging business cards. The total time between hauling out the KAP gear bag and placing it back in the trunk is about 35 minutes.
Beechcraft 18, Daytona Beach, Florida
(Canon S400 Digital Elph)
When scouting for subjects, I often look for juxtapositions that play well from my low-altitude vantage point. On seeing this derelict Beechcraft 18 mounted on a post above a miniature golf course, I had to stop and shoot. Taking the shot involved
flying the rig blindly from the other side of a low-rise hotel.
Point Bonita Lighthouse, Marin County, California
(Canon Rebel SLR w/ 15mm fisheye lens)
Point Bonita guards the northern flank of the Golden Gate Straight. Its lighthouse is perched precariously low on the
outermost rocks to keep it underneath the fog. The foundation outline of a former keeper assistant’s cottage is visible in the foreground. The barrel distortion of the rectilinear fisheye lens evokes the Earth’s curvature.
Pueblo Bonito, Chaco Canyon, New Mexico
(Canon Rebel SLR w/ 24mm lens)
Since my earliest studies in architecture, I have been
en-thralled by the great pueblos of the Southwest and speculations about the ancient civilizations that built them. Flying above Pueblo Bonito was a particular treat.
Pigeon Point Lighthouse, San Mateo County, California (Canon Rebel SLR w/ 24mm lens)
Dense fog marked my drive out to this lighthouse, threatening the inaugural flight of my single-lens, reflex KAP rig. Just as I arrived, the fog, visible in the photograph, pulled back a couple hundred yards and stayed politely out of my way.
Children’s Play Structure, San Francisco, California
(Yashica T4)
Viewed from the ground, this climbing structure appears as chaotic as the children it entertains. But from the air, its structure and organization read as clearly as an architectural blueprint. The exposure was taken under the diffuse light of a cloudy day, lending a soft quality to the shot. The Yashica T4 is an impressively capable point-and-shoot camera.
Moored Boats at the Berkeley Marina, Berkeley, California (Yashica T4)
Many subjects reveal a different nature in plan view (looking straight down), and so it is with boats. One can’t help but wonder about the variety of boat shapes evident in this image — narrow beam vs. broad, blocky vs. sleek — and the reasoning behind each design. Murky water and boat shadows lend a tangible presence to San Francisco Bay’s surface.
The S.S. Jeremiah O’Brien, San Francisco, California
(Canon Rebel SLR w/ 24mm lens)
The Jeremiah O’Brien is one of two remaining Liberty Ships, an anachronistic supply vessel from World War II. It was lovingly restored to operating order by a group of veterans and enthusiasts. In my early days of kite flying, I once tangled a
kite in the ship’s upper rigging. It was extricated by a willing and able septuagenarian to whom I remain grateful. Practice with those kites!