This article appeared in Make: Vol. 78. Subscribe today to get the latest projects delivered to your mailbox.

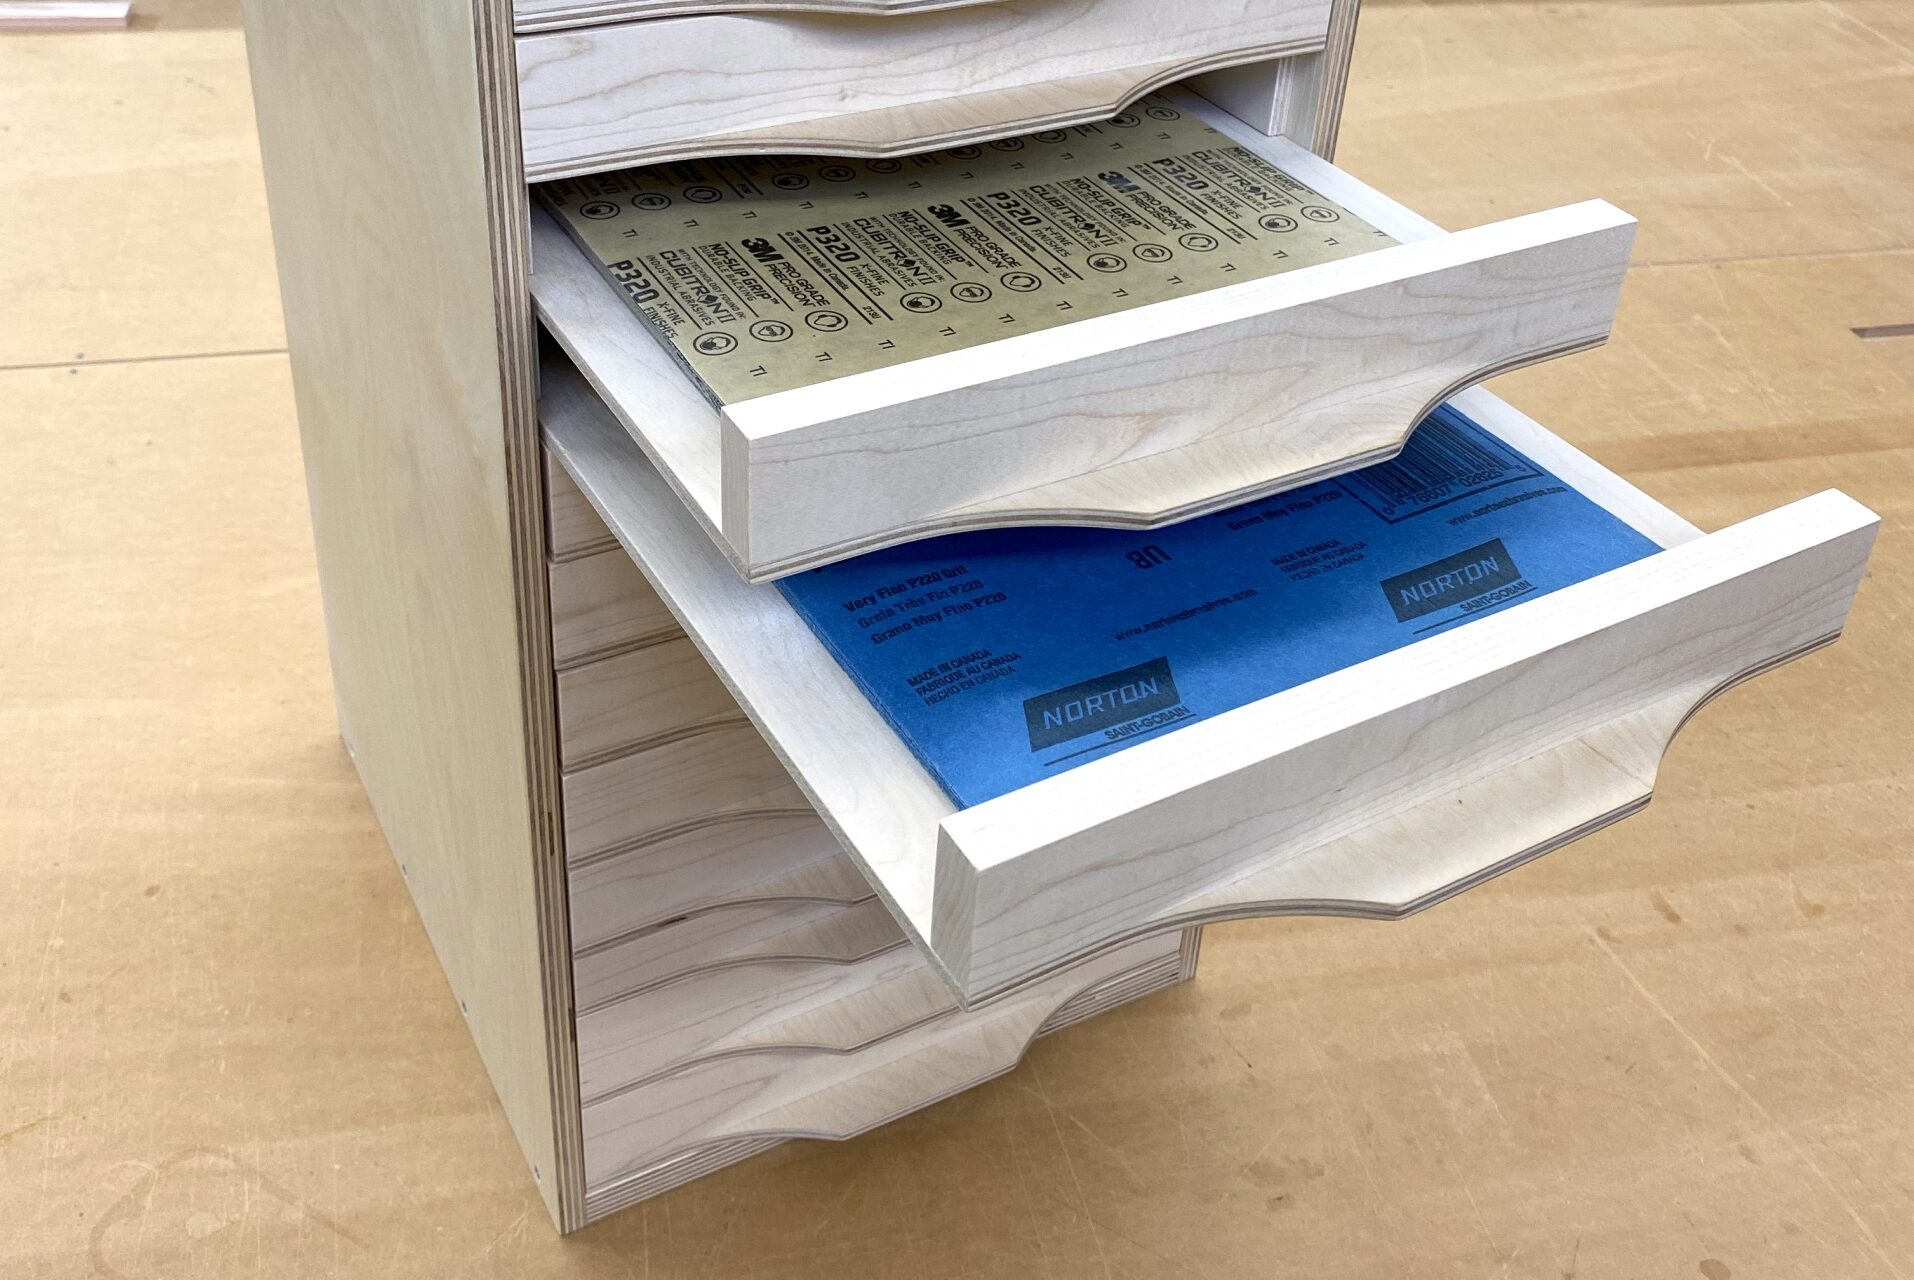
Sandpaper is one of those things that can be a challenge to store. Bunches of random loose sheets thrown in a box or drawer, rubbing together and losing their grit, or inside cardboard sleeves obfuscating how many sheets you have left, or worse, mysterious partial sheets with no grit numbers on the back.

Having a simple way to store every grit in its own place makes it a lot easier. This sandpaper flat file has enough drawers for all the grits I keep on hand, from 60 up to 400, a couple of drawers for the super high grits from 1000–2000, plus a drawer for sanding sticks and blocks, and one for lightly used pieces that still have a bit of life in them. And lastly a hidden bonus: the narrowest drawer is actually a straightedge tearing board for quickly making half sheets.

You can build this file in a day or two, for your own workshop or makerspace, or as a gift for anyone who does wood, fiberglass, resin, or other fabrication and finish work.

Photography by Len Cullum

I use a jointer and planer to dimension the maple wood for the drawer fronts to exactly 5/8″ thick. But if you don’t have access to these tools, you can work with off-the-shelf ¾” wood instead. Select the straightest piece(s) you can, and rip them to size on the table saw. To accommodate the extra thickness, you’ll just cut the carcass, front rabbet, and drawer bottoms a bit deeper:

  • Add 1/8″ to the carcass pieces, making them 131/8″ deep
  • Change the front rabbet from 21/32″ to ¾” wide
  • Make the drawer bottoms 1/8″ deeper, from 13½” to 135/8″
You can download my SketchUp drawing, and modify it if you wish.

Dados and Rabbets?

Yes, this project uses dados and rabbets. Here’s a breakdown of the terms:

  • A kerf is the space left by a saw blade when it cuts, the part that turns into sawdust.
  • A dado is a wide kerf going across the grain.
  • A groove is a wide kerf going with the grain (though these are often used interchangeably).
  • A rabbet is a two-sided groove (instead of three) cut along the edge of a board.

Project Steps

1. Cut the Carcass Pieces

The first thing to take care of is getting the carcass plywood broken down. From the ¾” sheet, cut two pieces 13″×25″ and two pieces 13″×11″. Also cut one piece 10-3/8″×12″ (not shown), to go in the sheet tearing drawer.

TIP: Because the factory edge of plywood tends to get marked up by the time you get it, I like to make my first cuts ¼” wider than I need, and then flip them to cut to final size, assuring four fresh, clean edges.

After orienting the parts for which edges I want to face forward and which sides I want to face out, I stick a Post-it near what will be the top, and draw an arrow pointing to front. Sure, I could just draw on the plywood, but I like the strong visual cue of a Post-it or tape, and the fewer marks I have to sand out at the end, the more I like it.

2. Lay Out the Drawer Dados

Next is the layout. In this cabinet there will be 11 drawers for sandpaper above, two deeper drawers at the bottom for scrap sandpaper and for sanding blocks and sticks, and one thinner drawer between them for the sheet tearer.

First I clamp the parts together and start marking out the dado lines. Measuring down from inside the top, make a mark at 1-7/16″ and another at 1-11/16″. Repeat this 10 more times, measuring from the bottom of the previous set of marks. To help keep track, I make small hashes on the tape measure itself.

The twelfth drawer from the top will be the tearing drawer; for this one I’ll mark lines at 15/16″ and 13/16″.

To make up for any small discrepancies that happened above, for the last two drawers I measure the remaining distance to the bottom board and divide by 2. This gives me marks at 1-21/32″ and 1-29/32″. Note that the bottom drawer will sit directly on the bottom board.

3. Cut the Dados

After fitting my table saw with a dado stack at ¼” width, and setting it to cut ¼” deep, I make a test cut and check the width of the slot, using a piece of the ¼” plywood. It should slide easily with an approximate 1/32″ gap. If it’s too tight to slide, you’ll need to shim out your dado stack to accommodate. Also verify that your depth is ¼” as the rest of the build will rely on it.

Because each plywood piece will be oriented on the table saw to be twice as wide as it is long, it would be very risky to try to cut these dados using the rip fence — a very high risk of kickback, don’t do it. Instead I use my crosscut fence. Starting with the slot for drawer #1, I align the (not spinning) blade with my marks, then clamp a stop to the fence. Slide the piece back, and then up to the blade again, and recheck that I’m still on my marks. Once I’m satisfied that my setup is good, I make the cut. Then I take the other carcass piece making sure its top is oriented the same direction, slide it gently to the stop, and make the same cut.


Turn off the saw, and repeat the setup for the rest of the slots.

TIP: Because dado sets are typically undersized by ⅟₃₂”, there’s always a little space between the layout lines and the sides of the blades. For consistency, I try to keep the blade aligned to the same side of the lines for every cut, usually the one closest to the bottom.

4. Cut the Rabbets

When the dados are all cut, it’s time to make the rabbets (or “rebates” for the European types). Without changing the height of your setup, change the dado stack to ¾” width. The first cuts will be the top and bottom rabbets. On the crosscut slide, I set a stop and remove ¾”×¼” deep on both ends of the two side pieces.

Once those are cut, I move on to the front edge. For the front rabbet, which creates the drawer front recess, I’ll use the rip fence and remove 21/32″ (5/8″ + 1/32″).

And once those are cut, I cut a rabbet on the back edge of all four carcass pieces. This rabbet should be 5/16″ wide. And there you have it, all of the drawer slides are cut!

5. Build the Carcass

At this point I give the whole interior a light sanding, just to remove any splintering around the dados and to smooth things out a little bit.

Because this is shop furniture, I’m going to keep this build as simple as I can using screws and glue to hold it together. If nails or biscuits or finger joints are your thing, I say choose your adventure. Just remember that if you’re using fasteners, you will be putting them into the edge grain of plywood, so you’ll want to test any nailing on scraps, and predrill for any screws to keep the plywood from delaminating.

I begin by clamping the whole thing together, getting it flush and square, and then making layout marks for my screws. It may seem like overkill, but I find careful spacing of visible fasteners can give a piece a much cleaner look.

When everything is laid out I predrill and countersink all my screw holes, and then disassemble. I apply a light bead of glue to the joints, reclamp, and then drive all the screws. You could glue first and then drill, but I don’t like how the drill bit tends to gum up with glue, so I do it this way.

When all the screws are in and the carcass is checked for square, it’s time to install the back. After measuring the back opening, I cut a piece of ¼” plywood at 11″×24-1/16″. Since the ¼” shoulder doesn’t leave a lot of room for fasteners, I’ll be using #18×¾” nails, driven in at a slight angle, and spaced to avoid the dados.

6. Cut the Drawer Bottoms

From the remainder of the sheet of ¼” plywood, I cut 14 pieces at 10-15/16″×13½”.

TIP: Were I to do it again, I would cut the plywood with the grain parallel to the short dimension instead of the long. That way the grain would be in the same direction as the drawer fronts, giving it a nicer look.

Slip all the bottoms into their slots and make sure they move smoothly. Then it’s on to the drawer fronts.

7. Cut the Drawer Fronts

To make the drawer fronts, I’m starting with 9 feet of nominal 1×4 maple (true dimensions ¾”×3½”) and jointing/planing it down to 5/8″ thick. If you don’t have access to a jointer and planer, no worries, just select the straightest piece(s) you can and rip them to size on the table saw. Again, to use full ¾”-thick material for the drawer fronts, just make the dimension adjustments listed in the intro.

Next, set a stop on the miter saw to 10-15/16″ (should match the width of your drawer bottoms), cut two pieces, and rip them to 111/16″ wide. These are the two bottom drawer fronts. Then rip the rest of the board into two strips 17/16″ wide and cut these into 12 pieces 10-15/16″ long. Lastly, rip one of those down to 7/8″ for the tearing drawer.

With the drawer bottoms inserted, I put all the drawer fronts in place and check the fit. There should be about 1/16″ space between each drawer, and about 1/32″ on each side.

8. Shape the Handles

The front 7/8″ of the drawer bottoms are designed to be used as integral handles. The corners could be left as is, or rounded, or given long miter cuts, or anything else as long as it’s only 7/8″ deep. I like the look of concave curves to center. To do this, I make a template on a sheet of conveniently sized, 8½”×11″ card stock. I measure in 7/8″ on the wide end, and then after finding center, I measure out 15/8″ to either side. This gives me a pull that is 3¼” wide.

Because the fit of the drawer fronts relies on that 7/8″ mark, to make it easier to land them, I make sure to save part of that mark: I measure in 1½” from the edges as the starting point of my curve. To create the shape, I fool around with some French curves until I find le sucré spot.

After cutting out the curves, I trace them to the drawer bottoms and cut them out on the bandsaw.

Remember to save your line along the first 1½” on either side.

When all the handles are cut, I give the edges a very light pass with a piece of 220 sandpaper. Just enough to remove any fuzzy bits, but not enough to round over the corners. Clamp all of them together in a nice square stack and sand the curves to match, again being careful not to sand past the lines that define the front edge.

Once the curves are faired out, I sand each piece front and back, just enough to make it smooth, but not enough to change its shape.

9. Build the Backstops

Because sandpaper by its nature doesn’t slide too much, the drawers don’t need much of a backstop, just enough to give the plywood a little stiffness.

I’m using 12 strips of ¼” ply ripped at 3/8″ wide and cut to 10-3/8″ long. I cut these on the table saw using a push block, but they could be cut on the miter saw as well.

To attach the backstops, I start by using a square to get them centered, then use two pieces of painter’s tape to create a hinge along the back.

This keeps them from sliding around in the gluing process. When all are taped, one at a time, open the hinge and apply a thin bead of glue along the length. Remember that these will never be under enough stress to break free (unless you’re a real drawer slammer), so avoiding a lot of squeeze-out is a good idea.

When they’re all glued, clamp flat boards over the ends and allow the glue to cure, usually about an hour.

Of the two remaining bottoms, one is for the bottom-most drawer, the one for sandpaper scraps. For this one I attach a taller piece to the back. I used a 1½”×3/8″ cedar scrap I had laying around, but could have used an off-cut of the maple, had I seen that first. The other bottom is for the tearing drawer.

TIP: To protect against any glue that does squeeze out, I use strips of waxed paper. This might seem like an extra step, but it sure beats discovering that some of your drawers have glued themselves together. So apply the glue, close the hinge, and press flat; repeat and stack them, alternating face to face and end to end, while placing a strip of waxed paper between each one.

10. Attach the Drawer Fronts

Once the backstop glue is set, it’s time to attach the fronts. Placing one drawer front at the edge of the bench, and a second a few inches back for support, I position a drawer bottom on top of them (backstop strip down). After flushing up the corners, clamp it in place. I’m using 1″ drywall screws and glue to connect them, but if you prefer nails, go for it!

Note that the ⅞” drawer front should be attached to a drawer bottom with no backstop.

11. Make the Sheet Tearing Drawer

The almost last bit of business is to build the sheet tearing drawer. Begin by centering the 10-3/8″×12″ piece of ¾” plywood in the ⅞” drawer. It should abut the drawer front and be flush with the back. I attached it through the bottom, using a ¾” screw in each corner with no glue, in case I ever want to change it out.

Because I want to be able to quickly tear a sheet in half in long or short direction, I’m going to locate the hacksaw blade 5½” from the left side of the plywood deck. After making reference marks I lay the blade in place, with one end even with the back of the deck and the other end sitting on the drawer front. The back of the blade (without teeth) is the side you’ll want to tear against. The teeth side leaves a very ragged edge on the sandpaper. Trace the holes in the blade onto the deck and drawer front.

Using a 5/8″ Forstner bit in a drill press, I carefully drill the front hole until it is flush with the deck.

Then using a chisel, I trim the edges of the hole square.

To attach the blade, I use one #6 washer under the blade, and one #6×¾” screw and a finish washer, on each end.

I predrill and attach the front end first and the back second, to avoid putting a bow in the blade.

I add two more reference lines, to help me tear the sheets: one at 4¼” from the smooth side of the blade, and then one perpendicular line from side to side. Lastly, since the drawer needs to be taken all the way out to tear lengthwise, I give the back corners of the drawer a good rounding, so that it slots back in easily.

Conclusion

And there it is! All that’s left is to give it all a good sanding, soften all the edges and corners, and apply your favorite finish — but only on the outside, as finishes inside of boxes can go rancid and smell terrible. Or don’t finish it at all, letting it bask in its own raw glory.

Then figure out your filing system; high grits up or down? Label the drawers with grit numbers or turn every day into a memory puzzle? The choice is yours. Load it up and enjoy your new and improved organized life!


This article appeared in Make: Vol. 78.