Anyone who’s played with a gyroscope toy powered by pulling a string wound around its axle knows that it’s fascinating, but also frustrating because it runs down so quickly and has to be rewound.

[vimeo http://www.vimeo.com/16076189 w=560&h=315]

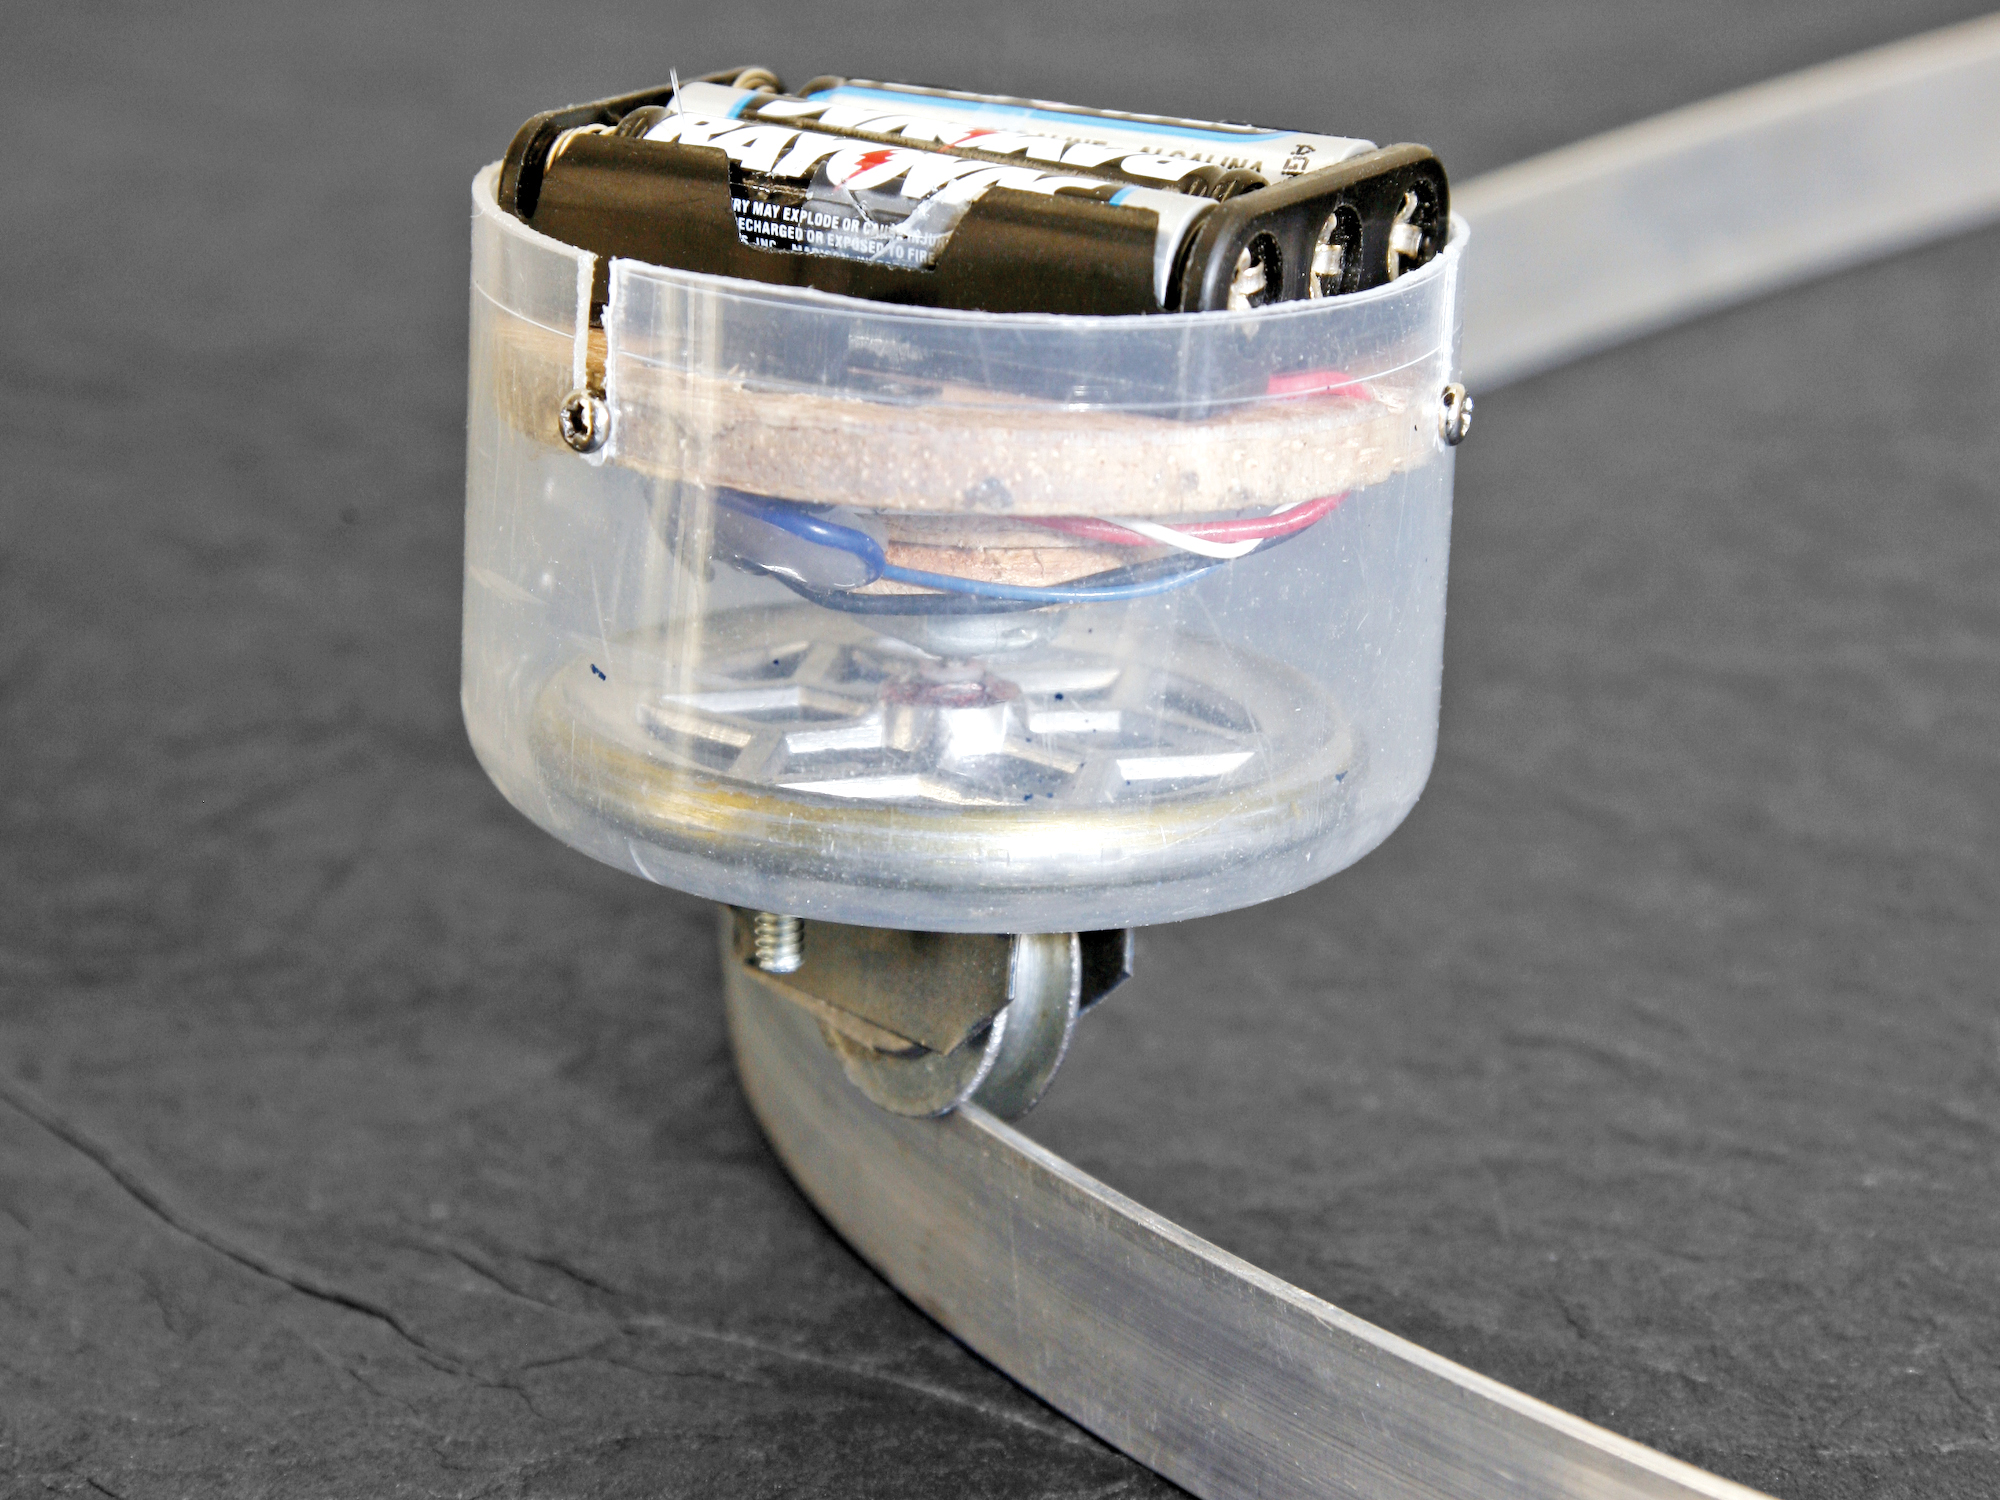
I decided to make an electric version that runs for as long as its AAA batteries hold out — which can be at least a half-hour, since the spinning gyroscope wheel stores some energy, easing the load on the motor.

I went through 3 iterations before arriving at this simple design, which is easy to build and works well.

In addition to battery power, the Gyrocar has a small track wheel at the bottom that’s friction-powered by the main gyroscope wheel.

The track wheel drives the Gyrocar along any thin, horizontal edge while it bears the gyroscope’s weight, but otherwise it doesn’t press against the main wheel, to avoid draining energy. Three screws let you adjust the track wheel or disable it entirely so that the Gyrocar stays idling in one place.

I’m sure MAKE readers will improve on my design. And if you’ve got access to a metal lathe, you can make an original version that isn’t based on the toy.

Project Steps

Make the motor assembly.

Trace around the plastic cap on the plywood sheet. Use a saw or router to cut out a disk that size, then file and sand it down until it fits flush just inside the cap.

TIP: If you use a hole saw, back the plywood with another piece of wood. This ensures that the saw won’t rip the grain on the exit side, so the disk will have clean edges. A hole saw also drills a hole in the center, which is fine.

Measure the diameter of the motor, then scribe, cut, and sand 2 plywood rings whose inner diameters are just smaller than the motor and whose outer diameters are about twice the motor’s diameter. File or sand the holes until the motor fits snugly inside. You can also cut a matching hole in the larger disk, which will give the gyroscope wheel more vertical space to fit inside the cap.

Finish the motor mount assembly

The battery pack attaches flat on top of the large disk, so you need to make a way for the wires to run through the disk to the motor underneath. If you cut a motor-sized hole, use a small file or hobby knife to make a small channel deep enough to accommodate the wires under the battery pack. Otherwise, drill small holes that the wires can pass through, as shown here.

Drill 3 roughly equidistant pilot holes into the circumference of the large disk, and temporarily insert 3 small wood screws.

Glue the 2 small rings together on the bottom of the large disk, with all their centers aligned so that the motor fits in vertically.

Test-fit the motor into the disk assembly and route the leads out the top. Use the remaining 2 small wood screws to attach the battery holder centered to the top of the large disk. I added a small switch (optional).

Free the gyroscope wheel.

Remove the gyroscope wheel from its wire housing and try tapping the axle out with a hammer.

If it comes free, you can fit in a plastic rod, which will make things easier. If the rod is a bit too wide to press-fit through the hole, chuck it in an electric drill and turn its diameter down by running it against a file.

If you can’t extract the axle, saw it off and file or grind it down on both sides of the wheel.

Mark the gyro wheel's center.

Before drilling the gyro wheel, you must find its exact center point. If you inserted a plastic rod, push a pin into it where you think the center should be, then hold the pin pointing upward and gently spin the wheel like a top to see if it wobbles. Keep adjusting the pinpoint location and spinning the wheel, using trial and error until you find a good balancing point.

If you filed down the original metal axle, you can scribe crosshairs on the wheel using a try square set to 45°, mark the point with a hammer and center punch, and test-spin the wheel with the pin in the mark.

NOTE: If you have access to a metal lathe, you can chuck the wheel on its outer diameter and drill a center hole on the lathe. You might even try making your own gyroscope wheel.

Drill the gyro wheel.

Use a caliper or micrometer to measure the diameter of your motor shaft. Find a drill bit that’s the same size, or a few thousandths of an inch smaller if you’ve fit in a plastic rod. I used a #55 drill bit. The center hole you’ll drill in the wheel must grip the shaft tightly, so that it doesn’t detach at high speeds.

At the exact center point of the gyro wheel, drill the hole for the motor shaft, as perpendicular to the wheel as possible.

Mount the gyro wheel to the motor.

Press or tap the wheel onto the motor’s shaft, as close to the motor as possible without interfering with it turning freely.

This connection needs to be tight and strong. You can reinforce it with hot glue.

Make the track wheel bracket.

Download the track wheel mounting bracket template from above, under Files, and print it at full size.

Cut and trace the outline onto sheet metal, then cut it out with tinsnips and bend it with pliers, following the notes on the template.

Drill the holes in the mounting bracket, as noted on the template.

Prepare the track wheel.

Use a file or grinding wheel to remove the head of the rivet that connects the tension roller to its spring steel leg. This will leave you with a free-turning wheel held by a small metal bracket; this is the drive wheel, or track wheel.

File or grind down one edge of the track wheel to reduce its diameter all around. The track wheel will be centered underneath the gyro wheel, but you want only one of its circular edges to touch the gyro wheel.

Mount the track wheel.

Thread the existing hole in the wheel bracket with the 10-32 NF tap, and attach it with a #10-32 machine screw and nut to the mounting bracket you made. The screw should be about 3/8″ long; it mustn’t interfere with the free turning of the track wheel.

The depth of the plastic cap from rim to inside bottom should be about 1/4″ greater than the height of the motor assembly from the top of the large disk to the bottom of the gyroscope wheel. If the cap is too deep, mark and trim its rim down evenly.

Turn the cap over and mark a 5/16″ x 7/8″ rectangle centered on the cap, plus 2 points 5/16″ from the long sides, matching the bracket mount holes. Cut out the rectangle and drill the holes with a 1/8″ bit.

Secure the bracket and drive wheel to the bottom of the cap using two 6-32 x 3/8″ machine screws, washers, and nuts.

Assemble the Gyrocar.

To simplify construction, you can trim and connect both motor wires to the battery pack directly. This way, you turn the car on and off by popping one of the batteries in or out. But to make my latest Gyrocar easier to operate, I wired a small switch into one connection.

In the rim of the plastic cap, cut 3 slots about 1/4″ long each, sized and spaced to accommodate the 3 screws on the circumference of the large disk.

Now put the Gyrocar together by fitting the cap over the 3 screws on the disk.

Adjust it.

Run the motor and fix the cap’s position so that the gyroscope doesn’t press against the track wheel constantly, but only when the Gyrocar is resting on the track wheel and the thin plastic cap flexes slightly under the gyroscope’s weight.

(If you find that the gyro wheel’s axle interferes with the track wheel, you may need to grind or file down the axle.)

Finally, adjust the screws that hold the drive wheel bracket to the cap so that the Gyrocar remains upright as it runs, rather than leaning to one side. You want to center the Gyrocar’s center of gravity, and the holes in the bracket are large enough for some adjustment room.

That’s it; you’re done! After these 2 adjustments are made, you won’t have to make them again.

Take Gyrocar for a spin.

You can use a large cooking pot as a simple track for your Gyrocar, or you can make a track that offers more interest.

I used an old band saw blade 1/2″ wide by 64-1/2″ long that worked very well as a track for my Gyrocar. To hold the blade upright, I cut some 1″-wide blocks of wood out of standard 2″ wooden furring strip and cut a 1/4″ deep slot in each with a thin saw blade. You can watch videos of the Gyrocar running on this track at makezine.com/23/gyrocar.

If you raise the gyro wheel so that the track wheel doesn’t turn, the Gyrocar will rest comfortably on a taut string — even travel along the string if it’s raised or lowered.

Conclusion

I've built a few Gyrocars with different designs. For one of them, I used foamcore board instead of plywood, which I covered with colored foil wrapping paper. I also covered the battery pack with a hemispherical spray-can lid, all of which gave the Gyrocar a flying-saucer look. I'd love to see your designs.

Related Posts on Make: Online:

DIY Electric Gyroscope

http://blog.makezine.com/archive/2006/11...

Gyroscopes: Everything You Need to Know

http://blog.makezine.com/archive/2006/03...

This project first appeared in MAKE Volume 23, page 84.