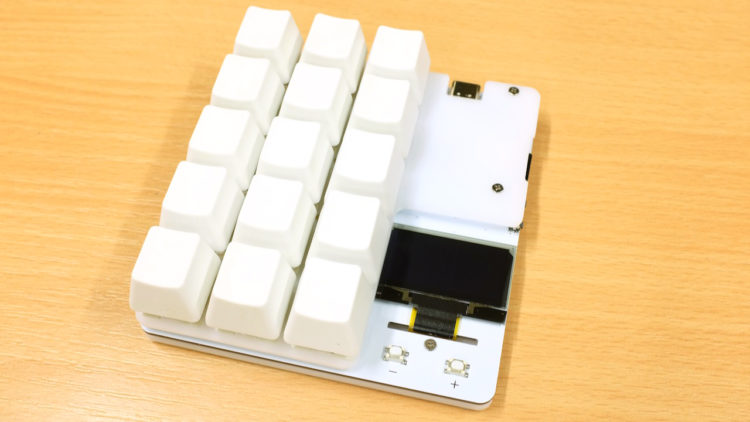
DuckyPad is a 15-key, do-it-all mechanical macro pad that helps streamline and speed up your workflow by automating keyboard (and mouse!) inputs. It features a sleek design and all the goodies of a high-end keyboard — mechanical switches, hot-swap sockets, RGB LEDs for each key, and USB-C.

But more crucially, duckyPad also features previously-unseen-in-macro-pads innovations such as:

• OLED screen that maps what each key does

• Sophisticated multi-line scripting with duckyScript

• 32 profiles of 15 keys, for 480 macros total

• Automatic profile switching based on active window

• microSD card storage — move between devices without losing macros

• Works with all major OSs, no driver needed.

This article appears in Make: Vol 79. Subscribe today!

When pressed, each key executes a user-created duckyScript to automate keyboard actions and speed up your everyday routine. The scripts can be as simple as shortcuts like Control+C, or as sophisticated as launching applications, managing livestreams, moving the mouse cursor, even creating root backdoors or grabbing passwords. 😈 It’s all up to you!

You can assemble your duckyPad from a kit in a half-hour, no soldering required, or build your own from scratch if you’re handy with surface-mount soldering. Here’s how to build it and use it.

HANDLING BARE CIRCUIT BOARDS

When handling the bare circuit board, remember to:

• Wash your hands first

• Always hold the circuit board by its edge

• Don’t touch the components.

The reason for hand-washing is to reduce the risk of static electricity (SE) on your body zapping the board and damage it, especially in dry weather. By washing your hands, you release the existing SE through the metal water pipe, your hands are moist to prevent further SE buildup, and your clean hands won’t leave greasy fingerprints all over the place, win-win-win!

Of course, your hands can’t be dripping wet either, but that’s just common sense.

Join the duckyPad Owners’ Club official Discord for discussions, asking questions, sharing scripts, and latest updates!

ALL HANDS ON DECK

“Keeb” nerds are passionate about their hobby: customizing full-size mechanical keyboards. Sure, it’s partly about speed — faster typing, coding, or gaming — but it’s also about aesthetics: cool design themes, artisanal limited-edition keycaps, colorful lighting, and, obsessively, the sound and feel of different key switches: smooth, quiet linear switches, tactile switches with a moderate feedback bump, or loud-and-proud clicky switches. For a taste of keeb world, check out r/MechanicalKeyboards and the vendors listed here and here.

We’re stoked to see makers taking hardware developed for the keeb scene, and using it to build unique DIY input devices like live-streaming decks, video editing decks, and macro pads for work and play. The new Raspberry Pi Pico and other RP2040 boards can act as USB HID devices, making them perfect for all kinds of keyboard projects. Here are some fun builds and kits to try.

MACROPACT

Heat up your iron and solder this 17-key macro pad with IPS display, two rotary encoders, and low-profile Kailh Choc V1 switches and keycaps. Designed by Sean Yin and coded by <kbjunky>, it’s powered by a Pico running CircuitPython and KMK — a Python firmware layer for mechanical keyboards — all packed into a sleek 3D-printed housing with RGB lighting.

ADAFRUIT MACROPAD RP2040

Compact and functional, this kit packs a lot: 12 hot-swap Kailh linear keys each with RGB NeoPixel, a monochrome OLED display, rotary encoder, plus reset button and on-board speaker. Based on the RP2040 chip, you can code it in Arduino or C but of course it’s geared to CircuitPython, with several Adafruit libraries to support it. Like the duckyPad kit, this PCB comes presoldered with sockets, OLED, etc., so assembly is simple. More than just a keyboard sidekick, people have turned these into a LinuxCNC control pendant, Home Assistant automation controller, Simon Says game, and much more.

 NEOKEY EMOJI KEYBOARD

Start out super easy by building Liz Clark’s fun, four-key macro pad for your favorite emojis. Just plug an Adafruit 1×4 NeoKey Stemma board into a QT Py RP2040, no soldering required.

 PIMORONI KEYBOW 2040

Straightforward 16-key pad with per-key RGB LEDs, Kailh Speed switches, and transparent DSA-profile keycaps. The circuit board comes presoldered with RP2040, 2MB flash, reset button, and user-programmable BOOTSEL button, so it’s another easy build. Available in linear, tactile, or clicky versions, and supported by a CircuitPython library.

 PICO RGB KEYPAD STREAM DECK

Live streamers: Connect a Pico and OLED to Pimoroni’s ٤×٤ Pico RGB Keypad to make this stream deck for OBS Studio. Built and coded by Kota Morishi, it runs on CircuitPython and the powerful Pico RGB Keypad Python module by Martin O’Hanlon. —Keith Hammond

Christian Fehmer in Cologne, Germany, spent 3 years perfecting this custom 60% keyboard in a CNC’d walnut case with Zealio V1 switches, DZ60 PCB, and Signature Plastics “1976” SA-profile keycaps. Pretty sure I wore an OP shirt that looked exactly like this.
Jai Hidro in the San Francisco Bay Area is running out of space (and money) for his keeb hobby. Those jars are full of key switches. Current favorite: TKC Kiwis. @jaihidro

What will the next generation of Make: look like? We’re inviting you to shape the future by investing in Make:. By becoming an investor, you help decide what’s next. The future of Make: is in your hands. Learn More.

Project Steps

1. PREPARE THE BACK PLATE

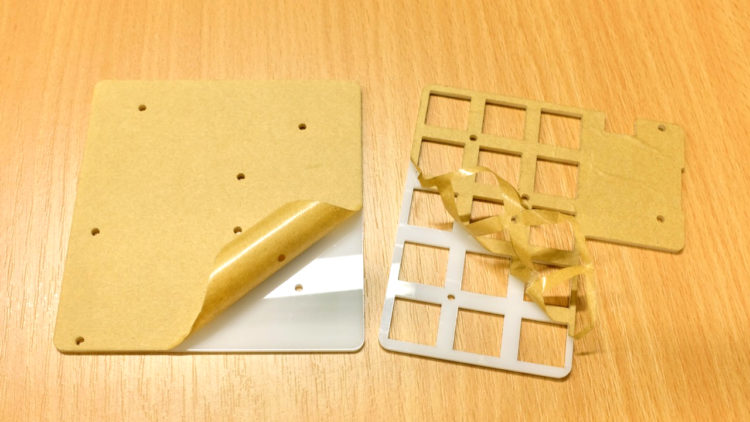
Start by peeling off the protective cover on the front and back plate (Figure A).

A

Place the Back Plate in front of you as shown in Figure B. Note the orientation of the holes.

B

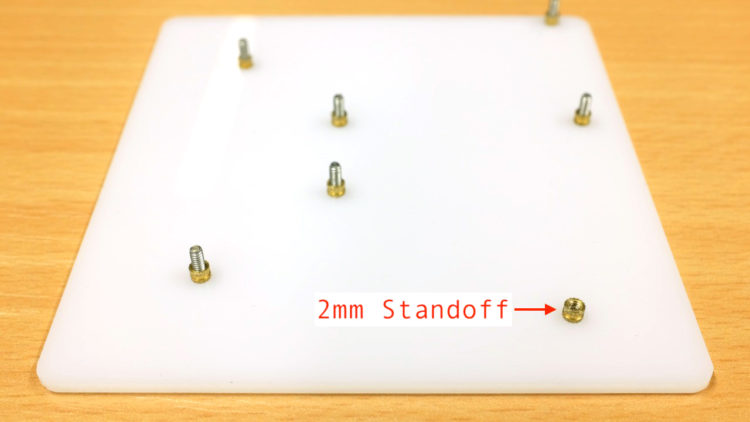
Starting from a hole in the middle, put an 8mm screw through the backside. Then screw on the 2mm standoff. Don’t overtighten! Doing so might deform or crack the acrylic plate. Finger-tight is OK, just make sure it’s not loose and doesn’t rattle. Do the same with all the holes except the bottom right (Figure C).

C

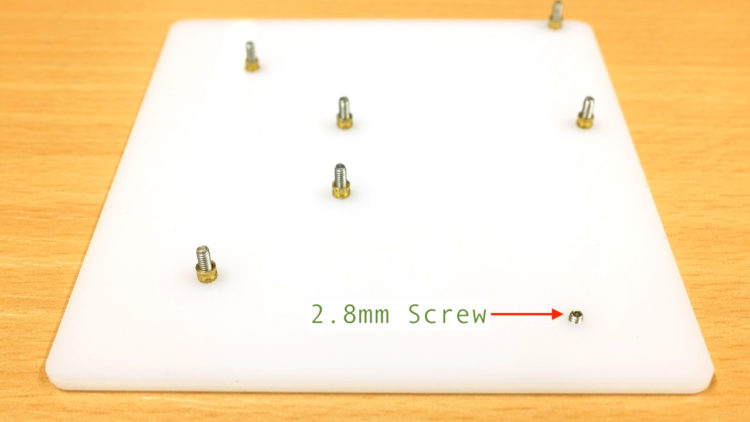
Put a 2.8mm screw through that last hole (Figure D) and install the 2mm standoff (Figure E). This is gonna be a PITA, but you’ll eventually get it. Careful not to drop the small parts.
D
E

2. MOUNT THE PCB

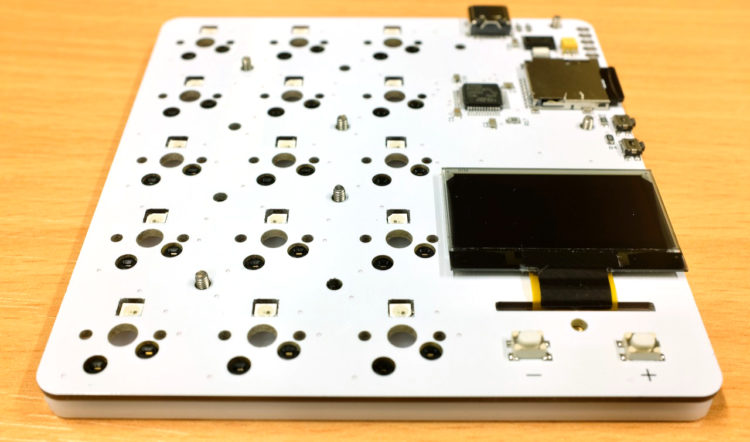
Now go wash your hands, grab the circuit board by its edge, line it up and install it as shown in Figure F.

F

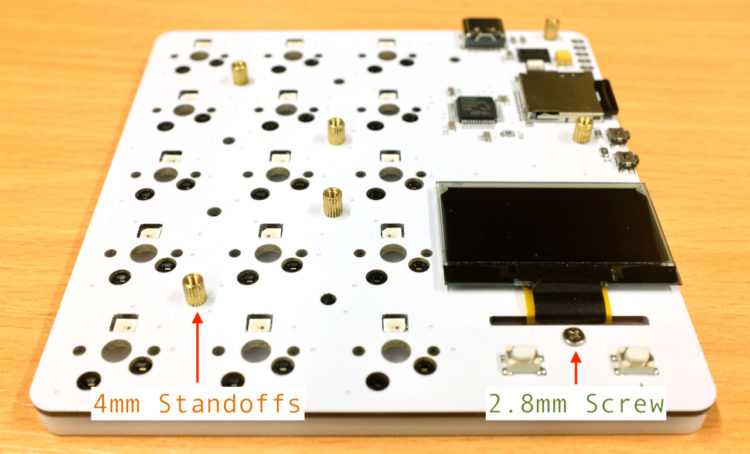
Install all six 4mm standoffs, and moderately tighten. Also install the 2.8mm screw on the lower right (Figure G).

G

3. MOUNT FRONT PLATE AND FEET

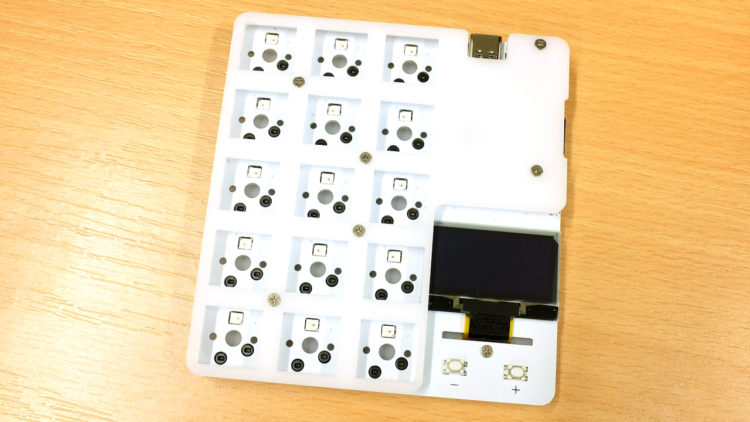
Install the front plate using the remaining 2.8mm screws (Figure H). Do not tighten each screw as you install it! Put them all on loosely first, then tighten them one by one. This ensures the plate is properly lined up. Again, don’t overtighten.
H

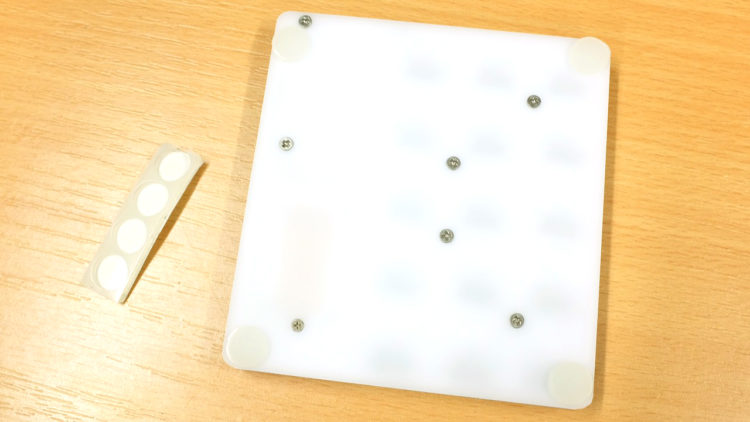
Flip it over, clean the back plate with a dry cloth if dirty, and stick on the anti-slip pads on each corner (Figure I).

I

4. INSTALL THE KEYS

Time to install the key switches! duckyPad supports hot-swap, so no soldering is needed. Make sure the pins are straight, otherwise you might damage the circuit board or the switch itself! Then line up with the holes, and gently push the switch straight down until it clicks in place (Figure J).

J

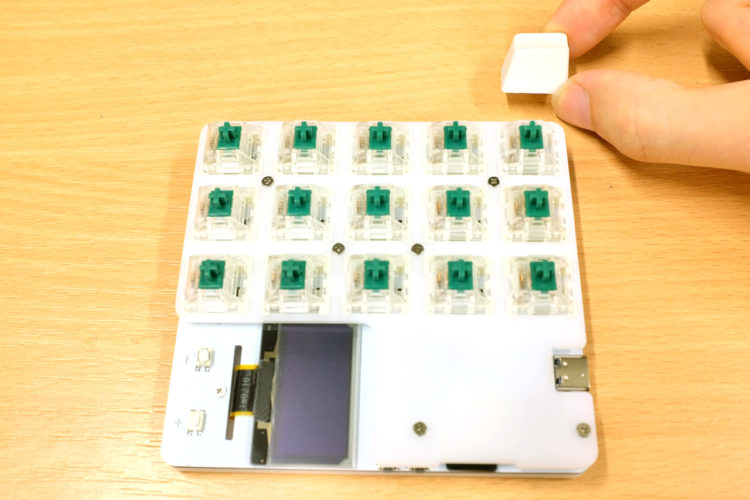
Keycaps next! Note the keycap orientation (“slope” side pointing left in Figure K). Just push it down. Each key should line up evenly. If not, try to push it down or wiggle it a little.
K

Finally, peel off the protective cover on the OLED screen, and you’re done (Figure L). Congratulations!

L

USING YOUR DUCKYPAD

Your duckyPad kit comes with a microSD card already installed, containing some demo profiles. Simply plug it into your computer, and voilà!

• Press a key to execute the corresponding script.

• Press + and – button to switch profiles.

• Hold down + button for profile quick-switch.

• Hold down – button to change RGB backlight brightness.

• To change keyboard layout, hold down the
top left key while plugging it in, then select
your layout.

The samples might be fun, but duckyPad’s true purpose is to do what you want! duckyPad uses a microSD card to store your profiles, scripts, and settings. You can insert/remove the SD card while duckyPad is on (Figure M). If you decide to use your own SD card, it should be formatted in FAT32 or FAT.

M

USING DUCKYPAD CONFIGURATOR

Head here to download the latest release of duckyPad Configurator for Windows, MacOS, or Linux. Extract the .zip file and launch the application by clicking duckypad_config.exe (Figure N). For Linux users, simply run the duckypad_config.py script with Python 3.6
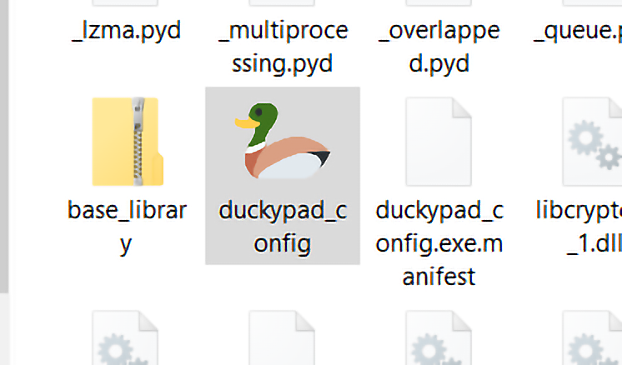
or higher.

N

After launching the app, make sure your duckyPad is plugged in, and press the Connect button. The app should then load all the data from duckyPad (Figure O).

O

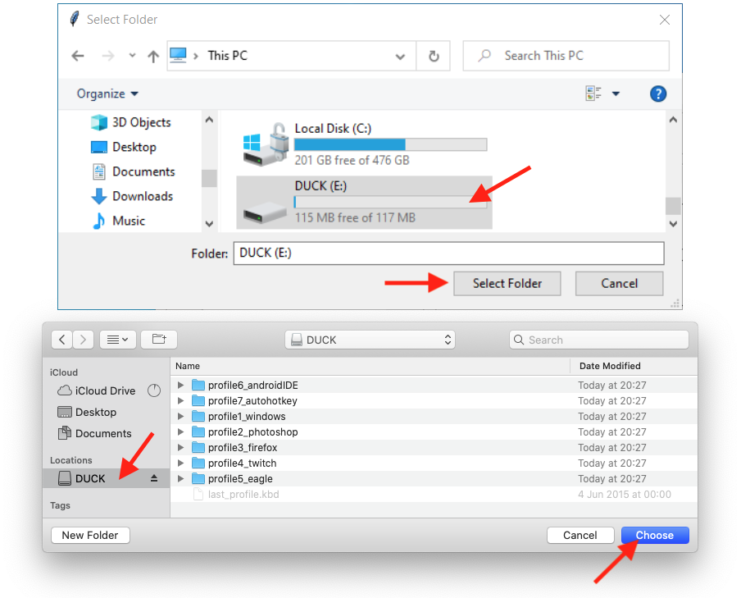
You can also load from SD card. Remove the card from duckyPad, mount it on your computer, and select the entire SD card. It should load just the same (Figure P).

P

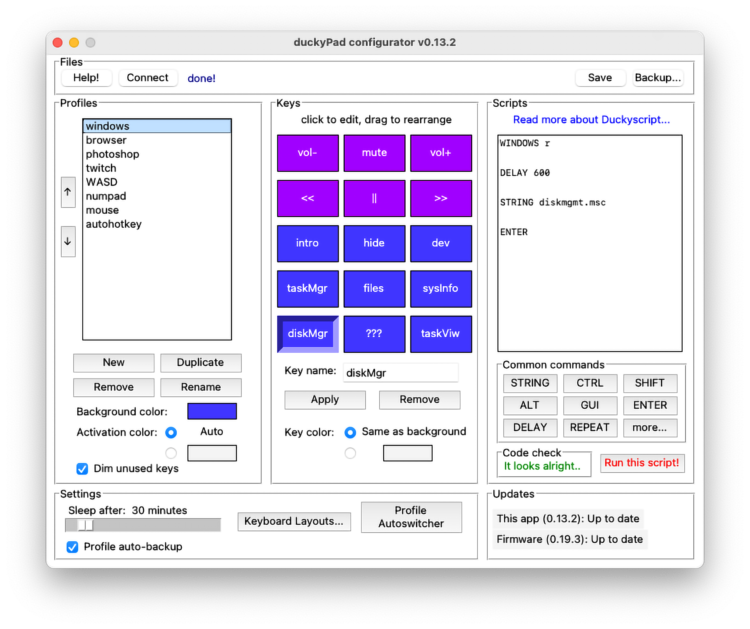
 Profiles Let’s break down the GUI (Figure Q). The leftmost column is for profiles. Each profile contains a group of scripts corresponding to the keys on the duckyPad. As you can see, you typically create a profile for each app you want to control.
Q

Use the buttons to create a new profile, duplicate an existing profile, and remove or rename a profile. Use the up/down arrow buttons to reorder your profiles.

Choose a background color for the RGB backlight. “Activation color” is the color that a key changes into when you press it. On the Auto setting it would be the inverse of background color. By default, unused keys are dimmed; you can override this by unticking the checkbox.

 Keys In the middle column, you can configure the 15 keys on your duckyPad. Click a key to select it, type to give it a name, or click Remove to delete it. You can assign a unique color to each key, or use the same color as background. Drag a key to rearrange its order.

 Scripts Finally, the rightmost column is for scripts. When you select a key, the script it will execute is displayed here.

WRITING DUCKYSCRIPT

duckyPad uses duckyScript, a simple scripting language for automating key presses. It was originally developed for USB Rubber Ducky, the famous “bad USB” thumb drive that hackers and pentesters use to “inject keystrokes at superhuman speeds”.

duckyScript is very easy and straightforward to write, you basically just tell it what key to press! Let’s take a look at some examples first:

Open the Task Manager:

CONTROL SHIFT ESC

Open a webpage on Windows:

WINDOWS r

DELAY 400

STRING 

ENTER

Save a webpage then close it:

CONTROL s

DELAY 600

ENTER

DELAY 600

CONTROL w

Use REM for comments, DELAY to pause the script (useful for waiting for the UI to catch up), and STRING for typing out text. Code check will be performed as you type, and errors will be highlighted in yellow.

DuckyScript supports all special keys and function keys (ESCCTRLRCTRLCOMMANDCAPSLOCKBACKSPACEF1F24, etc.), plus media keys (volume up/down, play/pause, etc.), numpad keys, mouse buttons, scroll wheel, mouse moves (x-y coordinates), and more! It also supports dozens of keyboard layouts, from the default English-US layout to Dvorak, French, Belgian, and more. Dig into all the details.

Press the “Run this script” button to test-run it on your computer. Make sure you trust the script! Test-run starts after a 2-second delay. It can’t get past Windows User Account Control screens, so you’ll have to run it on the real thing. On macOS, if test-run doesn’t work, go to System Preferences  Security & Privacy  Accessibility, unlock, remove then add the app.

Test-run might not be 100% accurate; some keys like CAPSLOCK and NUMLOCK can’t be emulated in software. Run your scripts on the real thing if you’re not sure.

Finally, press the Save button to save the changes.

RUN IT!

duckyPad should automatically reboot when you press Save, and your new scripts will be ready to use! (If you’re configuring via SD card, insert it back in duckyPad and then power it on.) Again, press a key to execute the corresponding script, and press the + and  buttons to switch profiles.

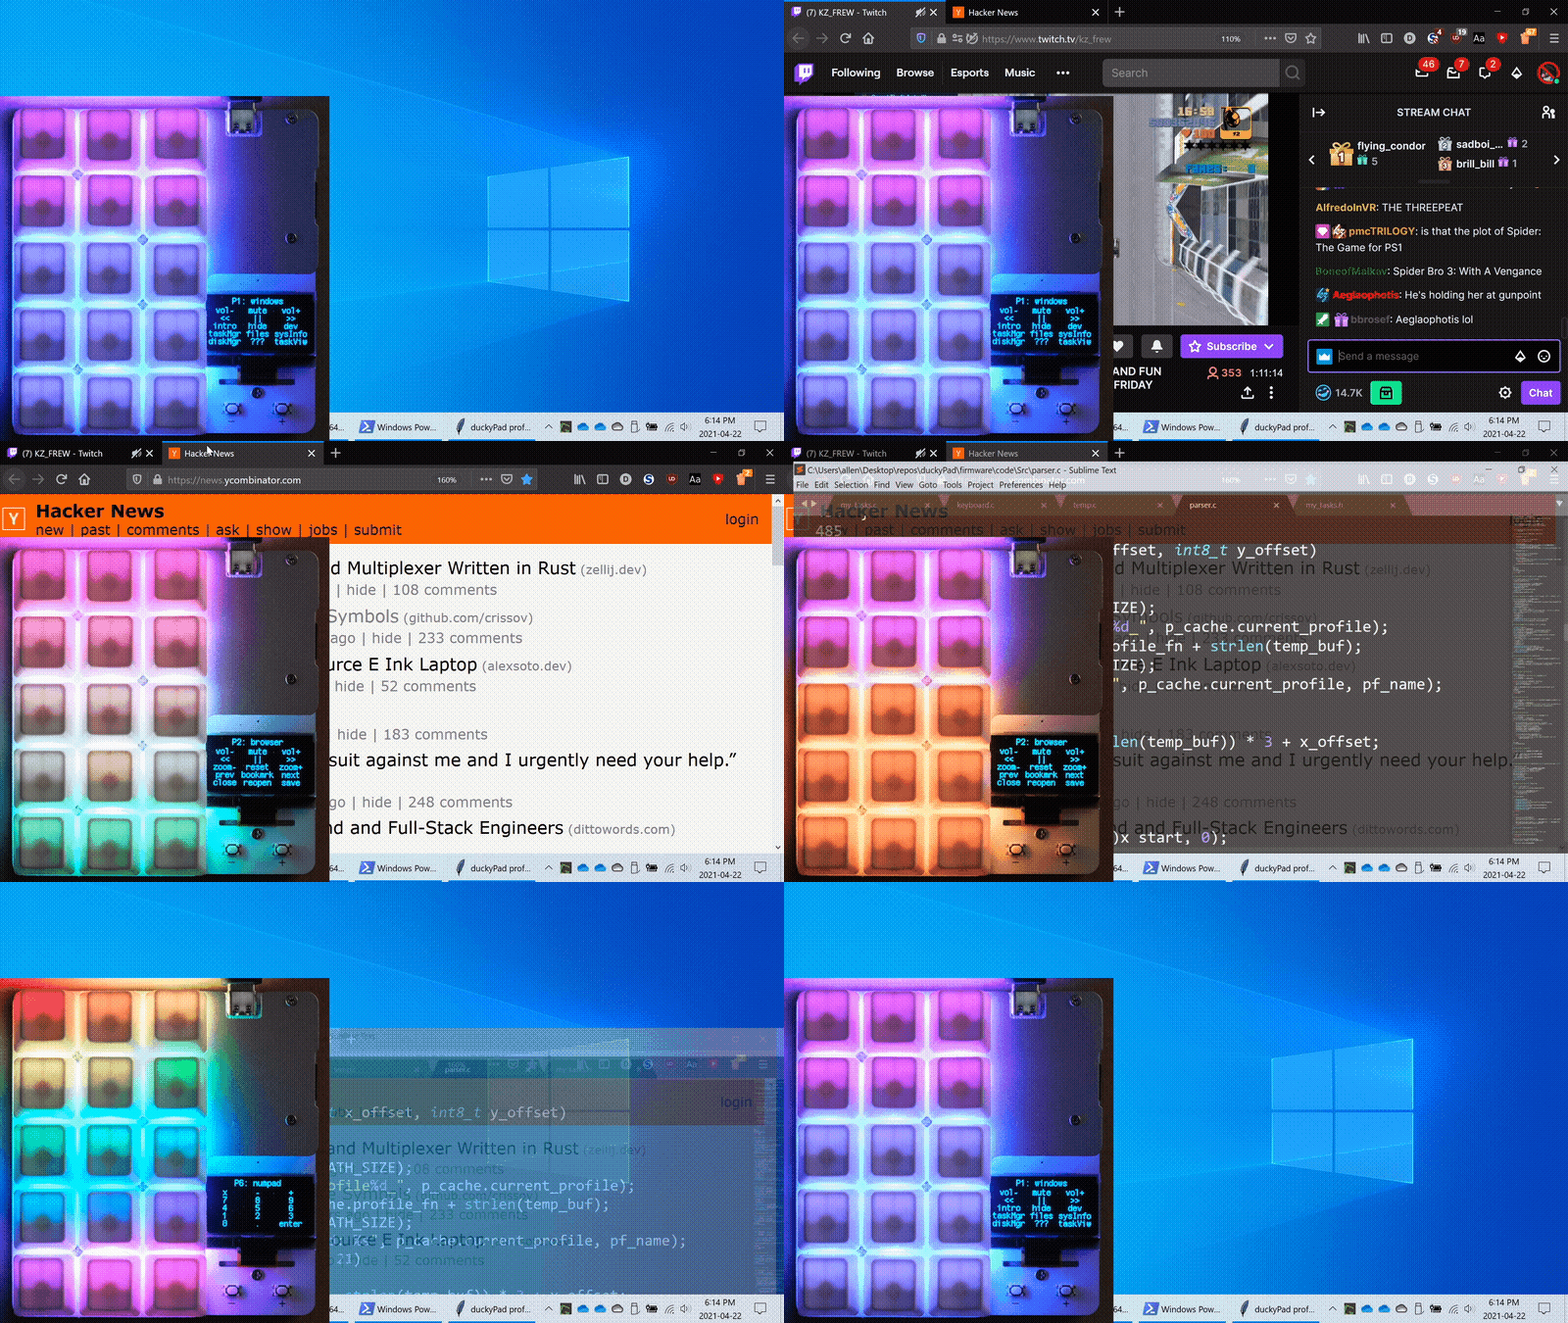
duckyPad can also switch profiles automatically based on your current active window, say, from Windows (Figure R) to Twitch (Figure S) to web browser (Figure T) to code editor (Figure U)! Check out the Profile Auto-Switcher app.

Here are just a few examples of what you can do with your duckyPad:

 Photoshop / CAD — Put all your commonly used shortcuts in one place, for a more efficient workflow (Figures V and W).

 Managing livestreams — Switch scenes, start/stop stream, start/stop recording, play ads, and a lot more (Figures X and Y).

 Security research — With the ability to automate keyboard inputs, it is possible to take over an entire computer with the push of a button (Figure Z). This is known as BadUSB attack, and it was the original purpose of duckyScript and USB Rubber Ducky.

 One-finger Twitch chat — (Figure Aa).

TIPS AND TRICKS

CONSOLIDATE KEYBOARD SHORTCUTS

The most obvious use case is putting your commonly used hotkeys on duckyPad! Simply create a profile and add them in.

For many applications, you can find an official list of keyboard shortcuts. Just search “<app name> shortcuts” on Google.

LAUNCH APPS ON WINDOWS USING TASKBAR

Another popular usage is launching apps. There are two ways of doing this. Here’s the first. Find the app, then Right-click  More  Pin to taskbar. Now you can use WIN + <number> to launch the apps on the taskbar (Figure Bb). In duckyScript, it would be WINDOWS 1WINDOWS 2, etc.

Bb


LAUNCH APPS ON WINDOWS USING SHORTCUTS

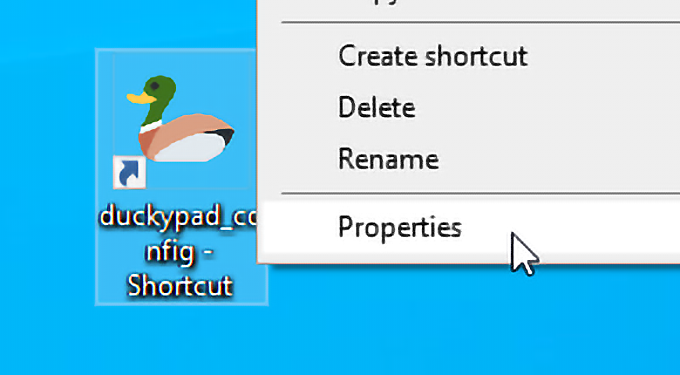
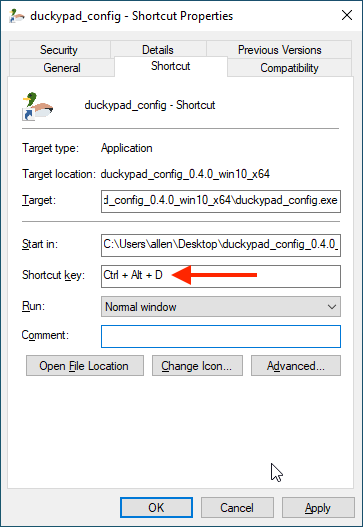
This method works with any file, not just apps! Right-click on any file, then select Send to…  Desktop (create shortcut). Find the new shortcut on your desktop, right-click, and select Properties (Figure Cc).

Cc
Dd

Set a hotkey in the Shortcut Key box (Figure Dd). Then you can use duckyPad to press this combo to launch anything with a push of a button! In this case, the duckyScript would be CONTROL ALT D.

LAUNCH APPS ON MACOS

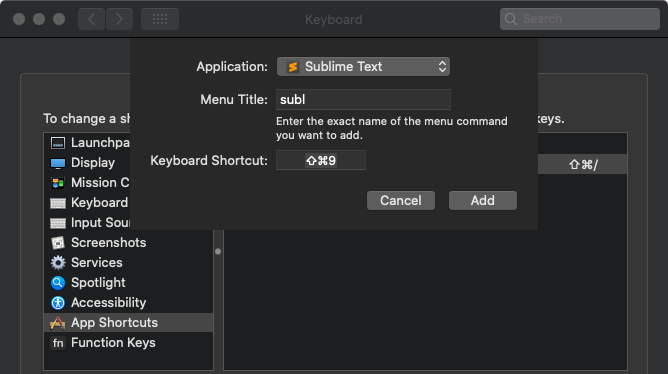
Go to System Preferences  Keyboard  Shortcuts  App Shortcuts. Press the + button, select an app to open, assign a hotkey, and set up duckyPad accordingly (Figure EE).

Ee

ADVANCED SCRIPTING WITH AUTOHOTKEY

You can use the free and open-source AutoHotkey for even more sophisticated needs, such as controlling mouse movements, executing scripts, etc. To do this, set up duckyPad to press a simple combo like WIN + F1, which then gets captured by AutoHotkey to execute a more complex custom script on your PC.

Download and install AutoHotkey. Then download and save this sample autohotkey script as an .ahk file: raw.githubusercontent.com/dekuNukem/duckyPad/master/resources/duckypad_autohotkey_script.ahk. Switch the profile on your duckyPad to autohotkey, then run the script by right-clicking and selecting Run Script (Figure Ff).

Ff

AHK will execute the script. Press any key on duckyPad, and a corresponding message box will appear (Figure Gg). Now you can write your own AutoHotkey script to do whatever you want! Learn more in getting_started.md at the Github repo.

Gg

For macOS, you can try BetterTouchTool to accomplish the same thing.