Make a ledged & braced door

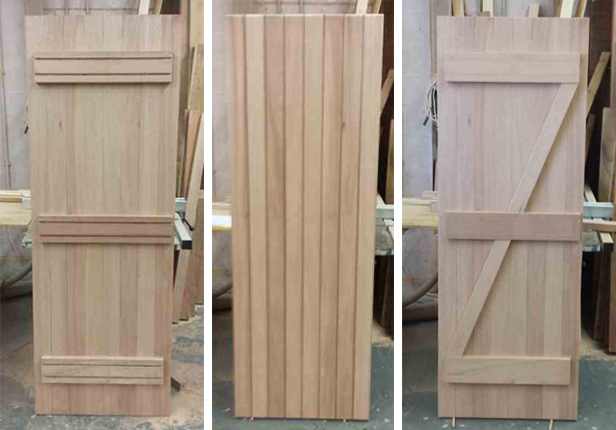
As timber doors go you cannot get much simpler than a ledged and braced door.

A ledged and braced door is based on at least three horizontal rails (ledges) on the rear of the door, a diagonal brace (again on the rear of the door) and then as many vertical boards as needed to make the front face of the door.

We often make wooden doors that match our wooden gates or garage doors. It must be said that a ledged and braced door does lack some of the strength and stability of a framed ledged and braced door, but having said that, if used as an internal door, they are fine and can give you that “rustic cottage” look.

I wouldn’t tend to recommend a ledged and braced door as an external door (i.e. with one side internal and one side external) as the differences between temperature and weather conditions on each side of the door can more likely than not cause the door to twist and warp, so in this instance, a *framed* ledged and braced door is the better option.

Cutting List

What you will need to make the door: Timber!

All of these pieces should be planed all round. All lengths included waste and need cutting to the required measurements.

Cutting list as follows:

*Boards 8 at 1940mm x 95mm x 24mm

Ledges 3 at 800mm x 125mm x 30mm

Brace 1 at 1900mm x 70mm x 25mm

6 pieces 800mm x 10mm x 12mm

Scrap timber (to test machine setups and also for plug cutting)

*The number of boards and widths of boards will vary depending on how wide your door is, how big the tongue is and, finally, how much the board is reduced by gutting the groove edge.

Ledge length and board length is dependent on how tall and how wide the door is, as is the diagonal brace length!

A quick note on choosing the right kind of wood: if you’d like to find some durable timber, have a look at the wood durability database for a few ideas.

Project Steps

Machining The Boarding

I’ve already planed all round the timber I will be using.

The width of the vertical boards is determined by the width of the doors; these boards, ideally, do not want to be too wide (the wider these boards are, the more prone they will be to movement – twisting, warping, cupping etc) so I’m aiming for boards no wider than 100mm (by the time I’ve machined my boards, I’m left with 95mm in width, however).

To get the board size, divide the width of the door by 95mm (my current board width); my door width is 672mm wide and this gives me 7.07 boards, so I’ve rounded this up to 8 boards.

The main thing to remember is that seven of the boards are all the same width; these all have the tongue on. One of these seven boards has only a tongue on; the other six all have tongues and grooves on. The eighth board only has a groove (and no tongue) so it is slightly narrower than the rest of the boards; this board is the same width as the rest of the boards, less the tongue width! Confused?! You will be!

So my 672mm door width, divided by eight boards equals 84mm per board; this gives us the width of the board with only a groove on; the remainder of the boards are this width plus the width of the tongue; in my case this is 6mm extra.

***If you’re not sure what width of tongue you will produce, then once you’ve set your router (or in my case, spindle) up, run a piece of scrap timber through the machine and measure the newly produced tongue! This does need checking before you go any further, otherwise you could end up with undersized boards. It’s also worth checking whether your boards will be reduced in width when you run the groove on one edge – again, check this first.

Machining The Boarding #2

So, that gives us seven boards at 90mm and one board at 84mm wide. As luck would have it, the spindle cutters I am using for the grooves reduce my boarding by 5mm so what I have already machined up is fine, however, one board needs reducing prior to grooving to 89mm, so once grooved, it will give me 84mm; I’ve done this prior to machining the groove on.

To start with, we’ll produce the groove. The reason I’m starting with the groove first is, if needs be and the boards are slightly too wide, then they can be put through the thicknesser (groove side down!) to reduce them slightly. If you try this with the tongue on (tongue side down) then the boards will twist over, as the thicknesser takes them through!

Set your router up so you have the max sized groove (in width) possible and also so the ‘Vee’ joint is as large as you can get, without forming a step down from the face of the board; as I say above, it’s worth machining a piece of PAR (Planed All Round) scrap first to double check everything.

Once you are satisfied that the groove is set up correctly, then run six of the wider boards through the router (or spindle) and then run the narrower board through. Once you’ve done this, first place the narrower newly-grooved board elsewhere as you don’t want to run a tongue on this by accident.

Machining The Boarding #3

Now, set up the router for running the tongue on. Again, you want the tongue as wide as possible, the ‘Vee’ joint not creating a step on the front face, and finally, you need to make sure that the tongue, once cut, fits into the groove without creating a step between the two boards on either the front or rear face; boards need to be flush together on both the rear and front face when interlocked.

Once you’ve done this you should have:

One board with just a tongue on,

one board with just a groove on

and six boards with both a tongue and groove on.

* In case you are wondering, I’m running a combined cutter, so to produce a groove the boards need to go through face up. To produce the tongue, the spindle block is lifted and then the boards go through face down. In a router, you can ignore this, as the boards should go through face down.

Next, with the tongues and grooves on all the boards, grab the board with only a tongue moulded on and the board with only a groove within it as we need to run a chamfer on the still square edge. These are the two end boards.

With the tongues, grooves and chamfer cut, we need to cut the boards to the required length (in my case this is 1890mm long) and then lay the boards (on bench bearers) interlocked on your bench.

Preparing The Ledges

You’ve got a choice of how to fit the ledges to the boarding. I want to hide the screws that I will be using but don’t want to cut countersink holes and plugs for each hole, so I’ll be cutting two rebates in the rear of each ledge, the screws will then sit within the groove.

I’ve kept the grooves about 30mm up from each edge and they are 10mm deep x 10mm wide.

* Other methods of securing the ledges to the boards include using nails; you have a choice of nailing from the rear of the ledge or nailing through the face of the boards into the ledge. The old fashioned way is actually to nail through the face of the boards with nails that are too long by around 6mm or so, then turn the door over, bend the end of the nail over and drive it back into the timber. This adds strength but looks a bit messy! This is called ‘Clinch Nailing’.

Usually, the ledges would be around 24mm or so shorter than the width of the door, so the boards would shoot over the ledges by around 12mm on each side (this is if the door is closing within a rebated frame, otherwise, the ledges can be full width).

In my case, I’m making a ledged and braced door to replace an existing door and need to match it as close as possible, so the ledges are 75mm narrower than the door. The centre ledge is 65mm shorter than the door width in the one I am making.

Cut the ledges to the length you require.

Securing The Ledges To The Boards

Before we secure the ledges to the boards, it is worth giving the rear of the boarding a quick sand with an orbital sander!

Usually, from the bottom of the door the underside of the bottom ledge, it would be 150mm or so.

The top ledge is around 150mm or so down from the top of the door, with the centre ledge positioned centrally between the top and bottom ledge.

These can be adjusted to suit your own preference or to suit existing hinge positions on a frame.

* Again, in what is pictured, these are to suit an existing door, so the positions are slightly different!

Now, with the boards all interlocked together but only pushed together tight (not cramped up), make sure the bottom edges of the board are all sitting nice and flush together; you can double-check this using a carpenter square.

Mark the heights of each of the ledges on the rear of the door and square the lines across the width.

Also, if your ledges are not finishing flush with the edge of the door, mark the point at which each ledge would start from.

Run a couple of beads of glue on the rear of a ledge at a time and position each ledge at a time where required on the door and cramp into place.

Pre-drill holes through the grooved part of the ledge; you want two screws in each boards, space them alternately for best results something similar to what is pictured: one is in the top groove towards the edge of the boarding, the other is in the bottom groove towards the other edge of the board. Just remember to keep the screws in enough from each edge of the boarding so they don’t protrude through the ‘Vee’ section of the moulding.

Drive all the screws home.

Repeat this for all of the ledges, and then clean off any glue that is leaking out.

Hiding The Screw Fixings

“Your secret way of hiding the screws is not very secret!” I hear you cry!

Using the six pieces of 10mm x 12mm bead that I mentioned earlier, we are now going to hide the screws.

Don’t be tempted to cut this beading to the same length as the ledges, it wants to be longer and can be cut later.

Run three beads of glue in the six grooves; one along the bottom over the screw heads and one on each edge of the grooves and slide in the beads and tap all the way into the groove using a hammer (and block of wood for protection). When positioned correctly, the beads should protrude by 2mm.

Repeat this with all the grooves and then clamp the bead into place and leave to dry. As the cramps will only reach the ends of the bead, it’s also worth weighting the beading down with something heavy whilst it dries.

*For best results, you really need to try and match the timber in the beading to the timber that the ledges are made from, i.e. grain pattern, colour of timber etc.

Hiding The Screw Fixings #2

Once the glue is dry, then it’s time to clean up the beading.

Using a tenon saw, hold it flush with the end of the ledges and trim the beading off. Once cut, clean up with a block plane; if you don’t have one, then clean up with sandpaper instead.

Next, plane down the bead that protrudes up from the rear face of the ledge. Again, if you’ve not got a block plane, then you can use a belt sander.

Adding The Diagonal Bracing

As it’s called a ledged and braced door, we need to add the diagonal bracing before we can complete the door!

The diagonal bracing needs to point down to the bottom hinge. Sit the bracing on the ledges of the door, so the bottom of the brace is flush with the edge of the bottom ledge on the hinge side. The top of the brace wants to sit flush with the edge of the top ledge at the latch side of the door.

Holding the brace in position, mark the brace where it intersects with the ledges.

Cut the brace to the lines you’ve just marked on it.

Once they’ve been cut, sit the braces back into position. If you’ve not cut accurately then you may need to fit the braces using your block plane so the joint between ledge and brace is nice and tight.

Adding The Diagonal Bracing #2

If you’re happy with the joints, then pre-drill each brace twice, evenly space holes in the length of the brace – aim for the centre of the boards too, using a No.10 countersink through the brace into the boarding.

Remove the bracing, then add glue to the rear of the brace and to each top edge that joins with the ledge. Reposition the braces and screw up in place.

Adding The Diagonal Bracing #3

Using a pillar drill and a No. 10 plug cutter, cut yourself enough plugs to fill screw holes in braces. Cut these from the same timber as everything else is made from.

Prise the plugs out from where they have been cut, and then apply glue to the bottom and around the edge and place in screw holes. Position these so that grain in the plug runs parallel to the grain within the brace. They usually need a tap with a hammer to get them in properly.

Clean off any glue. Then using a 25mm chisel, cut the end of the plug that protrudes from the brace off. Give this a rub with some sandpaper to clean it up.

Cleaning The Door Off & Finishing Off

All that is left to do on the rear of the door is to give the ledges a quick orbital sand, along with the braces.

Once you’ve done this, spin the door over on your bench and give the front of the boarding a sanding, again using the orbital sander.

The final task is to put a chamfer on the top and bottom edges of the boards.

You can do this in one of three ways: block plane, router or belt sander. Personally, I prefer the block plane but using this (or the router) you must remember to plane/router from the edge of each board to the centre, so in essence you are planning/routering each board twice.

Failure to do this, and planing each board right the way across, will result in the far edge (from where you start from) splitting as the plane/router runs across it.

That’s it: you’ve made a Ledged and Braced Door!