M32_IDmakers_Opener_jb

OK, so you’ve made your project. Whether it’s an original concept of your own or something from a MAKE how-to article — good for you! Maybe you’ve learned a new skill or tried a new tool or process: that’s the fun and reward of making.

But consider your end result. How well does it really work? How does it look? What would make it better? Maybe you’re ready to take your creation to the next level: manufacture and sell. How would a professional maker approach it? That’s a job for an industrial designer!

Industrial design (ID) is the science and art of creating commercial products, experiences, and environments. The skills and techniques the designer uses include ideation sketching, drawing/rendering, drafting, sculpting, and model making. An industrial designer also must know about materials, manufacturing processes, electronics, computer programming, engineering, printing, and graphics.

The industrial designer is the champion of a new product and sees the concept through all the stages: presenting new ideas to management, selling them to marketing, proving the design to engineering, and shepherding the design through the legal and patent processes. The designer needs to consider product safety, cost and ease of manufacture, and package and logo design for print, web, or TV advertisements. In many ways, an industrial designer is a “professional maker.”

History of ID

Since humans began making things, from flint-edged tools to flintlock rifles, we’ve been designing. But in the 20th century, modern manufacturing and mass marketing required a new combination of talents. In the fast-paced, competitive marketplace, only the best-looking, best-working, and most affordable products (and the companies that made them) survived. Manufacturers sought out individuals who had the vision and skills to make the many decisions required in producing a product.

Raymond Loewy and a few of his iconic designs.


Loewy’s design for the Studebaker Avanti, 1961.

One of the first and most famous industrial designers was Raymond Loewy. An engineer by training, his natural artistic skill and dramatic French flair earned him important commissions. In 1929, Loewy, a true maker and DIYer, hand-sculpted clay in his NYC apartment living room to create a sleek, simplified design for Gestetner’s mimeograph machine. His streamlined designs made things cleaner and easier to use, as well as better selling. Loewy and his firm went on to create or redesign many iconic forms of 20th-century America: the Coca-Cola bottle, the Pennsylvania Railroad S1 locomotive, the Studebaker Avanti, Air Force One, and many others. He famously said, “The most beautiful curve is a rising sales graph.”

Charles and Ray Eames' homemade plywood-bending “Kazam!” machine, 1941.
Charles and Ray Eames’ homemade plywood-bending “Kazam!” machine, 1941.

In the second half of the 20th century, husband-and-wife team Charles and Ray Eames expanded the field of industrial design to include not just products, but also exhibits (IBM at the World’s Fair) and educational films (Powers of Ten). Together, they created handsome chairs and furnishings for homes and offices. Also very hands-on, the Eames assembled their own electrically heated and bicycle pump-pressurized molding machine, nicknamed the “Kazam!” They used it in their Los Angeles apartment to bend flat pieces of plywood into three-dimensional shapes, creating splints and litters for the U.S. Navy. The classic Eames chair is the direct descendent of their early experiments. Their application of both science and art produced tasteful and elegant designs that connected with consumers emotionally and continue to sell and inspire designers 50 years later.

Eames bent  plywood litter for U.S. Navy, 1941.
Eames bent plywood litter for U.S. Navy, 1941.


Ray Eames’ chair design sketches, 1940s.

Today, industrial designers like Jonathan Ive (Apple iMac, iPad) or Yves Behar (XO laptop) have access to advanced technologies like Cintiq tablets, SolidWorks, and rapid prototyping fabrication, but the basic approach to designing a new product is the same. As an exercise, let’s take a sample MAKE project and see how the creative process used by an industrial designer might improve it.

The ID Creative Process

The Helium Balloon Imaging “Satellite” camera from MAKE Volume 24 is Jim Newell’s clever hack made by adding a timer circuit to the shutter button of an inexpensive camera, then sent aloft by tethered helium balloons to take aerial photographs. It’s made of repurposed items: a CD serves as a platform to hold the camera, a prescription bottle contains the circuit and battery, and it’s all held together by twists of wire. It looks as if it were thrown together from items scavenged from the trash bin: MacGyver-worthy, but not a very elegant design.

The original ballon cam from MAKE Volume 24.
The original balloon cam from MAKE Volume 24.

It’s also not very easy to use: you have to remove the camera (it’s fastened to the CD with double-sided tape), turn it on, replace the camera, connect the circuit board, attach the battery that starts the timer, reconnect the cap (and don’t let the balloons get away while you’re doing all this!), let out the string to fly the balloon, taking pictures as it goes up. It’s begging for a redesign.
For the purpose of this article, let’s assume there’s a client who wants to manufacture and sell the Balloon Cam as a DIY kit and is working with an industrial designer to help refine the design. The design process includes these steps:

  1. Define scope
  2. Ideate
  3. Review
  4. Develop prototype
  5. Test and revise
 

Project Steps

1. Define scope

The first steps are the most important and set the direction the product will take. The client and designer agree on all the constraints and problems that need to be solved by the final design. Some concerns are for the manufacturer, some for the consumer. For this project, the revised design should be:

  • Inexpensive to manufacture, meaning low tooling costs. No sense in dreaming up an injection-molded design if the molds will cost too much or take too much time to create.
  • Easy to assemble. We’ll assume the person buying this kit would have some basic skills and tools.
  • Low-cost in its components. The price of the kit can’t be too high, and we’ll assume the customer will provide his own hacked camera and circuit.
  • Cool-looking and inspire purchase. It should be a “wow!” and not a “meh.” The design of a product alone can make the sale.
  • Light, strong, waterproof, and easy to fly and take pictures.

A real project for an actual manufacturer would have many more concerns like product safety, patent infringement, green manufacturing,
end-of-use disposal, etc. This list is enough for our exercise.


Ideate

Designers use ideate to describe the active process they use to generate ideas. To realize and explore directions, designers draw many rough sketches. Quick notations spread over the page as ideas flow forth, like visual stepping stones. These aren’t meant to be pretty pictures or even drawings that anyone else will see: they’re used to express and explore ideas. Think Leonardo da Vinci’s codices (he even wrote his notes backward so no one else could read them!).
The point of the ideation phase is to create as many related ideas as possible: more ideas will lead you to better ideas. Have a playful sense of humor with the ideas. Don’t settle on one idea yet — keep ’em coming!

Here are some of the ideation sketches for the Balloon Cam.

Preliminary ideation sketches: keep the ideas flowing! Three lobed “ears” provide routing for the rigging. Top shell can be slipped up to access components inside.
Eliminate the lobed ears, and add recesses for string harness clearance. Rounder, domed shape. Balloons tethered to docking station with a water bottle as a weight and a hands-free crank.

Note these design threads:

  • Look for a simple solution: some kind of shell in a shape that holds and protects the camera and circuit board.
  • Unify the elements: use the strings to both support and align the components.
  • Simplify features to streamline use: give access to the switches to turn the camera on and to start the auto shutter circuit without opening the housing or reconnecting the camera.
  • Make flying the balloon easier: add a weighted docking station to hold the balloons before flight.
  • Add a hand-cranked reel. The designer makes notes, corrections, and improvements in sketch form, expressing, evaluating, and re-expressing as he goes.

3. Review

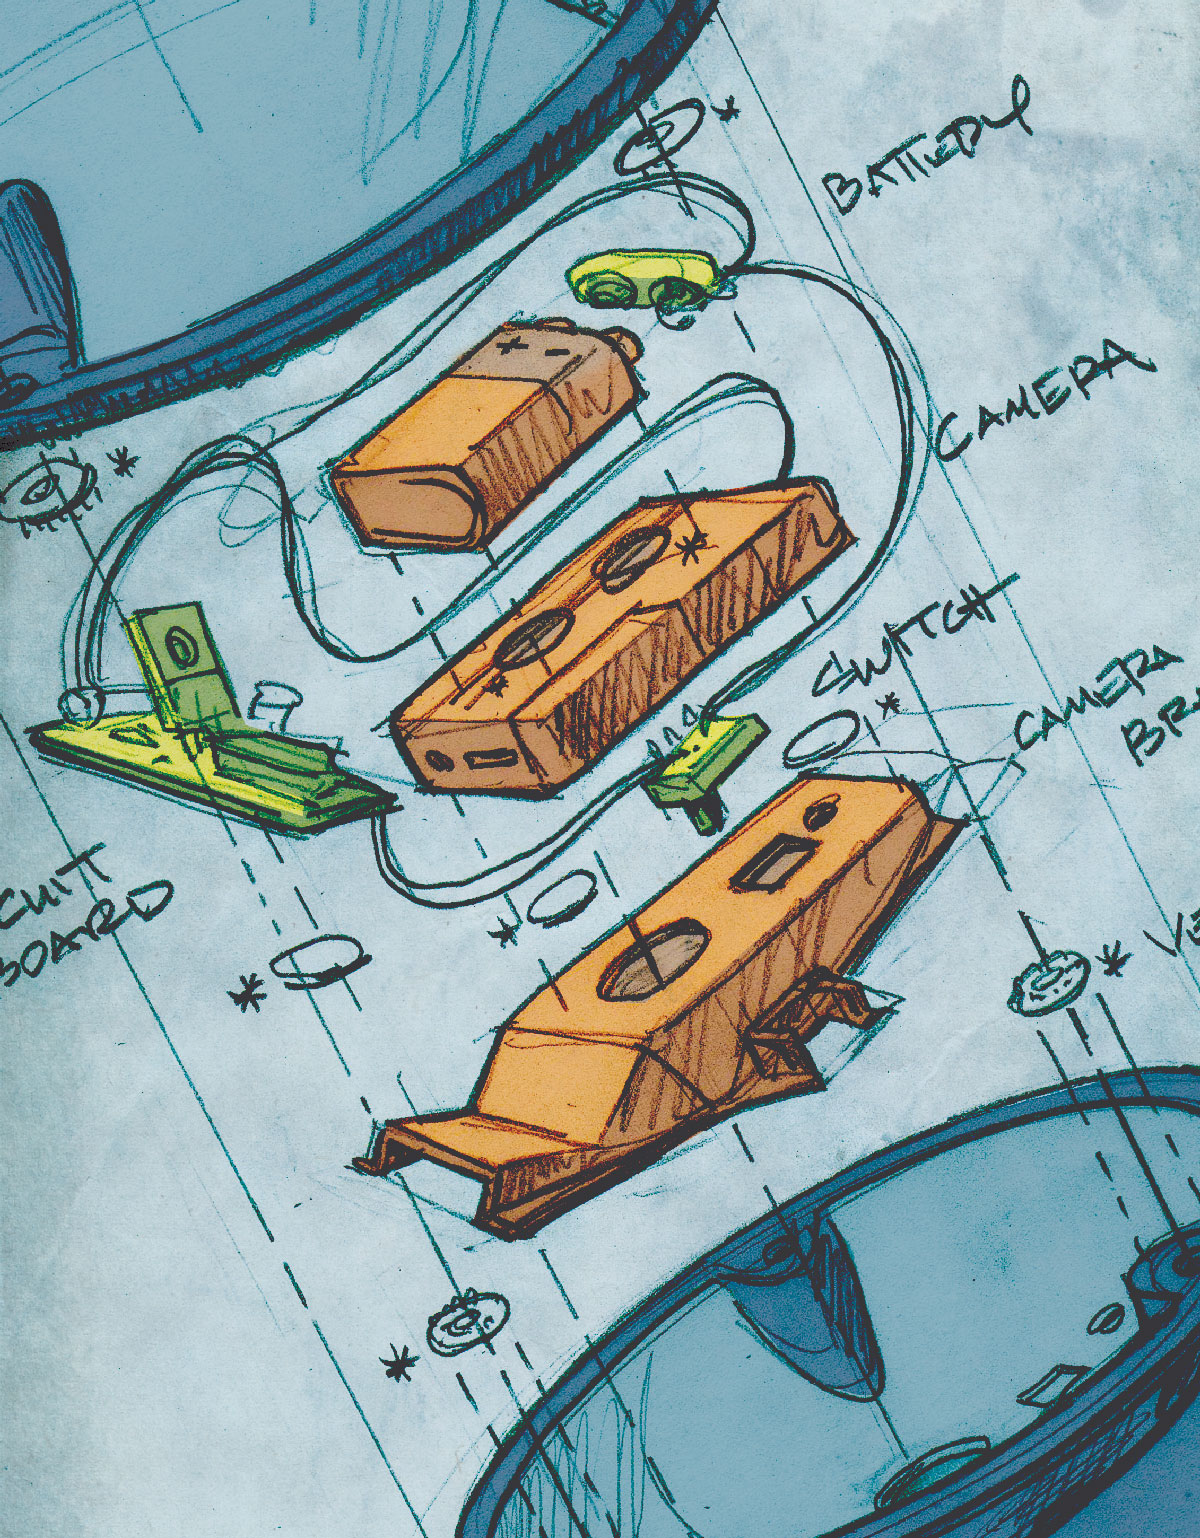
Reel details. Exploded view shows assembly and the added vacuum-formed bracket to support the camera and circuit board. Top and side views drawn in actual size. The curved section side view is used to make a template for turning on the lathe.

The designer selects the best combination of ideas and refines them into a proposed design. This requires more finished drawings, with plans, elevations, and a rendering of what it looks like to communicate the detailed design to the client. If the client approves the paper design, then it’s on to developing
the prototype.

4. Develop prototype

One constraint of this design project is low tooling costs. Vacuum forming is the perfect solution: light but strong plastic shells can be vacuum formed using low-cost patterns. Vacuum forming is also easily doable for the DIYer (see MAKE Volume 11, page 106, “Kitchen Floor Vacuum Former”).

The mold makes parts that can be used for both the top and bottom shells. Leaving the flanged rim on one part makes the top shell that fits over a smaller, trimmed bottom shell. It can even be molded in colored plastic so that no painting is required.

Here, drawing is used as a tool to solve a 3-dimensional problem: where to locate the camera, printed circuit board, and 9-volt battery inside the saucer shape. Side elevation and top orthographic views show the location of each component and the minimum size and shape of the basic shell. Further refinements simplify the design and remove the 3 protruding lobes. Instead, recessed features guide the support lines and at the same time provide mating horizontal surfaces to hold the shells together.

M32_IDmakers_image035

M32_IDmakers_image031

The next step is to make the prototype. The domed part of the vacuum-form mold is made from urethane foam, easily turned on a lathe using hand tools. First cut a round blank of foam and mount it to the lathe. Use a cross-section view from the elevation drawing to make a same-size cardboard template gauge for checking the progress of turning the exact shape. File the shape and check frequently with the gauge. If you don’t have a lathe, you can file the foam by hand, freeform.

M32_IDmakers_image033

M32_IDmakers_image037

Make 3 equally spaced rounded slots with a mill: first, mount the turned foam in a dividing head and mill the slot with a 5/8″ end mill. Index the head by 120°, cut the second slot, then index to 240° and cut again. If your mill has an adjustable head, add 2° of draft for easier unmolding. If you don’t have a mill, you can lay out the location of 3 equally spaced holes on the foam with a compass and drill three 3″ holes. Then carefully cut the slot with a handsaw.

M32_IDmakers_image041

To make the lipped flange feature, cut a second oversized disc from fiberboard and mount it to the foam. Drill 1/16″ holes all around the edges to provide airflow for snug vacuum forming.

M32_IDmakers_image043

M32_IDmakers_image045

Vacuum-form the shells from 0.030″ styrene sheet and trim to check the fit (above). The geometry of the curved dome shape, the flanged rim, and the 3 recesses all act together to create a rigid and strong part even when made from thin plastic.

Building preliminary prototypes like this often requires making small revisions. To hold the camera level in the curved shell, add a small bracket made from bits of styrene, solvent-bonded in place. In our theoretical exercise, this bracket would be a third part, vacuum-formed alongside and at the same time as the shells for very little additional cost. See the exploded view drawing.

To keep costs down, the buyer of the kit would do all the finishing work and assembly:

  • Trim the 2 shells and bracket, and solvent-bond the bracket to the bottom shell.
  • Drill a 3/4″ hole in the center for the camera lens (above).
  • Drill a 1/4″ hole for access to the camera’s mode button, and cut a square hole to view the camera’s LCD (above).
  • Cut another square hole for the timer circuit’s new on/off mini slide (above).
  • Drill three 1/8″ holes in the flats of both shells for the support strings to run through.
  • Fasten the camera and circuit inside the bottom shell with velcro tabs. It’s important to be able to remove the camera easily to upload the photos to a PC and change the camera’s battery.
  • Punch holes in 3 pairs of velcro dots and fasten them around the 3 string holes.
  • Make the rigging: tie three 36″ lengths of 12lb test fishing line to a split ring. Tie a bead 24″ from the ring on each line. Thread each line through a hole in the assembled shell, and then tie the ends together to another ring. Be careful so that the shell hangs level when supported by the 3 beads — that way the camera will face straight down for taking pictures in flight.

M32_IDmakers_image047

For the working prototype the reel handle is cut from wood and a crank is fashioned from styrene sheet and rod stock. A bent wire form acts as a line guide. A water-filled milk bottle serves as a weight that clips to the handle. Mounting the reel of fishing line off-center looks odd, but works great: when you take your hand off the crank, the line tension automatically stops the reel from spooling out and the balloon stays where it is.

5. Test and revise

The redesigned version of the Balloon Cam is much easier to use for taking aerial pictures: the docking station provides hands-free setup, the camera and circuit are much easier to turn on, and the shells pop open to allow access for changing batteries and downloading pictures. It even looks cooler with its cute, retro-UFO look as it hovers and flies around.

But how to manufacture the parts for the reel handle in quantities to make affordable kits? Hmm, that’s another job for the industrial designer — back to the drawing board!

Easy-to-start camera timer.
Reel clips to the water-filled bottle, and anchors the balloons as the saucer hangs chest-high off the ground, making it easy to check the batteries inside.
Balloon Cam Success!

M32_IDmakers_image073