M35_Proj_LaserMicro_Opener

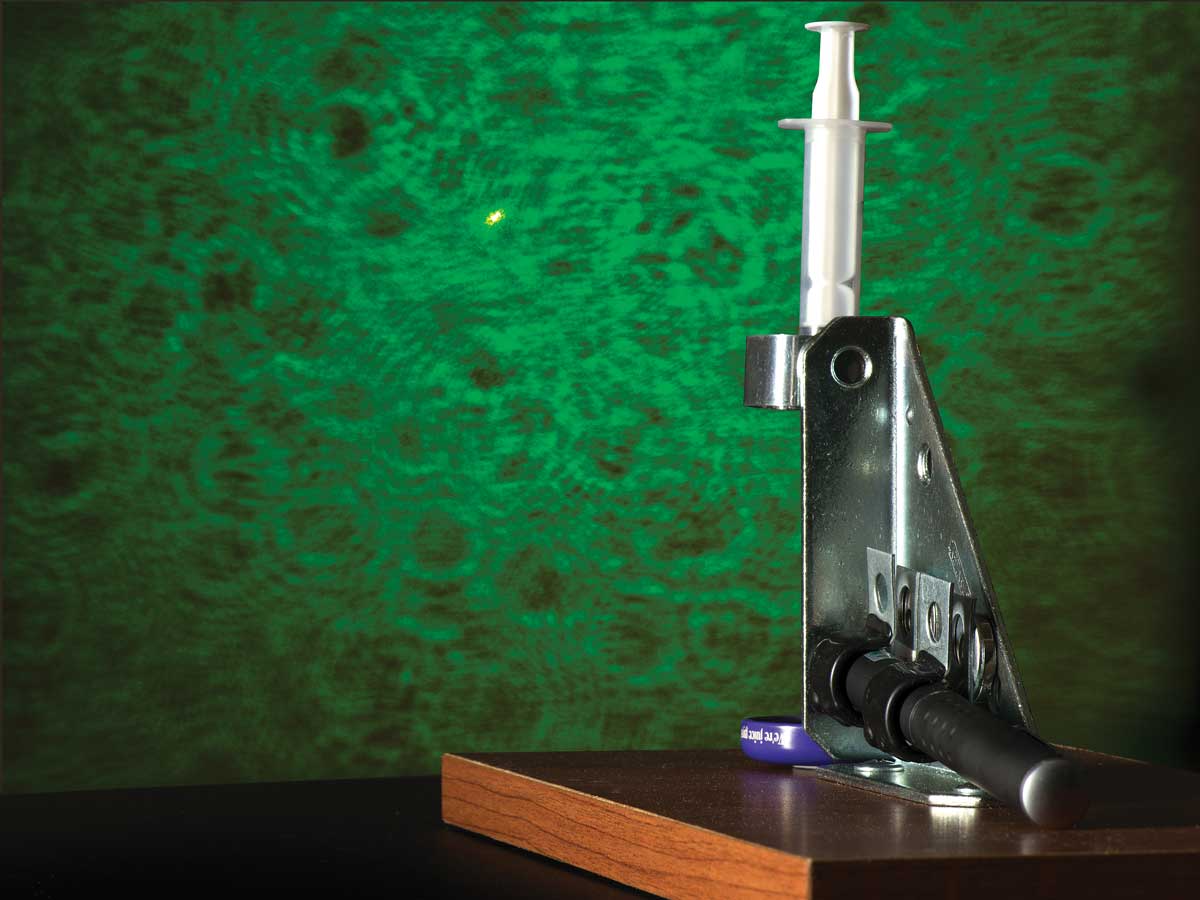
Inspired by Adam Munich’s page about his DIY laser microscope, (makezine.com/go/teravolt), I built this project and discovered it’s near the top of the list when it comes to getting the most bang for your buck. Whether you’re a scientist, a science educator, or just a bright curious monkey, you really have to try this one for yourself. A common laser pointer, a drop of dirty water, and boom — giant microbes wriggling on the walls!

The tricky part is getting everything aligned — the laser, the projection surface, the hanging drop of water — but this simple stand built from junk-box odds and ends makes it easy. The laser and syringe are mounted to cheap hardware clips on super-magnets that allow for easy adjustments, but fix everything in position once you’ve got it tuned.

YouTube player

Project Steps

Mount the corner brace.

Cut a strip of mounting tape to fit one entire side of the corner brace. Adhere it to the brace and affix it to your base. Or drill the base and mount the brace with screws.

Assemble mounting clips.

The syringe clip consists of a magnet and a broom clip.

The 2 laser clips each consist of a magnet and a hose clamp. That’s it!

Load the syringe.

I started out with scummy water from a drainage ditch, but eventually discovered that dirty water from a flowerpot was just as interesting.

Load the syringe with about 1mL of your sample by dipping the needle and pulling back on the plunger.

CAUTION: Exercise extreme care when handling a syringe. Use a blunt needle with a cap, and leave the cap in place at all times when the syringe is not in use. If you don’t have a cap, bury the tip of the needle in a wine cork.
Do not underestimate the potential dangers of stagnant and/or septic water. Use gloves when handling it, and wash your hands carefully when you’re done.

Assemble.

Attach the syringe clip to the brace’s upright arm. Try not to let these magnets “snap” against the metal too hard; they’re surprisingly easily to break.

Mount the laser in its 2 clips and attach them to the triangular vertical plate. Then align the lens with one of the holes in the upright. Add washers between the magnet and the clamp if necessary to adjust spacing.

Mount the loaded syringe in its clip and align the tip of the needle just above the lens of the laser.

Set the bottle cap underneath the syringe to catch any drips.

TIP:< With some lasers, you can use the hose clamp to keep the laser’s activation button depressed.

Fire it up!

Put on wavelength- and power-appropriate

protective eyewear for your laser. Position the projector on a flat, level surface, above waist height, about 5–10 feet from the projection

surface. (The image is focused at infinity, so choosing a distance is a tradeoff between how big you want the projected image and how much power your laser puts out.)

Activate the laser, and adjust the position of the stand and/or laser clips to center the laser dot on the projection surface.

Depress the syringe plunger lightly to extrude a droplet of liquid at the tip of the needle.

Being careful to avoid looking directly into the beam, adjust the position of the syringe until the water droplet is perfectly centered in the beam path. This will be obvious from the projected image. When you’ve got it, the bright dot will mostly disappear and the microscopic image will appear. Enjoy the show!

CAUTION: To be effective, this project requires a Class 3 laser in the 5mW–500mW output power range. These lasers present real hazards to vision, and should not be used without appropriate protective eyewear. Never look directly into the beam of a laser, and beware of the danger of reflection from shiny surfaces, such as the metal parts used in the projector itself.

Going further.

The earliest publication of this idea that I’m aware of is Gorazd Planinsic’s 2001 article “Water-drop projector” in the journal Physics Teacher (free PDF at makezine.com/go/planinsic). On page 20, it provides a formula for calculating the approximate magnifying power of your projector based on the radius of the droplet, refractive index of the liquid, and distance to the screen.

It’s been suggested that it may be possible to focus blue and red lasers on the same drop and achieve a 3D projection when viewed through red/blue 3D glasses. My experience with this monochrome projector suggests that getting such a system aligned correctly would be challenging, but not impossible.

MAKE Labs tested this project with 5mW red, green, and violet pointers and found that the green performed best for brightness and projection distance. We couldn’t tell if the different wavelengths affected image sharpness, but that might be more obvious with higher-powered lasers. Experiment and let us know what you find out in the comments below!

Conclusion

This project first appeared in MAKE Volume 36, page 116.